Exploring stacks and queues
#computer-science #pythonWritten by Matt Sosna on November 28, 2021
In our last post, we covered data structures, or the ways that programming languages store data in memory. We touched upon abstract data types, theoretical entities that are implemented via data structures. The concept of a “vehicle” can be viewed as an abstract data type, for example, with a “bike” being the data structure.
In this post, we’ll explore two common abstract data types: stacks and queues. We’ll start with the theory behind these abstract types before implementing them in Python. Finally, we’ll visit some Leetcode questions that may initially seem challenging, but neatly unravel into clean solutions when using a stack or queue. Let’s get started!
Overview
Stacks and queues are array-like collections of values, like [1, 2, 3] or [a, b, c]. But unlike an array, where any value in the collection can be accessed in $O(1)$ time, stacks and queues have the restriction that only one value is immediately available: the first element (for queues) or last element (for stacks). For both stacks and queues, values are always added to the end.
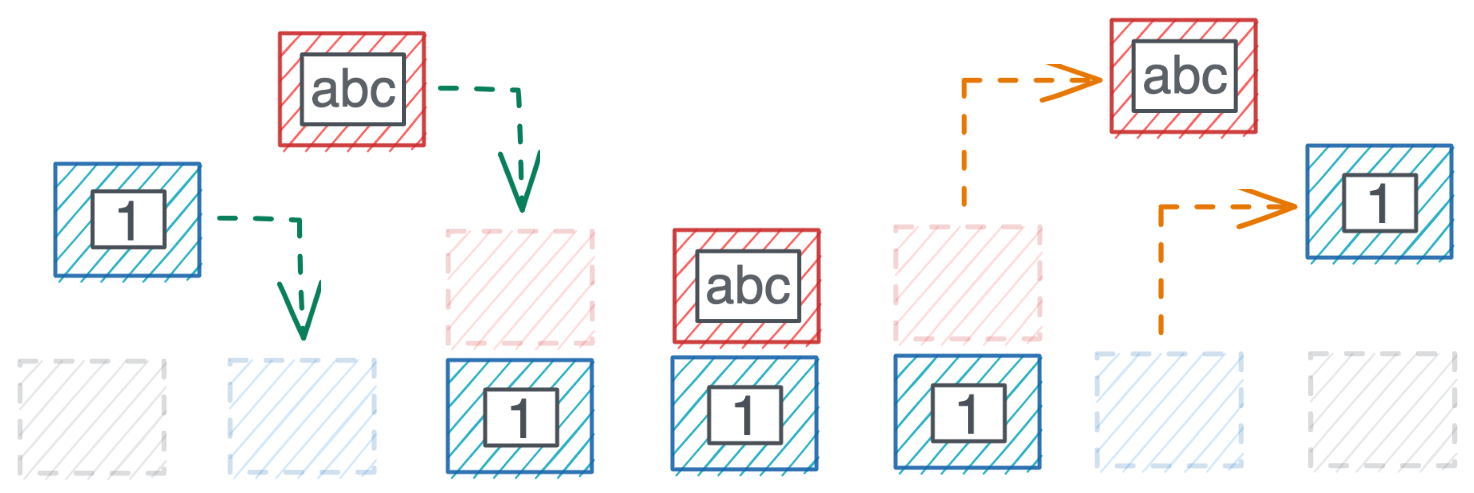
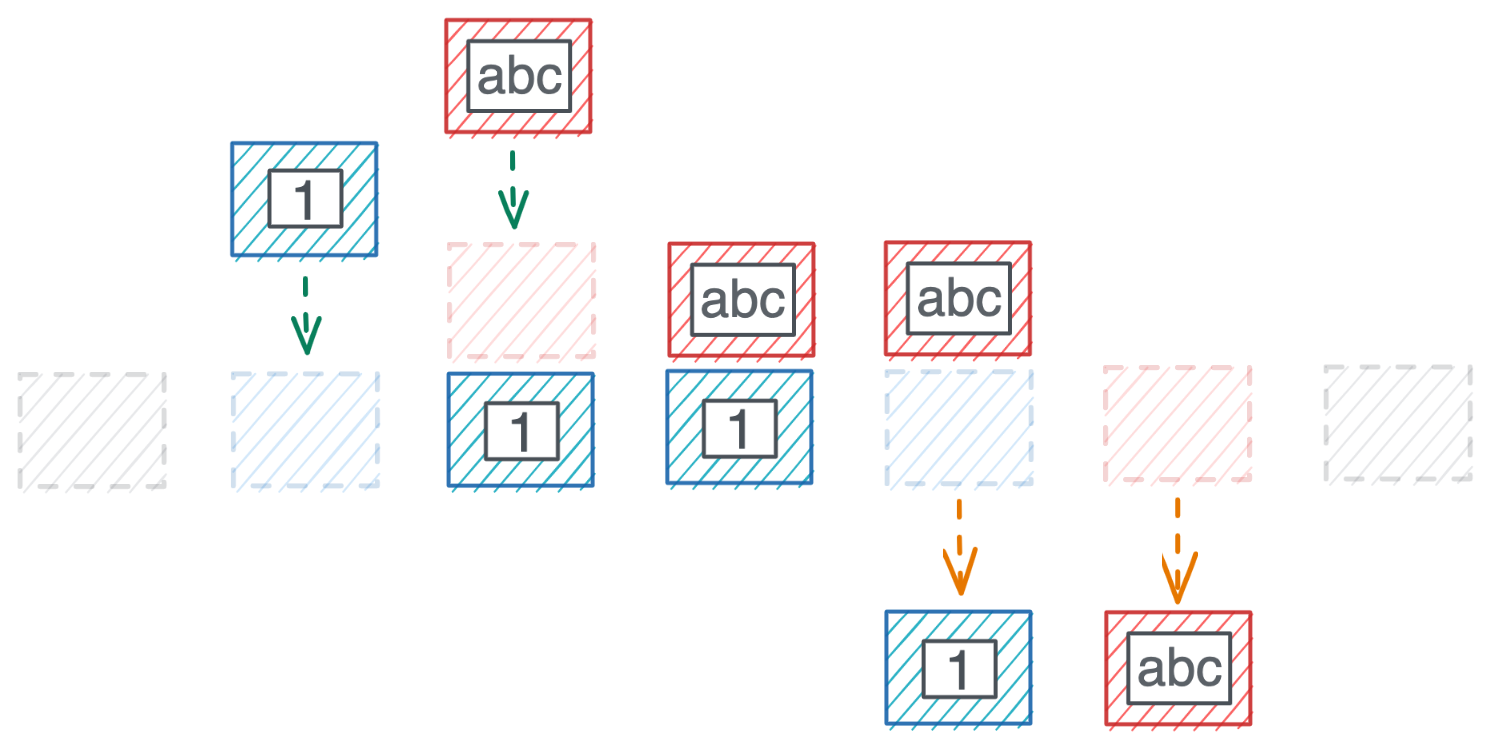
Visuals can help explain. Below, we see the process of adding and removing a value from a stack. Block C is added to the stack, then popped off. Stacks follow a Last In First Out pattern: the last element to be added to the stack is the first to be removed. The classic analogy is a stack of plates: the plate on top was the last one added, and it’s the first one removed.

Meanwhile, a queue is First In First Out. Below, we see that Block C is again added to the end of the queue. But this time, Block A leaves: it was the first one in, so it’s the first one out. A common example of a queue is the checkout line at a grocery store $-$ of all the people waiting in line, the person who was there the earliest will be the one who’s seen next (i.e. “first come first served”).

Immediate access to only the first or last element seems like a major disadvantage over arrays. Yet we don’t always want access to every element. There’s often a distinct order that we want to process elements, meaning we only care about $O(1)$ access to the next element.
We can see this in the major use cases for stacks and queues. Stacks are used for undo and redo operations in text editors, compiler syntax checking, carrying out recursive function calls, depth-first search, and other cases where we care about the last action performed.
Queues, meanwhile, are used for asynchronous web service communication, scheduling CPU processes, tracking the N most recently added elements, breadth-first search, and any time we care about servicing requests in the order they’re received.
Since stacks and queues don’t need immediate access to every element, they’re often implemented with the linked list data structure rather than arrays. This lets the stack or queue grow indefinitely, as well as be comprised of multiple data types if we need.
Implementation
Creating a linked list
Let’s build Stack and Queue Python classes that utilize linked lists. We’ll start by defining the list node, which consists of a value (self.val) and pointer to the next node in the list (self.next). We’ll also add a __repr__ magic method to make it easier to visualize the node contents.
| Python |
1
2
3
4
5
6
7
class ListNode:
    def __init__(self, val=None, next=None):
        self.val = val
        self.next = next

    def __repr__(self):
        return f"ListNode with val {self.val}"
We can create linked lists by chaining ListNode instances together. Here’s a simple example of creating and visualizing a list with the values 1, 2, and 3.
| Python |
1
2
3
4
5
6
7
8
9
10
11
12
13
14
# Create list
head = ListNode(1)
head.next = ListNode(2)
head.next.next = ListNode(3)

# Visualize list
node = head
while node:
    print(node)
    node = node.next

# ListNode with val 1
# ListNode with val 2
# ListNode with val 3
With the list node structure in place, we have the central building block for our stack and queue classes.

Creating stacks
As we’ve seen, a main operation for stacks is adding or removing the most recent element, also called pushing and popping. It’s also often helpful to view the top element in the stack without immediately removing it, a concept called “peeking.”
Let’s get started. Below, we define a Stack class with one attribute, _stack, which contains our linked list. The attribute starts with an underscore, signaling to other developers that this attribute should be considered private and not called directly outside the class.
Rather, we’ll only interact with _stack through our push, peek, and pop methods.[1] To achieve these operations in $O(1)$ time, we’ll place the most recent element in the stack at the head of the linked list in our Stack class, so it’s always easy to access.
| Python |
1
2
3
4
5
6
7
8
9
10
11
12
13
14
15
16
17
18
19
20
21
22
23
24
25
26
27
28
29
30
31
from typing import Any

class Stack:
    def __init__(self):
        self._stack = None

    def push(self, val: Any) -> None:
        """
        Add a value to the stack
        """
        new_head = ListNode(val)
        new_head.next = self._stack
        self._stack = new_head

    def peek(self) -> Any:
        """
        Return the top value of the stack. Does not modify
        the stack.
        """
        head = self._stack
        if head:
            return head.val

    def pop(self) -> Any:
        """
        Return the top value of the stack, modifying the stack.
        """
        head = self.peek()
        if head:
            self._stack = self._stack.next
            return head
Our push method creates a node for the new value, points the node’s next attribute to the existing list, then redefines self._stack as the new node.
peek and pop require some control flow to avoid raising an error if you call them on an empty stack. Both only allow us to call the val and next attributes if self._stack isn’t empty, which would otherwise throw an error.
Our methods return None if the stack is empty, but it’d be convenient to have a way to explicitly state if the stack has data. Let’s therefore add an is_empty method. We’ll also add methods that traverse the list: one that determines if the stack contains a requested value (contains), and one that prints the list contents (__repr__). Note that the traversal methods will execute in $O(n)$ time $-$ the longer the list, the longer it takes to scan or print all elements.[2]
(We could get fancy and achieve $O(1)$ time for contains by referencing a dict that keeps track of the number of instances of each value we add, but let’s keep things simple for now.)
| Python |
1
2
3
4
5
6
7
8
9
10
11
12
13
14
15
16
17
18
19
20
21
22
23
24
25
26
27
28
29
30
31
32
33
34
35
36
37
38
39
40
41
42
43
44
45
46
47
48
49
50
51
52
53
54
55
56
57
58
59
class Stack:
    def __init__(self):
        self._stack = None

    def push(self, val: Any) -> None:
        """
        Add a value to the stack
        """
        new_head = ListNode(val)
        new_head.next = self._stack
        self._stack = new_head

    def peek(self) -> Any:
        """
        Return the top value of the stack. Does not modify
        the stack.
        """
        head = self._stack
        if head:
            return head.val

    def pop(self) -> Any:
        """
        Return the top value of the stack, modifying the stack.
        """
        head = self.peek()
        if head:
            self._stack = self._stack.next
            return head

    def is_empty(self) -> bool:
        """
        Return whether the stack is empty
        """
        return self._stack is None

    def contains(self, val: Any) -> bool:
        """
        Returns whether the stack contains the requested value
        """
        node = self._stack
        while node:
            if node.val == val:
                return True
            node = node.next
        return False

    def __repr__(self) -> str:
        """
        Visualize stack contents
        """
        vals = []
        node = self._stack

        while node:
            vals.append(str(node.val))
            node = node.next

        return "Stack: [" + ", ".join(vals) + "]"
is_empty simply checks whether self._stack has any values. contains and __repr__ use a while loop to iteratively move through the list, setting node to its next attribute after either checking whether the node’s value is equal to the value we’re searching for, or appending the value to a list.
Below, we play around with our class and confirm it works as expected.
| Python |
1
2
3
4
5
6
7
8
9
10
11
12
13
14
15
16
17
18
# Create stack
s = Stack()
print(s.is_empty())  # True

# Add to stack
s.push(1)
s.push('abc')
print(s.is_empty())  # False

# Visualize contents
print(s.peek())      # 'abc'
print(s)             # 'Stack: [abc, 1]'

# Modify stack
print(s.pop())       # 'abc'
print(s)             # 'Stack: [1]'
print(s.pop())       # 1
print(s.is_empty())  # True
Creating queues
As with stacks, our Queue class will need a way to quickly add and remove elements. But while both element addition and removal occur at the head of the list for stacks, these operations occur on opposite ends of the list for queues.
So should the head of our linked list be the newest or oldest element in the queue? If it’s the newest, then addition will take $O(1)$ time but removal will take $O(n)$. If the head is the oldest element, then removal will be fast but addition slow.
This is actually a false dichotomy $-$ we can achieve both in $O(1)$ time if we store pointers to both the head and tail of our list. Below, we kick off our Queue class with _head and _tail attributes, as well as methods to enqueue (add), peek, and dequeue (remove) elements.
| Python |
1
2
3
4
5
6
7
8
9
10
11
12
13
14
15
16
17
18
19
20
21
22
23
24
25
26
27
28
29
30
31
32
33
34
35
36
37
38
39
40
41
42
43
44
class Queue:
    def __init__(self):
        self._head = None
        self._tail = None

    def enqueue(self, val: Any) -> None:
        """
        Add an element to the end of the queue
        """
        new_tail = ListNode(val)

        # If empty, set pointers to new node
        if not self._head:
            self._head = new_tail
            self._tail = new_tail

        # Otherwise connect nodes and update tail
        else:

            if self._head is self._tail:
                self._head.next = new_tail

            self._tail.next = new_tail
            self._tail = new_tail

    def dequeue(self) -> Any:
        """
        Remove an element from the front of the queue
        """
        if not self._head:
            return None

        # Save head's val before it disappears, then update head
        val = self._head.val
        self._head = self._head.next

        return val

    def peek(self) -> Any:
        """
        View the next element to be dequeued
        """
        if self._head:
            return self._head.val
These operations are a little more complicated than our stack, especially when our _head and _tail pointers point to the same node. We therefore use additional logic to handle when the queue is empty or has only one element.
| Python |
1
2
3
4
5
6
7
8
9
10
11
12
13
14
15
16
17
18
19
20
21
22
23
24
25
26
27
28
29
30
31
32
33
34
35
36
37
38
39
40
41
42
43
44
45
46
47
48
49
50
51
52
53
54
55
56
57
58
59
60
61
62
63
64
65
66
67
68
69
70
71
72
73
74
class Queue:
    def __init__(self):
        self._head = None
        self._tail = None

    def enqueue(self, val: Any) -> None:
        """
        Add an element to the end of the queue
        """
        new_tail = ListNode(val)

        # If empty, set pointers to new node
        if not self._head:
            self._head = new_tail
            self._tail = new_tail

        # Otherwise connect nodes and update tail
        else:

            if self._head is self._tail:
                self._head.next = new_tail

            self._tail.next = new_tail
            self._tail = new_tail

    def dequeue(self) -> Any:
        """
        Remove an element from the front of the queue
        """
        if not self._head:
            return None

        # Save head's val before it disappears, then update head
        val = self._head.val
        self._head = self._head.next

        return val

    def peek(self) -> Any:
        """
        View the next element to be dequeued
        """
        if self._head:
            return self._head.val

    def is_empty(self) -> bool:
        """
        Return whether the queue is empty
        """
        return self._head is None

    def contains(self, val: Any) -> bool:
        """
        Returns whether the queue contains the requested value
        """
        node = self._head
        while node:
            if node.val == val:
                return True
            node = node.next
        return False

    def __repr__(self) -> str:
        """
        Visualize the contents of the queue
        """
        vals = []
        node = self._head

        while node:
            vals.append(str(node.val))
            node = node.next

        return "Queue: [" + ", ".join(vals) + "]"
Notice how the is_empty, contains, and __repr__ methods are identical to our Stack class. The one difference is that __repr__ will print our elements in the order they were received for a queue, versus printing in reverse order for the stack. In either case, they’re printed in the order they will be removed.
We can now play with our Queue class like this:
| Python |
1
2
3
4
5
6
7
8
9
10
11
12
13
14
15
16
17
18
# Create queue
q = Queue()
print(q.is_empty())  # True

# Add values
q.enqueue(1)
q.enqueue('abc')
print(q.is_empty())  # False

# Visualize queue
print(q.peek())      # 1
print(q)             # 'Queue: [1, abc]'

# Modify queue
print(q.dequeue())   # 1
print(q)             # 'Queue: [abc]'
print(q.dequeue())   # 'abc'
print(q.is_empty())  # True
Use cases
Above, we defined Python classes for stacks and queues, using linked lists to store the objects’ contents. In this section, we’ll demonstrate the power of these abstract data types by solving a few Leetcode questions. At least to me, these questions seemed like impossible puzzles when I first saw them. Once I understood how stacks and queues work, though, the puzzles neatly unfolded into clean solutions. Hopefully I can share some of that “ah-ha” feeling in this post.
Stacks
One area where stacks are incredibly useful is code validation. As you undoubtedly know if you’re still reading this blog post, programming languages utilize curved (( )), square ([ ]), and curly ({ }) brackets for functions, indexing, loops, and more. Every open bracket needs a matching closed bracket, and you can’t have a closed bracket before an open bracket.
How do you keep track of all the open and closed brackets, and whether they’re curved, square, or curly, without going crazy? How can we automatically tell that the brackets on the below left are correct, but the ones on the right are wrong?
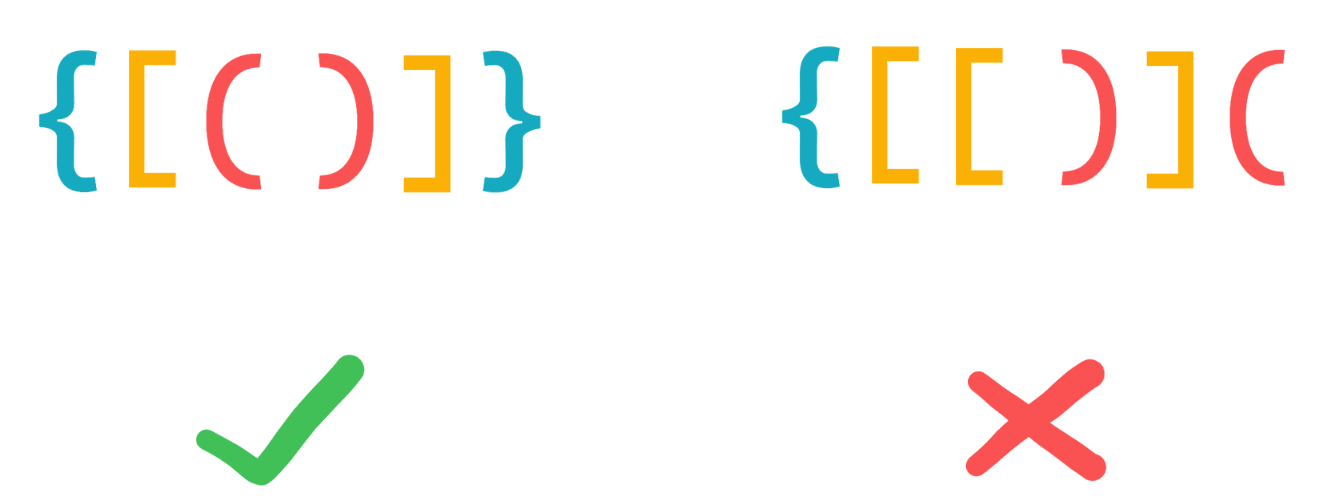
This question, LC 20: Valid Parentheses, is existentially painful without a stack, and wonderfully simple with one. Below, we’ll write a function that takes in a string of brackets and returns a boolean of whether the brackets are valid.
Our solution works like this at a high level: any time we see an open bracket, we add it to the stack. Any time we see a closing bracket, we check if the last open bracket we saw matches the closing bracket. If it doesn’t, we know the string isn’t valid. If it does, we pop that open bracket off the stack and continue scanning the string. If we make it to the end, the final check is to confirm the stack is empty, i.e. that there are no unmatched open brackets.
| Python |
1
2
3
4
5
6
7
8
9
10
11
12
13
14
15
16
17
18
19
20
21
22
23
24
25
26
27
28
29
30
31
32
def is_valid(string: str) -> bool:
    """
    Determines whether string has correct matching brackets
    """
    stack = []

    matches = {
        ')': '(',
        ']': '[',
        '}': '{'
    }

    # Iterate through string
    for char in string:

        # If open bracket - (, [, { - add to stack
        if char in matches.values():
            stack.append(char)

        # If close bracket - ), ], } - inspect stack
        elif char in matches:
            if stack:
                last_open = stack.pop()
            else:
                return False  # Stack is empty

            # Confirm close bracket matches open bracket
            if matches[char] != last_open:
                return False

    # Confirm no extra open brackets
    return len(stack) == 0
For simplicity, we use a built-in Python list for our stack, remembering to always push and pop from the end. We also utilize a Python dict as a lookup for our closing brackets $-$ whenever we see a closing bracket, we can quickly look up its corresponding open bracket.
We keep track of two cases where we can exit the for loop and declare that the string is invalid: 1) if we come across a closing bracket and the stack is empty, and 2) if the last open bracket doesn’t match our closing bracket. The final check is to ensure the stack is empty once we’ve made it through the string.
Let’s see it in action:
| Python |
1
2
3
4
5
6
7
8
9
10
good1 = '[{}]()'
good2 = '}}'

bad1 = '{}]'
bad2 = ')(((('

print(is_valid(good1))  # True
print(is_valid(good2))  # True
print(is_valid(bad1))   # False
print(is_valid(bad2))   # False
Let’s try a slightly tougher variation of this question. In LC 1249: Minimum Remove to Make Valid Parentheses, rather than output a simple “yes/no” boolean for whether the string is valid, we need to make the string valid by removing the misplaced brackets. The strings will also contain a mixture of letters and brackets, but as a minor concession, we only have to deal with curved brackets. In the image below, we need to remove the red brackets to make each string valid.
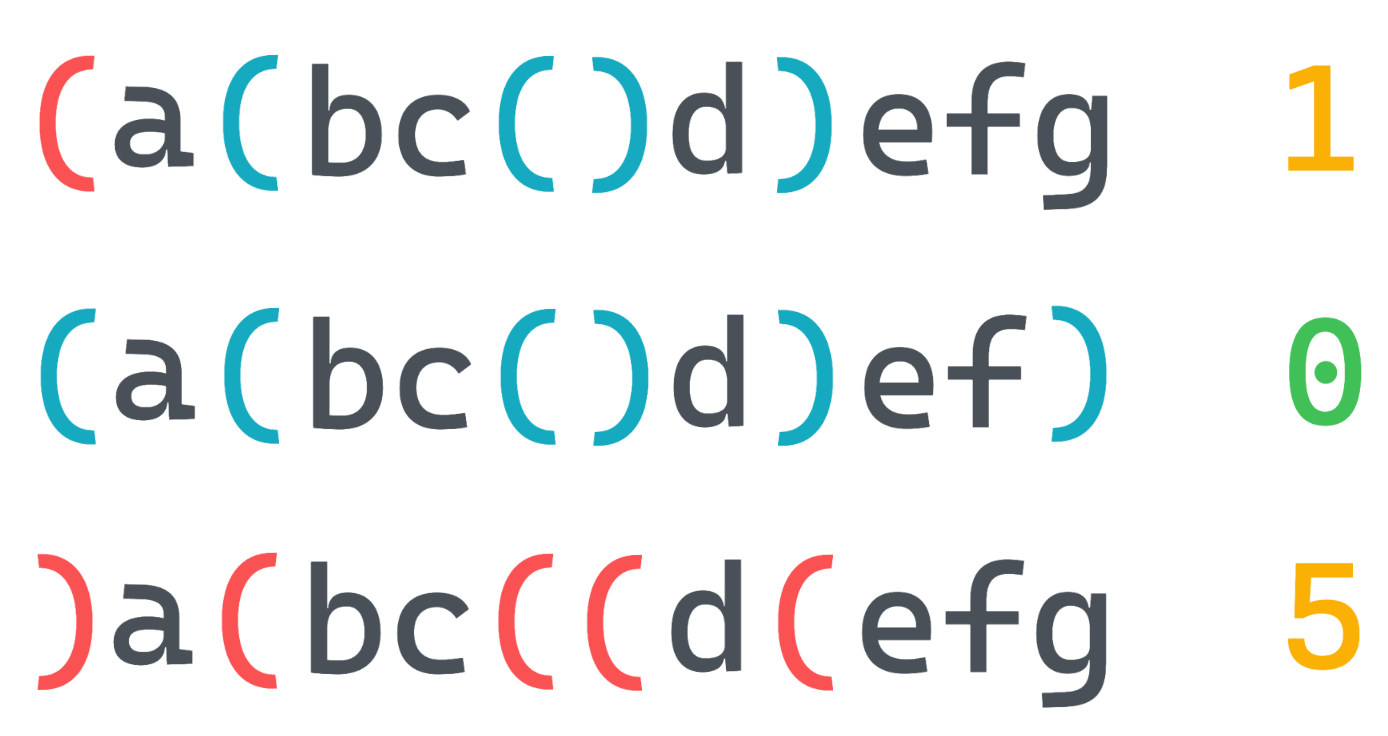
Here’s how we’d do it. At a high level, we’ll move through the string, adding to the stack when we see an open bracket and removing from the stack when we see a closing bracket. If we encounter a closing bracket with no open bracket, we immediately remove it $-$ there’s no open bracket later on that could match this closed bracket. Once we’ve gone through the string, we remove all remaining open brackets, since they had no matching closing brackets.
| Python |
1
2
3
4
5
6
7
8
9
10
11
12
13
14
15
16
17
18
19
20
21
def make_valid(string: str) -> str:
    """
    Return a string 'fixed' of misplaced parentheses
    """
    s = list(string)
    stack = []

    for i, char in enumerate(s):
        if char == '(':
            stack.append(i)
        elif char == ')':
            if stack:
                stack.pop()
            else:
                s[i] = ''  # Remove the ) if no corresponding (

    # Remaining ( to remove since no )
    while stack:
        s[stack.pop()] = ''

    return ''.join(s)
Let’s look at the code more closely. We start by converting the string to a list, since it’s much easier to modify elements in mutable lists than immutable strings. (We’d have to create a new string each time, versus modifying the list in-place.)
We then actually store the indices of open brackets in our stack, rather than the brackets themselves, as we’ll need to know where exactly to remove a misplaced bracket. We address misplaced closing brackets as we move through the string, as we know from the empty stack that there are no matching open brackets from earlier in the string. For open brackets, we need to pass through the entire string before knowing if they have a matching closing bracket.
“Removal” occurs by replacing the bracket with an empty string $-$ because we’re tracking the index of misplaced brackets, shifting the indices of existing elements while we’re moving through the list could cause a huge headache. Instead, we remove all empty strings in the final step, when we convert the list to a string with ''.join(s).
Finally, let’s make sure it works:
| Python |
1
2
3
4
5
6
7
string1 = '(())()'
string2 = '())'
string3 = ')(((('

print(make_valid(string1))  # '(())()'
print(make_valid(string2))  # '()'
print(make_valid(string3))  # ''
Queues
Let’s now shift our attention to use cases for queues. One common question where queues are useful is level-order traversal for trees. How can we print the value of every node in a tree, level by level? We’re usually provided only the root node, so we have no idea ahead of time what the tree looks like. We therefore want to process the tree correctly as we’re exploring it.
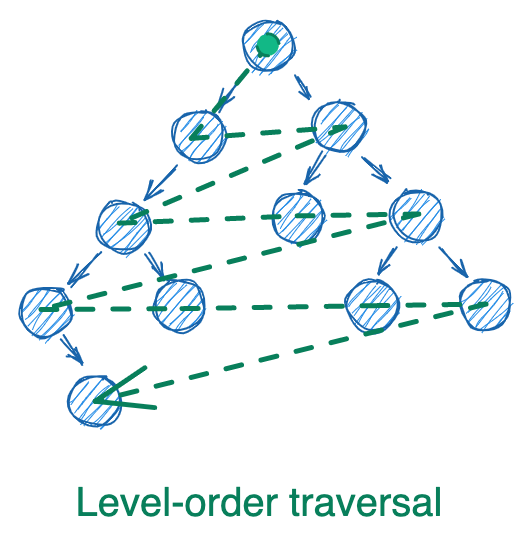
As in our previous post, we’ll use the following implementation for a tree node. This node will be a binary node in that it has at most two children, but our level-order traversal algorithm can easily extend to nodes with any number of children.
| Python |
1
2
3
4
5
class TreeNode:
    def __init__(self, val=None, left=None, right=None):
        self.val = val
        self.left = left
        self.right = right
With our TreeNode defined, let’s write a function that performs level-order traversal, given the root node of a tree. The solution is delightfully short if you use a queue.
At a high level, we start by enqueuing the root node. We dequeue the node, append its value to our answer, then enqueue its children. Then we simply repeat this process until we’ve processed all nodes. That’s it!
| Python |
1
2
3
4
5
6
7
8
9
10
11
12
13
14
15
16
17
18
19
from typing import List

def level_order_traversal(root: TreeNode) -> List[int]:
    """
    Return a list of tree node values from a level-order
    traversal
    """
    q = [root]
    answer = []

    while q:
        node = q.pop(0)

        if node:
            answer.append(node.val)
            q.append(node.left)
            q.append(node.right)

    return answer
As with our stack examples, we again use a built-in list, this time remembering to always enqueue at the end (i.e. .append) and dequeue from the front (i.e. .pop(0)). Because new child nodes are always added to the end, we’re guaranteed that all nodes on a level are processed before nodes from lower levels. Below we visualize the process of dequeing node B, appending its value to the answer, and enqueuing its child nodes.
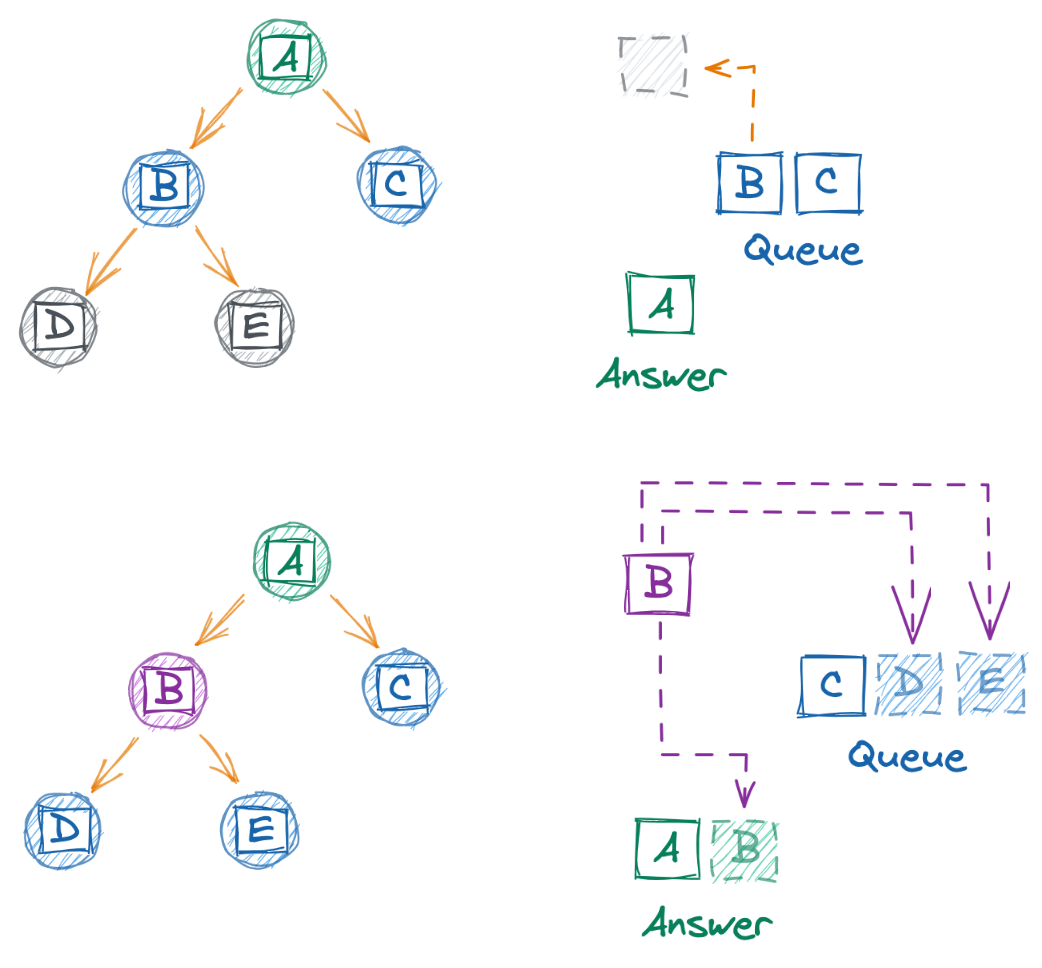
And let’s confirm it works:
| Python |
1
2
3
4
5
6
7
tree = TreeNode('A')
tree.left = TreeNode('B')
tree.right = TreeNode('C')
tree.left.left = TreeNode('D')
tree.left.right = TreeNode('E')

print(level_order_traversal(tree))  # ['A', 'B', 'C', 'D', 'E']
A trickier version of this question is to return only the rightmost node at every level in a tree. In the tree in the diagram above, for example, we’d want to return [A, C, E]. The general structure to answering LC 199: Binary Tree Right Side View is similar to our answer above, but we need additional logic to check if we’re at the rightmost node.
| Python |
1
2
3
4
5
6
7
8
9
10
11
12
13
14
15
16
17
18
19
20
21
22
23
24
25
26
def get_rightside(root: TreeNode) -> List[int]:
    """
    Return list of rightmost nodes in a binary tree
    """
    q = [root]
    answer = []

    while q:
        level_len = len(q)

        # Iteratively remove from left side
        for i in range(level_len):

            node = q.pop(0)

            # Add node if rightmost
            if i == level_len - 1:
                answer.append(node.val)

            # Either way, append children
            if node.left:
                q.append(node.left)
            if node.right:
                q.append(node.right)

    return answer
Notice that there are now two loops: a while loop that iterates through the queue until it’s empty, and a for loop that processes all nodes at a given level. The “trick” to this question is realizing that if we take a snapshot of the queue (line 9) before we start processing its nodes (line 12), we’re able to see all nodes at a given level, allowing us to identify the rightmost node. This snapshot is critical, as we modify the queue as we move through it (lines 21-24).
Below we visualize the queue (right) as our algorithm processes a larger tree (left). Notice how the snapshots occur when a queue contains all nodes in a level (and no more).

Finally, let’s confirm the code works:
| Python |
1
2
3
4
5
6
7
tree = TreeNode('A')
tree.left = TreeNode('B')
tree.right = TreeNode('C')
tree.left.left = TreeNode('D')
tree.left.right = TreeNode('E')

print(get_rightside(tree))  # ['A', 'C', 'E']
Conclusions
In this post, we did a deep dive on two of the most common abstract data types: stacks and queues. We covered their wide range of use cases before implementing them in Python and solving some challenging problems ourselves.
If you’re interested in learning more, priority queues are a great next step. This abstract data type assigns a ranking to each element in a queue, allowing us to prioritize certain elements over others. The security line at an airport, for example, operates as a classic first-in first-out queue as passengers go through the metal detectors. But when a passenger with TSA PreCheck arrives, they’re able to skip to the front and be processed first. Whether a passenger has PreCheck determines their priority in the queue.
Finally, it’s important to reiterate that there are many ways to implement a stack or queue. We chose to use a linked list for our Stack and Queue classes to mirror how these classes are often implemented in languages like Java or C, while we used a built-in Python list for our Leetcode questions to keep things simple. But there’s nothing stopping you from implementing a stack using a tree or a queue with a graph! On second thought, just because you can implement a queue with an graph doesn’t mean you should…
Best,
Matt
Footnotes
1. Creating stacks
It’s all honor code that you won’t directly call methods and attributes that start with an underscore! Python doesn’t actually enforce this rule; we can easily modify the contents and wreak havoc.
| Python |
1
2
3
4
5
6
7
8
9
10
11
12
class BankAccount:
    def __init__(self, password: str):
        self._password = password

b = BankAccount(password='abc123')

# Print it
print(b._password)   # 'abc123'

# Change it
b._password = 'something else'
print(b._password)   # 'something else'
There’s actually no real way to protect against this in Python. The closest we can get is to obfuscate a bit using the @property decorator. We can write rules for how the user can access an alias of _password, such as by blocking read access or requiring that the input meet some criteria before it overwrites _password. But if the user requests _password directly, we can’t stop them from viewing or modifying it.
| Python |
1
2
3
4
5
6
7
8
9
10
11
12
13
14
15
16
17
18
19
20
21
22
23
24
25
26
27
28
29
import logging

class BankAccount:
    def __init__(self, password: str):
        self._password = password

    @property
    def password(self):
        logging.error("Not authorized to access password")
        return None

    @password.setter
    def password(self, value: str):
        if not isinstance(value, str):
            logging.error("Password must be string")
            return None
        self._password = value

# Create a new account
ba = BankAccount(password='abc123')

# Our getter and setter are working...
print(ba.password)  # ERROR:root: Not authorized to access password
ba.password = 123   # ERROR:root: Password must be string

# ...but then the attacker "hacks" their way in
print(ba._password)  # 'abc123'
ba._password = 123
print(ba._password)  # 123
There’s also little hope in giving the attribute some crazy name, as an attacker could just use the vars command to spill all the juicy contents. While they might not immediately know what the attribute is for, they’d already have a neat set of key-value pairs to use.
| Python |
1
2
3
4
5
6
7
8
class BankAccount:
    def __init__(self, password: str):
        self._zv92x003 = password

b = BankAccount('abc123')

# Attacker just asks b for everything
print(vars(b))   # {'_zv92x003': 'abc123'}
Ultimately, any data that’s even remotely sensitive should be stored behind an API with strict security requirements. If your program does store sensitive data in a Python class, perhaps as it’s ferried between databases or APIs, you should ensure there’s no way to interact with this class from the frontend.
2. Creating stacks
It’s important to remember that Big O notation quantifies the worst case efficiency. In the worst case, our search will require scanning the entire stack to find the value we’re looking for (i.e. all $n$ values). This is different from the average case: if the values we search for are randomly distributed throughout the stack, we should expect to find the value on average in the middle (i.e. $\frac{n}{2}$ steps).
