
AWS Essentials for Data Science2. Storage
#aws
#sql
#python
Written by Matt Sosna on August 20, 2022
Do you store your music, videos, and personal files in a garage full of hard drives? My bet is… no. Unless you’ve avoided iCloud, Dropbox, and Google Drive the last fifteen years – and if you have, props to you! – then you’re likely using cloud storage. You can recover your texts if you lose your phone; you can share files with links instead of massive email attachments; you can organize and search your photos by who’s in them.
But these benefits extend into the professional realm, too. If you ever start a company that shares data – like, say, thousands of 4K movies and shows for a low monthly fee (😛) – you’ll want to store this data on a cloud server. Cloud servers don’t turn off when you close your laptop, and you don’t have to worry about nefarious users fetching your private data when they visit.
 Photo by Tech Daily on Unsplash
So how can we set up cloud storage? What’s the right type of storage for our data? And how can we interact with cloud storage directly from code, rather than needing to click around in a UI?
This post will answer these questions. We’ll set up our software environment before showing how to efficiently store blobs, tabular data, and JSONs in Amazon Web Services (AWS). (For an intro to the cloud industry in general, check out the last post.) Stay tuned for a follow-up post on compute, the other major offering of the cloud.
Table of contents
- Background
- S3 (Simple Storage Service)
- RDS (Relational Database Service)
- DynamoDB
- Cleaning up
- Conclusions
Background
Why cloud storage?
When you work alone on a small project, you probably don’t think too hard about data storage. Maybe you have a few CSVs in the same folder as your Jupyter Notebook or R scripts. Hopefully everything’s backed up to a hard drive.
But what happens when you want to add someone to your project? It doesn’t make sense to take turns using your laptop. You could copy the data to their laptop, but what if there’s more data than can fit on your teammate’s computer? Once the work starts, syncing changes across datasets is a headache waiting to happen. It’s also a lot of trust to hand over all the data right away – what if this new person leaves, taking everything with them to share with competitors or malicious actors?
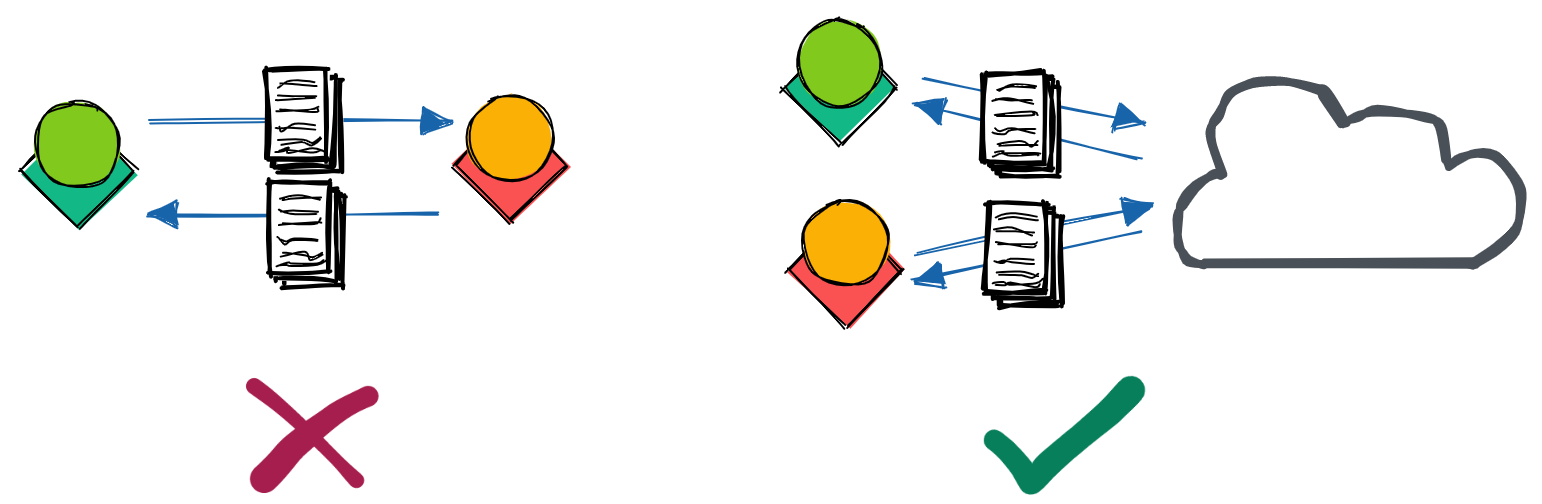
Cloud storage is designed to address these issues. As with Dropbox or Google Drive, you can simply send data through a link: “click here to access the database.” This data can be made read-only, with fine-tuned access rules – if your teammate turns out to be a spy from the competition, you can instantly turn those URLs into error messages the next time they try to fetch the data.[1]
We can use SDKs (software development kits) to access the data straight from our code, which is critical for scaling any application beyond a tiny handful of users. And as long as your internet connection is reliable, you should be able to access the data at any time – AWS, for example, guarantees an uptime of 99.9%, 99.99%, or 99.999% depending on your application.[2]
What am I storing?
So we see that it’s useful to store data in the cloud so it’s secure, accessible by code, and highly-available. But “data” is a broad term – is it raw videos and text transcripts? A user profile and activity logs? Python and R scripts? Grainy screenshots of Excel?
We could throw all our files into a big Dropbox folder, with photos mixing with config files and CSVs. As long as you know the name of the file containing the data you want, Dropbox will fetch the file when requested. But unless the file contains strictly the data you requested, you’ll need to then search through the file to extract the relevant data.
This issue – not knowing exactly where a piece of data is – is where a big Dropbox folder fails us as the amount of data grows. Because we often need to search for data that matches some criteria, the way we organize our data determines whether our applications can support 100 users or 100 million. And as we’ll see, the optimal way to access a particular type of data will strongly depend on how it’s formatted.
This format, i.e., structured, semi-structured, or unstructured, refers to how the data is organized within the file. Structured data is the tabular set of rows and columns you’re likely familiar with: typically, each row is a sample and each column is a feature of that sample. The tables in a relational database consist of structured data, which we can quickly search if the tables are indexed by a column that partitions the data well.
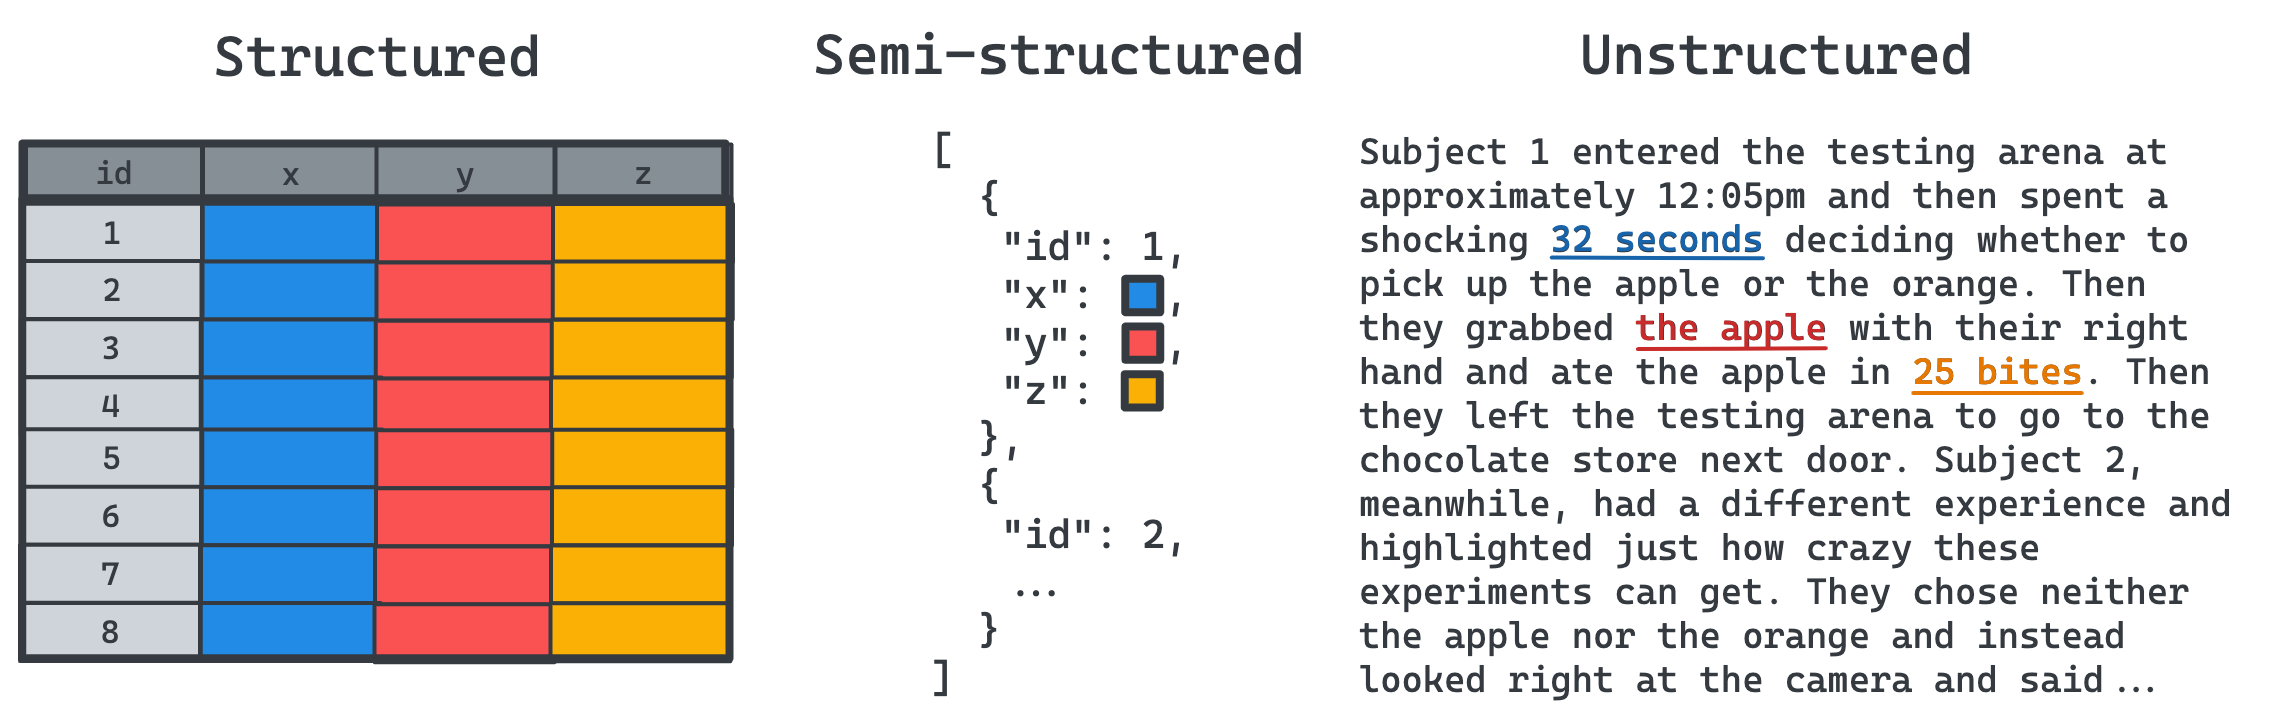
Semi-structured data includes JSON, XML, HTML, and large graphs, where the data usually doesn’t fit nicely into columns and rows. This format is ideal for hierarchical data, where a field may have subfields, many containing subfields of their own. There is no limit on the number of layers, but there is a required structure. An HTML page, for example, can have many <div> sections nested within one another, each with unique CSS formatting.
Finally, unstructured data is raw and unformatted, impossible to split into the rows and columns of structured data, or even the nested fields of semi-structured data, without further processing. One example of unstructured data that can’t – or shouldn’t – be broken up is binary large objects (BLOBs). You usually want to load an entire image at once, for example, so you shouldn’t store half the pixels in one file and half in another. Similarly, executable programs (e.g., compiled C++ scripts) are entities that you’ll always want to fetch all at once.
Avoiding getting hacked when using an SDK
Now that we have an idea on the types of data we can store in the cloud, we can start experimenting with AWS services optimized for each type. To really show the strength of the cloud, we’ll use the AWS Python SDK to integrate these services into our code. To use the Python SDK, we simply install the boto3 library. In Terminal or Command Prompt, we can simply type the following:
| bash |
1
pip install boto3
But before we run any scripts, there’s one thing we need to do to avoid getting obliterated by a hacker. It is crucial that we store our AWS credentials in a secure location in our code.
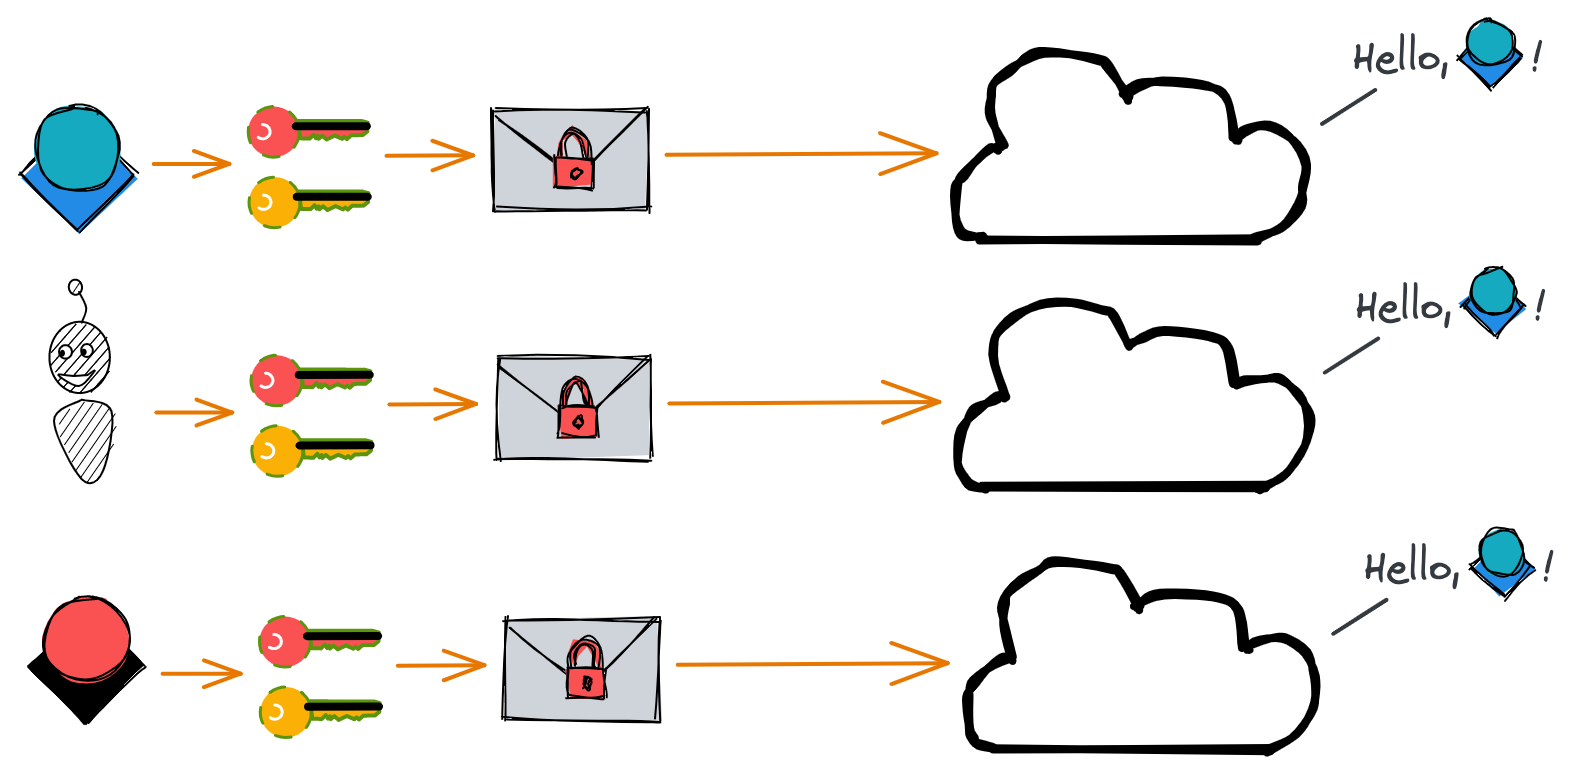
AWS servers receive dozens or hundreds of queries per second. If a server receives a request to download a file from your S3 bucket, how does the server know whether to block or allow the action? To ensure this request is coming from you – or a machine acting on your behalf – we sign our API requests with our AWS access key ID and secret access key. These keys are used to encrypt our message content and generate a hash to prove the message AWS receives is the same one we sent.
So in essence, any requests AWS receives that were signed with your access keys will be treated like they came from you. So it’s important to ensure that you’re the only one performing these requests!
boto3 requires us to pass in our access key ID and secret access key when we instantiate a client object. We can technically do this by defining our access keys as variables and then passing them in, like this:
| Python |
1
2
3
4
5
6
7
8
9
10
11
import boto3

# DON'T DO THIS!!
access_key = 'abc123'
secret_key = 'xyz456'

client = boto3.client(
  access_key,
  secret_key,
  region_name='us-east-1'
)
But this is a huge security vulnerability, as anyone who reads this code can impersonate you! And if you accidentally push this file to a version control system like Git, removing lines 4-5 and pushing a new version won’t be enough – anyone can scroll through the history of the file to find your keys.
Rather than hard-coding the values in Python, MacOS and Linux users can store these secrets in a .bash_profile.rc or .zshrc file. (See here for Windows.) This file contains aliases for filepaths (so Terminal knows you mean /opt/homebrew/bin/python when you type python, for example), as well as database passwords or other sensitive information. This file is located in your root directory and is hidden – to find it, you need to type ⌘ + . to see it.
In this file, we can set our AWS access keys. (Note the lack of spaces around the equals signs.)
| bash |
1
2
export AWS_ACCESS_KEY_ID=abc123
export AWS_SECRET_ACCESS_KEY=xyz456
Once we do this, we can access our variables through Python’s os module. By accessing the values from os.environ, they’re never visible to anyone reading the code.[3]
| Python |
1
2
3
4
import os

access_key = os.environ['AWS_ACCESS_KEY_ID']
secret_key = os.environ['AWS_SECRET_ACCESS_KEY']
With that, we’re now ready to start using AWS.
S3: Simple Storage Service
S3, or Simple Storage Service, is the closest analogue to Dropbox or Google Drive. Think of S3 as a “catch-all” for your files. Simply create a bucket (i.e., distinct directory) and upload any number of files of any type – text, CSVs, executables, Python pickle files, images, videos, zipped folders, etc. Define the access rules at the file, folder,[4] or bucket level with just a few clicks.
The downside to this simplicity is that S3 only contains data about the files, not what’s inside them. So you’re out of luck if you forget your Facebook password and can’t search your text files for the phrase my Facebook password is. If we need to search the data within our files, we’re better off storing that data in a database.[5]
But even with a database, S3 is still ideal for storing the raw data that generated those data. S3 can serve as a backup for logs, raw sensor data for your IoT application, text files from user interviews, and more. And some file types, such as images or trained machine learning models, are best kept in S3, with the database simply storing the path to the object.
Using S3
So let’s actually create a bucket. Don’t worry about getting charged by AWS for storing data – we’ll stay well within the boundaries of the Free Tier and delete everything once we’re done. We’ll create a bucket, then upload and download files. We’ll use the console, AWS CLI, and Python SDK to perform each of these steps, though note that we can do all steps from any one of the tools.
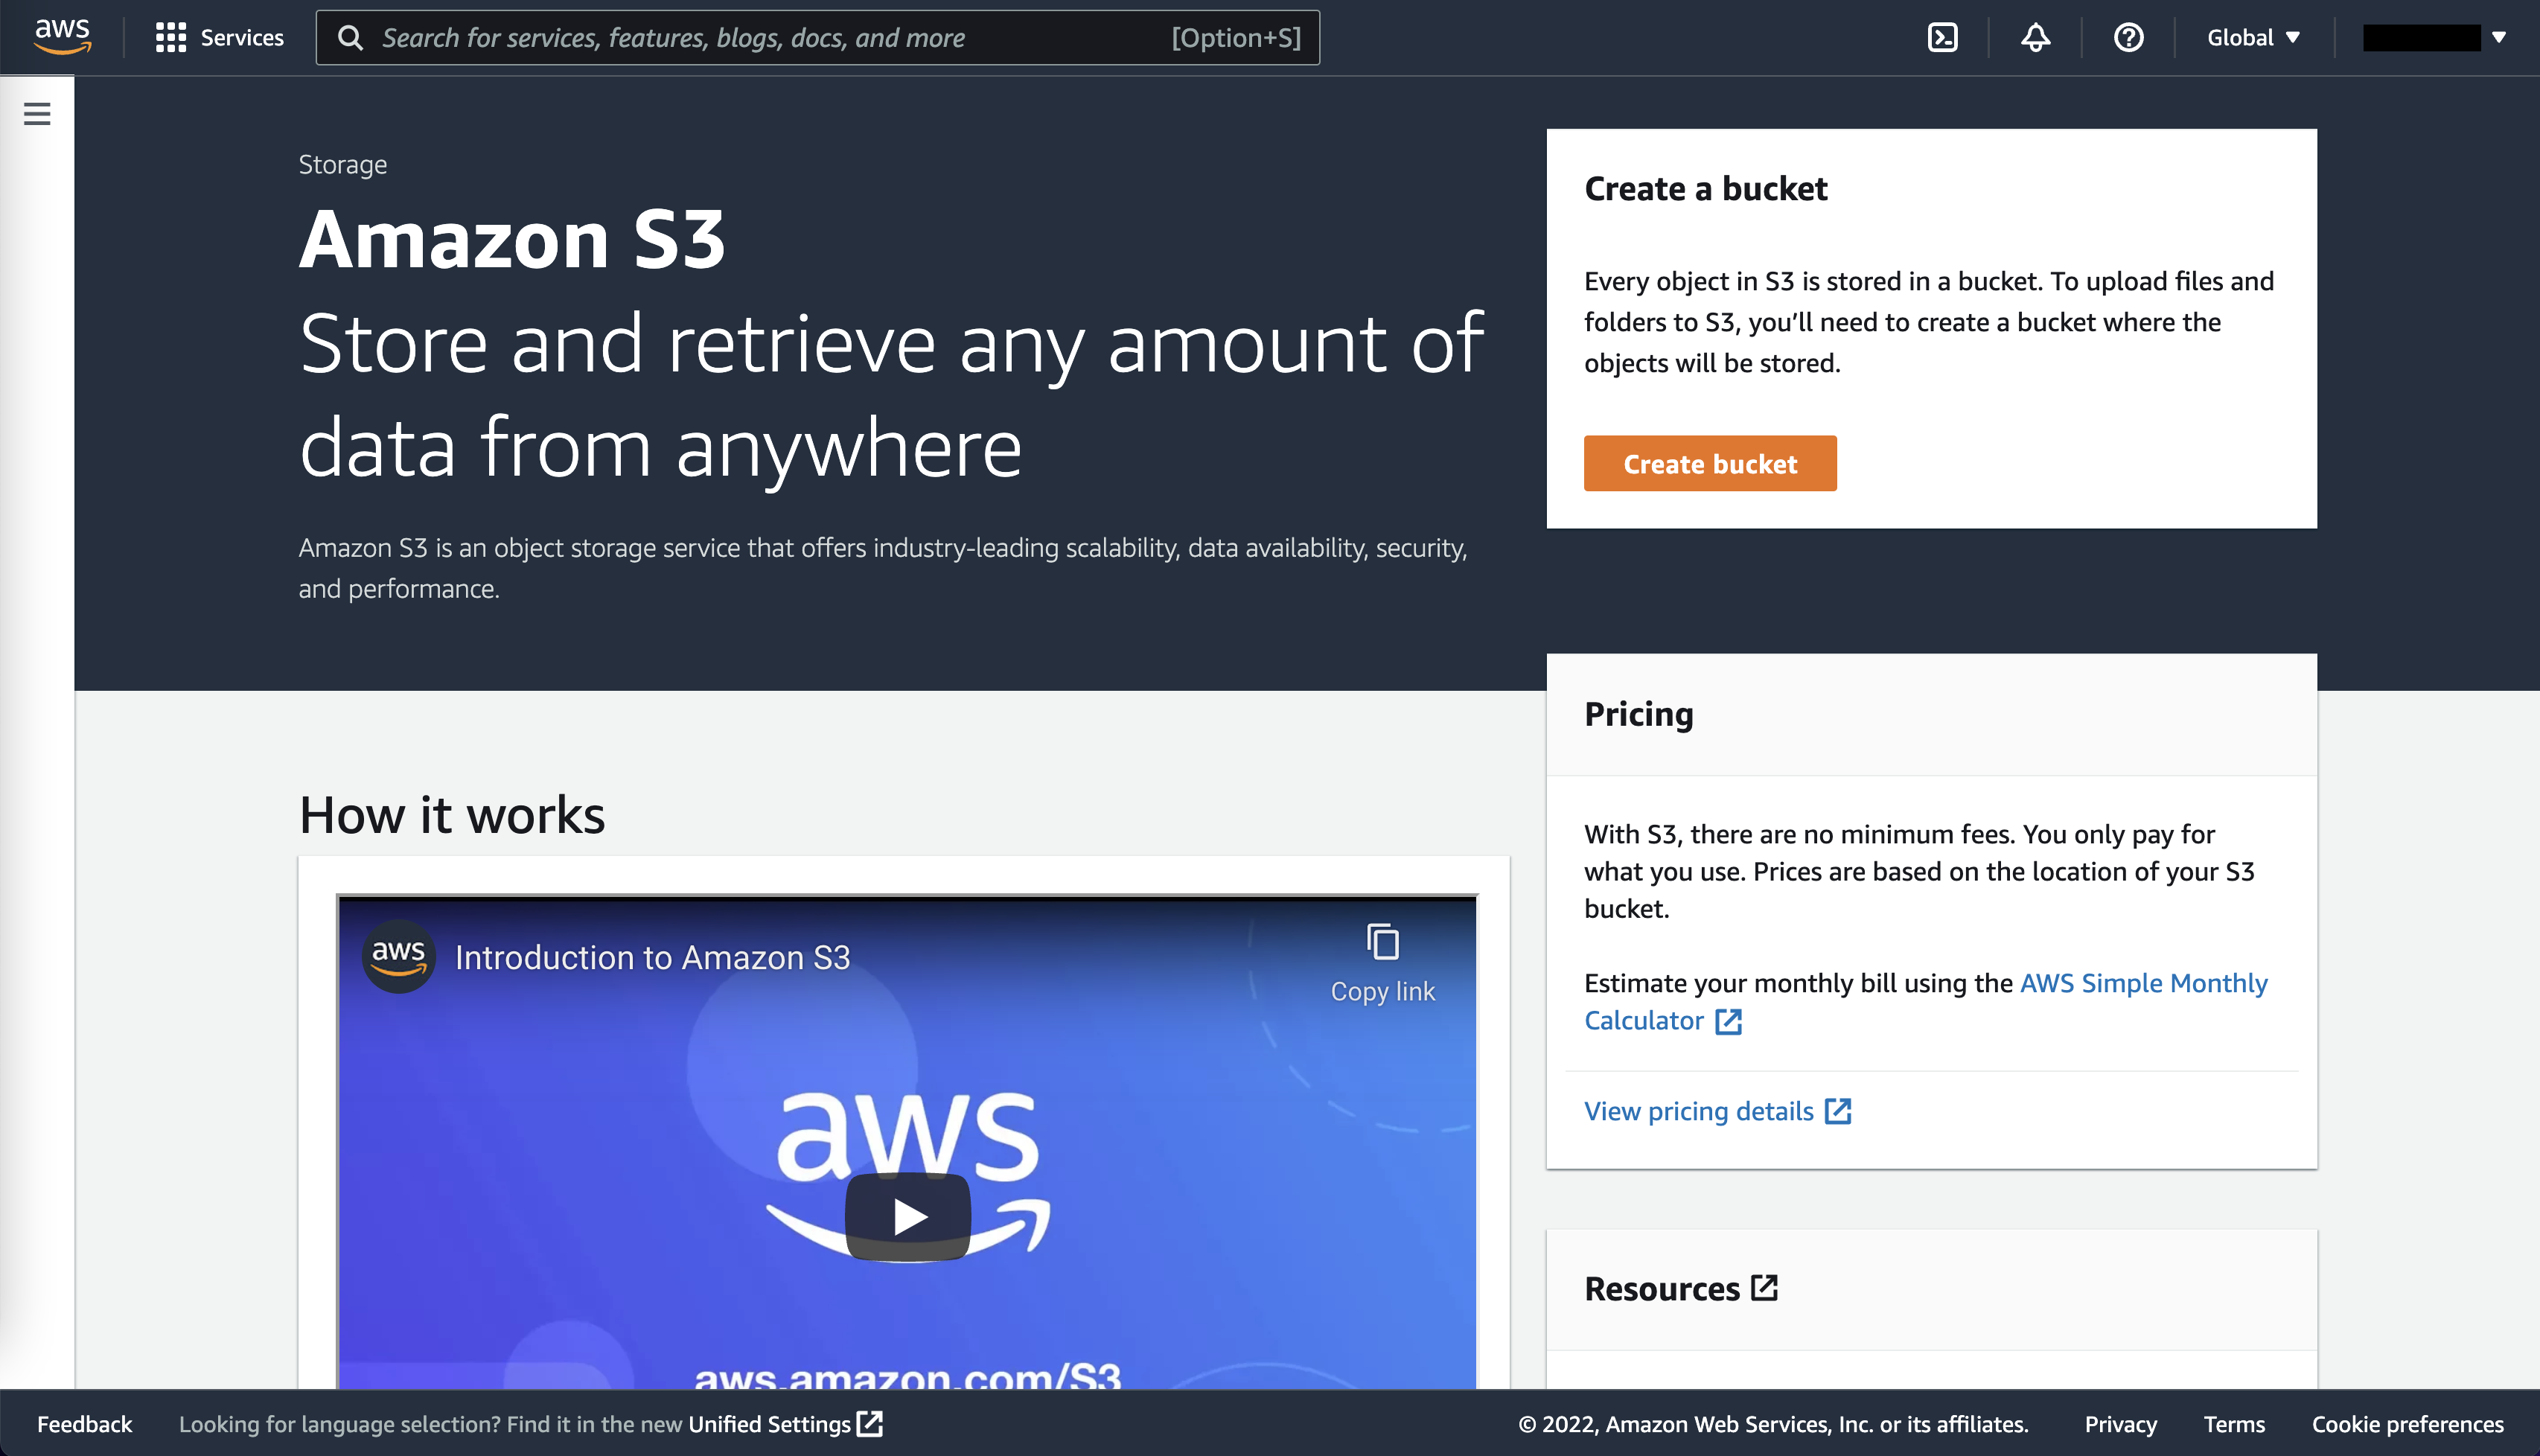
Create a bucket
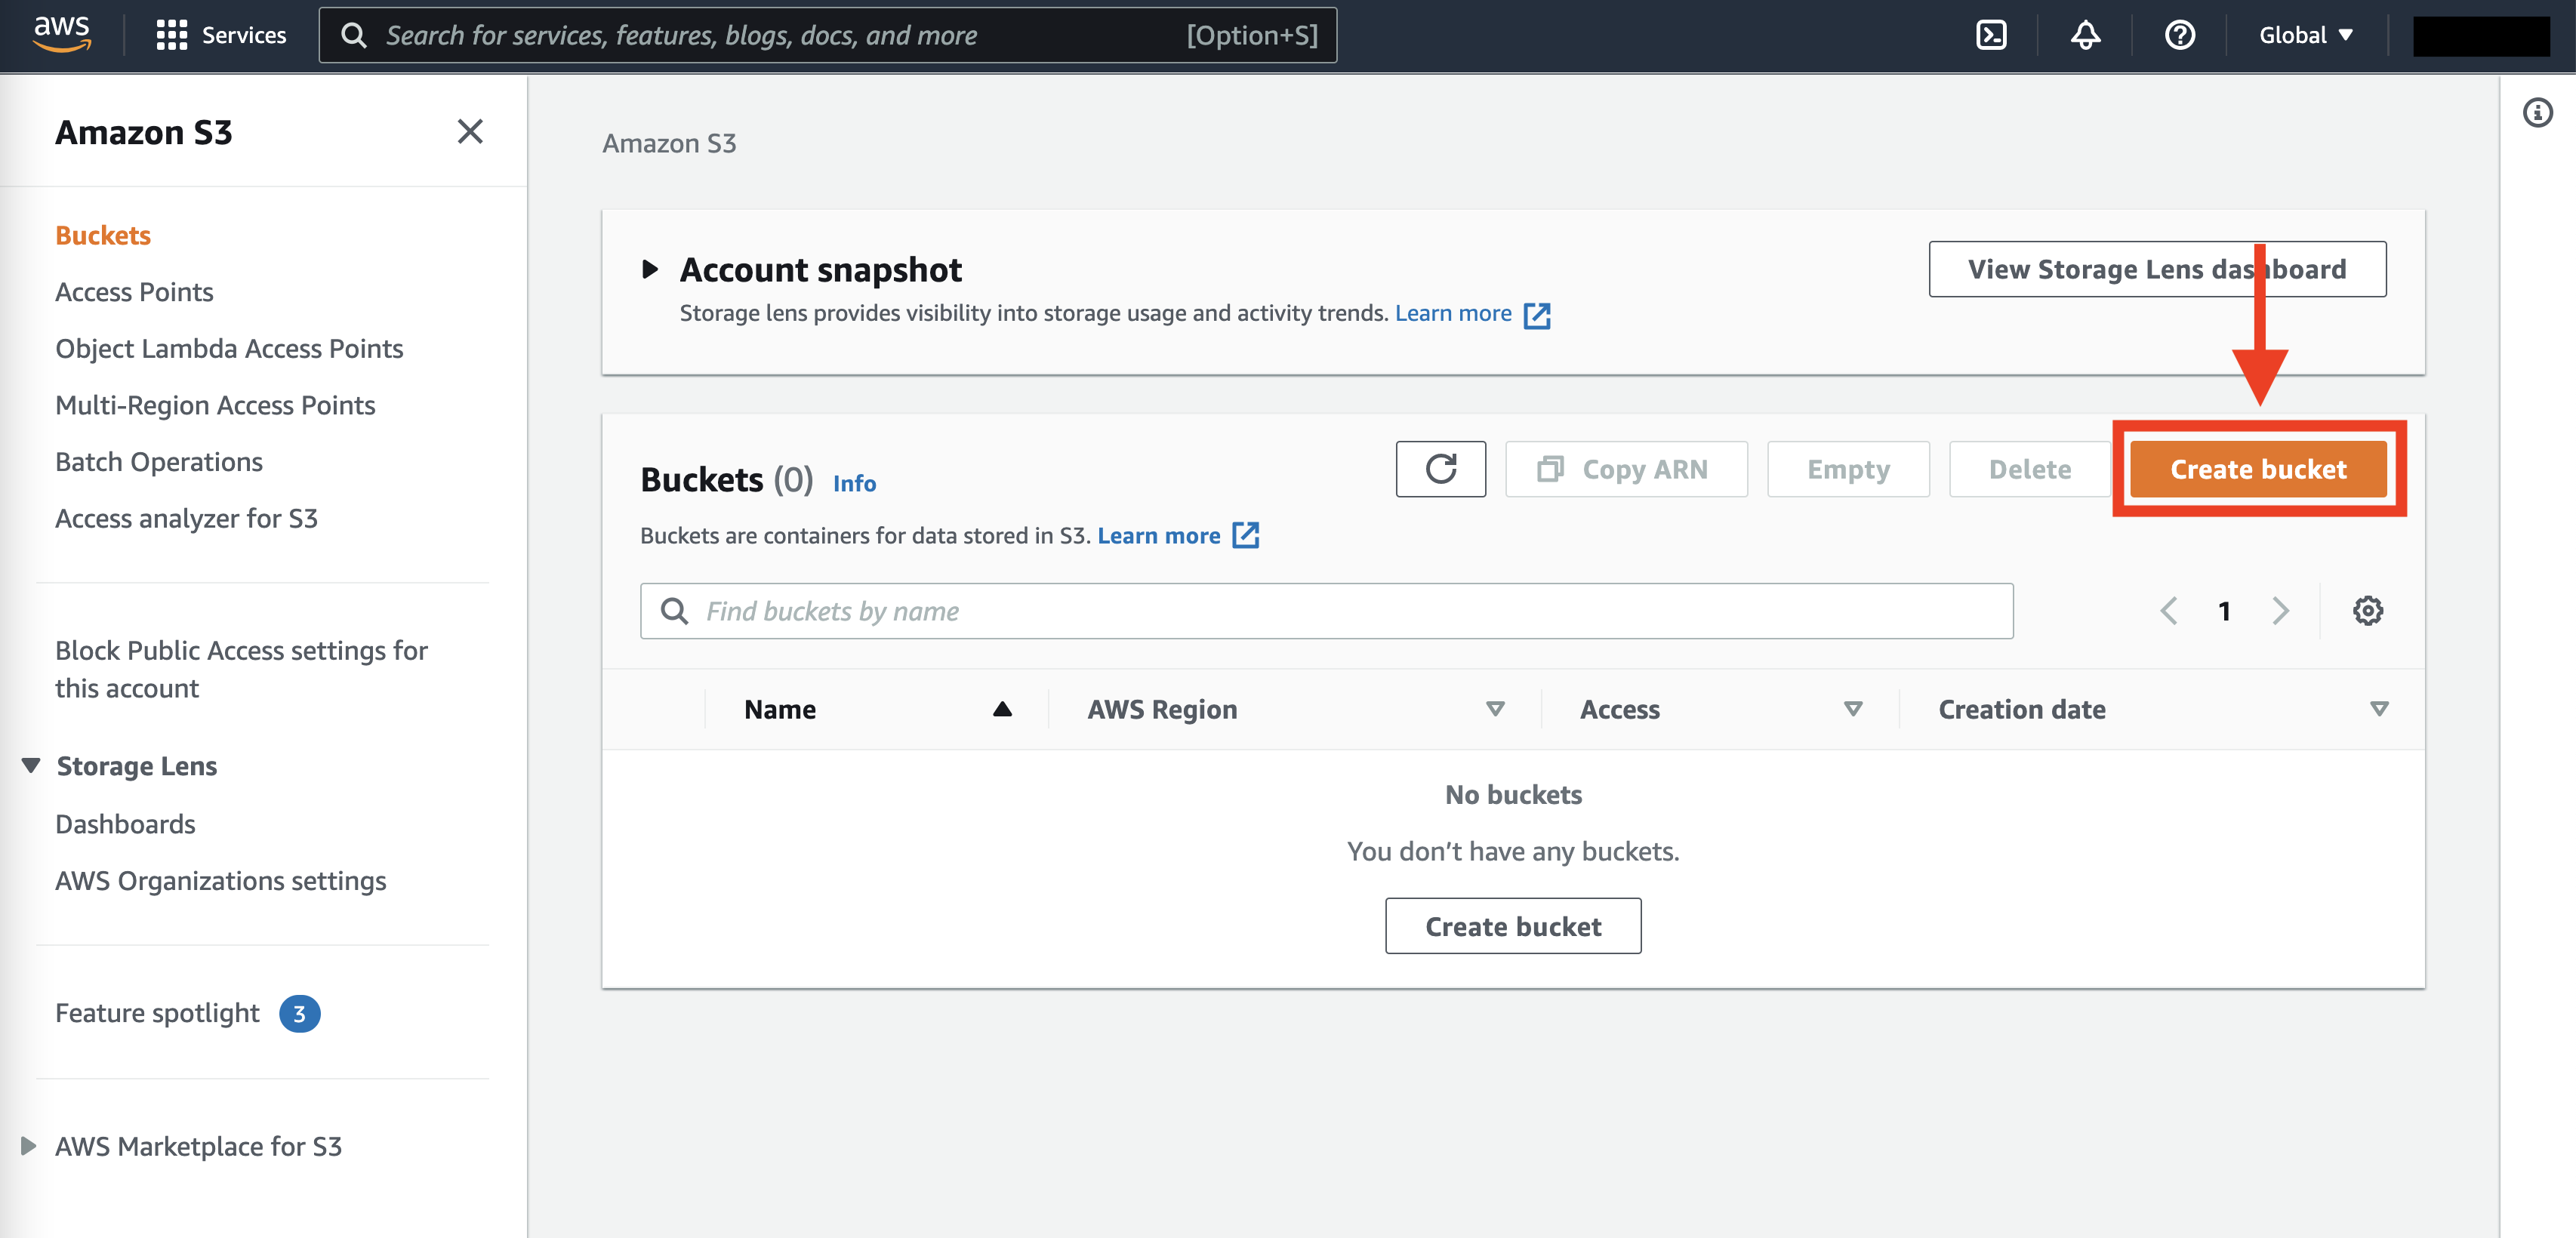
Let’s start with the console to create a bucket. We first log into our AWS account (preferably with an IAM role) and navigate to S3. Then we just click the “Create bucket” button:
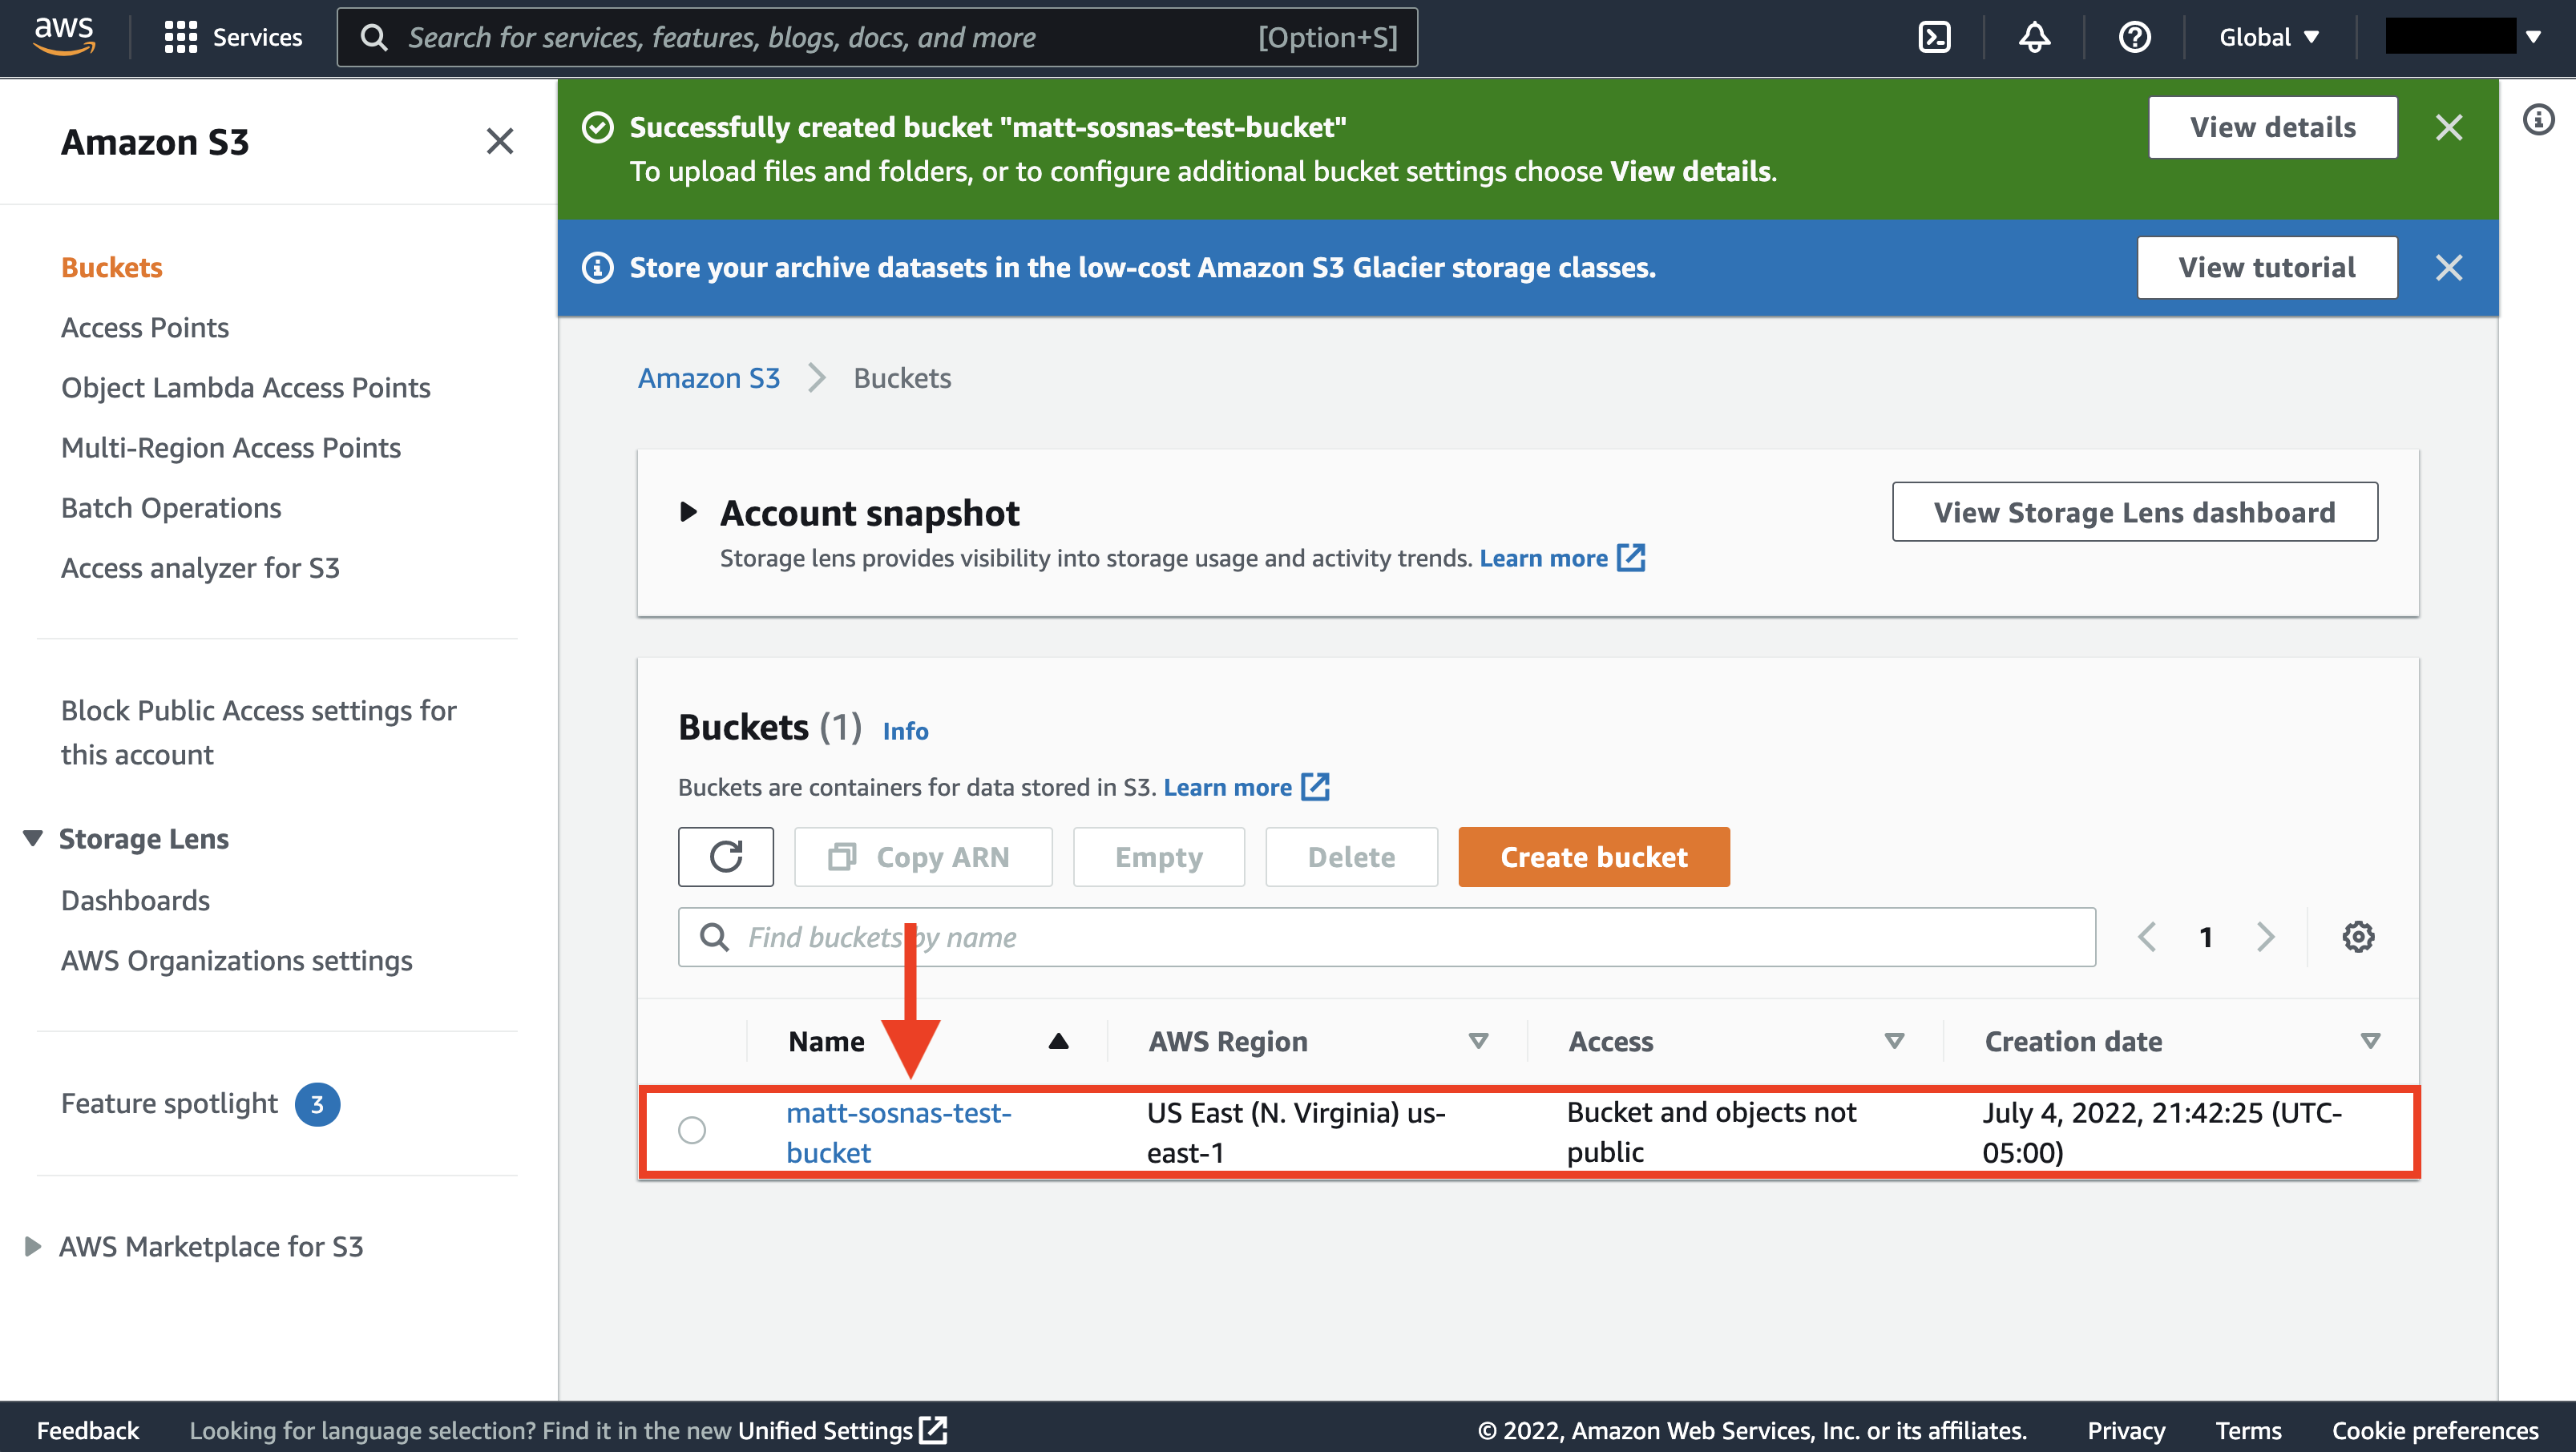
When we create a bucket, we need to give it a name that’s globally distinct across all AWS buckets. Here we create one called matt-sosnas-test-bucket.

Our bucket can have customized access rules, but let’s just keep it at disabled public access for now. Once we select that, our bucket is ready.
Upload files
Let’s now switch to the AWS CLI. In Terminal or Command Prompt, we can see our new bucket with the following command. (You may need to authenticate following the steps here).
| bash |
1
2
aws s3 ls
# 2022-07-04 22:42:25 matt-sosnas-test-bucket
We can now create a file and upload it to our bucket. To keep things simple, we’ll just create a file straight from the command line by piping a string into a file with echo and >. We’ll then upload the file with aws s3 cp <source> <destination>.
| bash |
1
2
3
4
5
6
7
8
9
10
# Create file
echo 'Hello there, this is a test file!' > test.txt

# Verify contents
cat test.txt
# Hello there, this is a test file!

# Upload to S3
aws s3 cp test.txt s3://matt-sosnas-test-bucket/test.txt
# upload: .\test.txt to s3://matt-sosnas-test-bucket/test.txt
We can now view our file with aws s3 ls <bucket_name>.
| bash |
1
2
aws s3 ls s3://matt-sosnas-test-bucket
# 2022-07-18 00:31:54   27 test.txt
If the S3 file path contains a folder, AWS will automatically create a folder for us. Let’s create a Python file this time, test.py, and upload it into a python/ directory in our bucket. Because s3://matt-sosnas-test-bucket/python/test.py contains a python/ directory, S3 will create one for us.
| bash |
1
2
3
4
echo 'print("This is a different test file")' > test.py

aws s3 cp test.py s3://matt-sosnas-test-bucket/python/test.py
# upload: .\test.py to s3://matt-sosnas-test-bucket/python/test.py
Now when we view the contents with aws s3 ls, we see the python/ folder next to test.txt in the root directory. If we add /python/ to the end of our bucket name in the command, we then see the contents of the folder.
| bash |
1
2
3
4
5
6
aws s3 ls s3://matt-sosnas-test-bucket
#                      PRE python/
# 2022-07-18 00:31:54   27 test.txt

aws s3 ls s3://matt-sosnas-test-bucket/python/
# 2022-07-18 00:42:39   39 test.py
Finally, we can upload multiple files by specifying the --recursive, --exclude, and --include flags. Below, we create two CSVs, file1.csv and file2.csv, first creating the header and then appending two rows each. We then use the AWS CLI to upload all files in our current directory (.) that match the file* pattern into the csv/ folder in our bucket. Finally, we list the contents of the csv/ folder.
| bash |
1
2
3
4
5
6
7
8
9
10
11
12
13
14
15
16
17
# Create file1.csv
echo "name,age" > file1.csv
echo "abe,31" >> file1.csv
echo "bea,5" >> file1.csv

# Create file2.csv
echo "name,age" > file2.csv
echo "cory,50" >> file2.csv
echo "dana,100" >> file2.csv

aws s3 cp . s3://matt-sosnas-test-bucket/csv/ --recursive --exclude "*" --include "file*"
# upload: .\file1.csv to s3://matt-sosnas-test-bucket/csv/file1.csv
# upload: .\file2.csv to s3://matt-sosnas-test-bucket/csv/file2.csv

aws s3 ls matts-sosnas-test-bucket/csv/
# 2022-07-19 01:05:22    23 file1.csv
# 2022-07-19 01:05:22    25 file2.csv
Download files
Uploading files is great, but at some point we’ll want to download them. Let’s use our third tool, the Python SDK boto3, to demonstrate downloading files. This step is more involved than the one-line AWS CLI commands, but we’ll go through it line by line below.
| Python |
1
2
3
4
5
6
7
8
9
10
11
12
13
14
15
16
17
18
19
20
21
22
23
24
25
26
import boto3
from io import StringIO
import os
import pandas as pd

# Establish a connection
client = boto3.client(
    aws_access_key_id=os.environ['AWS_ACCESS_KEY_ID'],
    aws_secret_access_key=os.environ['AWS_SECRET_ACCESS_KEY'],
    region_name='us-east-1',
    service_name='s3'
)

# Get the file
obj = client.get_object(
    Bucket="matt-sosnas-test-bucket",
    Key='csvs/file1.csv'
)

# Convert the file to a dataframe
body = obj['Body'].read()
string = StringIO(body.decode('utf-8'))
df = pd.read_csv(string)
#    name  age
# 0  abe    31
# 1  bea     5
We first import boto3, io.StringIO, os, and pandas. boto3 contains code for interacting with AWS, io is a library for working with stream data, os.environ stores our AWS credentials, and pandas will convert our CSV to a dataframe.
On lines 7-12 we instantiate a boto3 client that allows us to make requests to AWS. We perform such a request to get the csvs/file1.csv file from matt-sosnas-test-bucket on lines 15-18. This object is packed with metadata, so we extract the byte string on line 21, decode it to a CSV string on line 22, and finally parse the string to a dataframe on line 23.
RDS: Relational Database Service
Throwing all our data into a bucket, even with file types arranged by folder, only gets us so far. As our data grows, we need a more scalable way to find, join, filter, and perform calculations on our data. A relational database is one way to store and organize our data more optimally. (See this post for a primer on databases.)
We could rent an EC2 instance (i.e., virtual server) in the cloud and install a MySQL or PostgreSQL database ourselves. But this is barely better than hosting a database on a server in our garage – while AWS would handle server maintenance, we would still be responsible for scaling, availability, backups, and software and operating system updates. For slightly added cost, we can use a service like Amazon RDS to have AWS manage everything except our actual data.
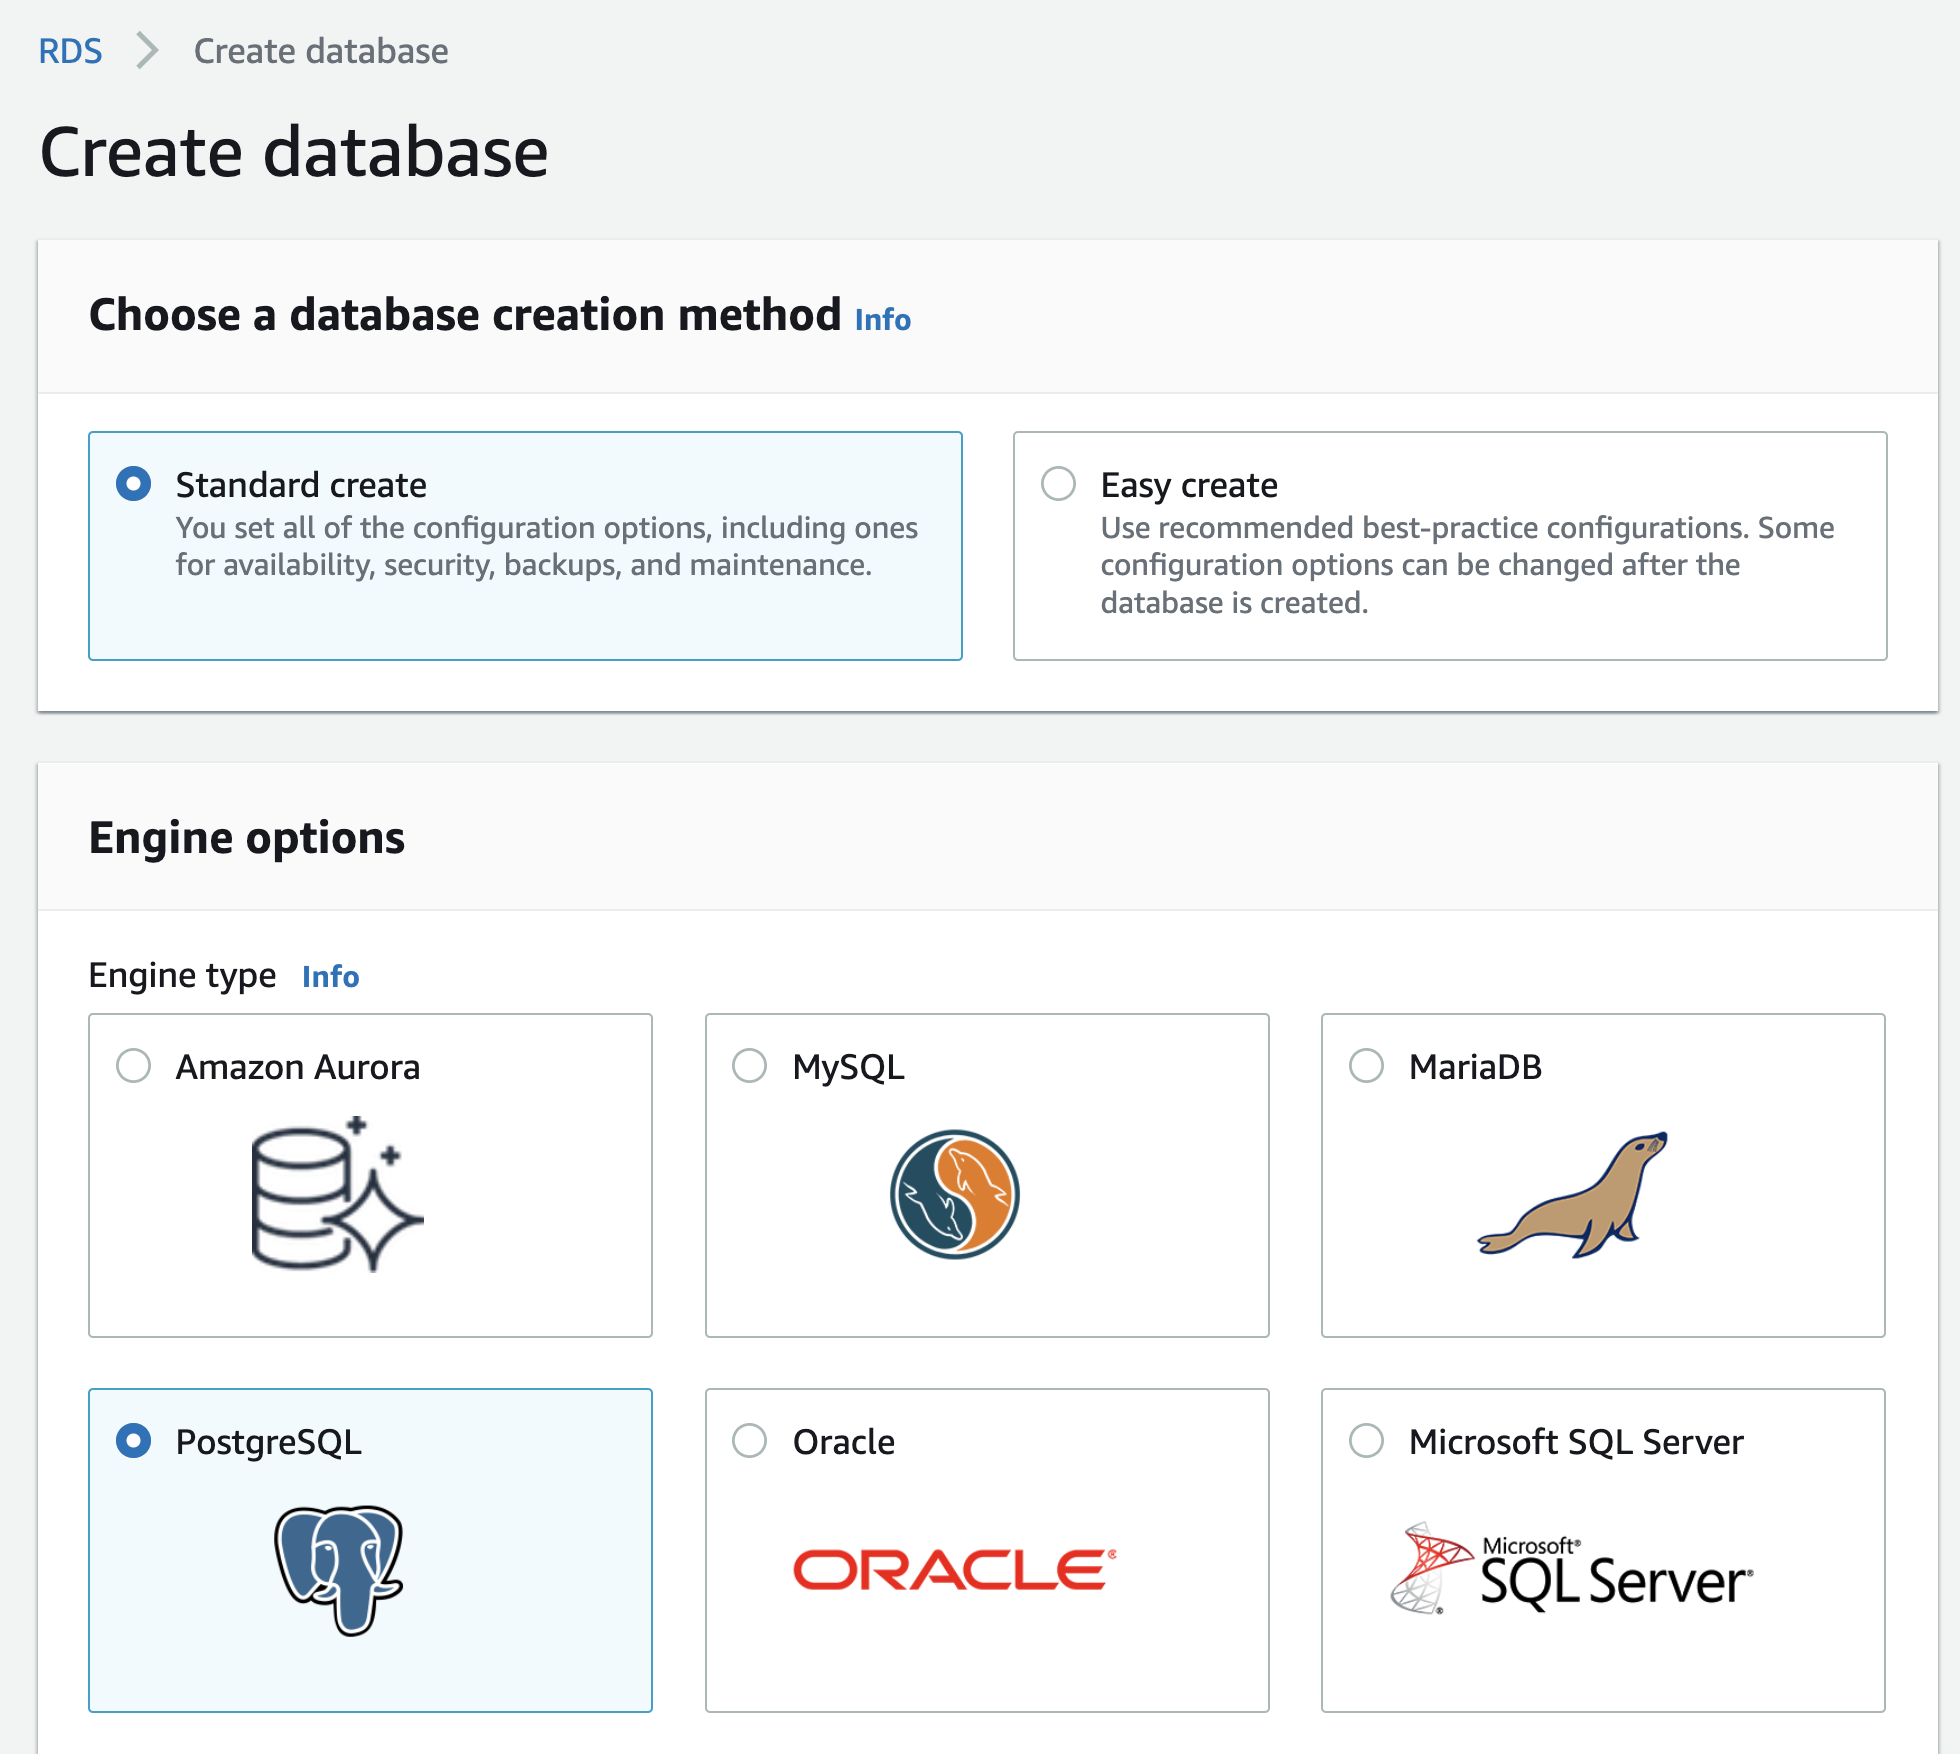
So let’s create a database in RDS. We’ll sign into the AWS console, navigate to RDS, and click Create database. If you read Intermediate SQL for Everyone, you might already have pgAdmin, a GUI for Postgres databases, installed. Since I already have pgAdmin on my computer, then let’s go with Postgres. 🙂
In the setup wizard, select Standard create as the creation method and Postgres as the engine.
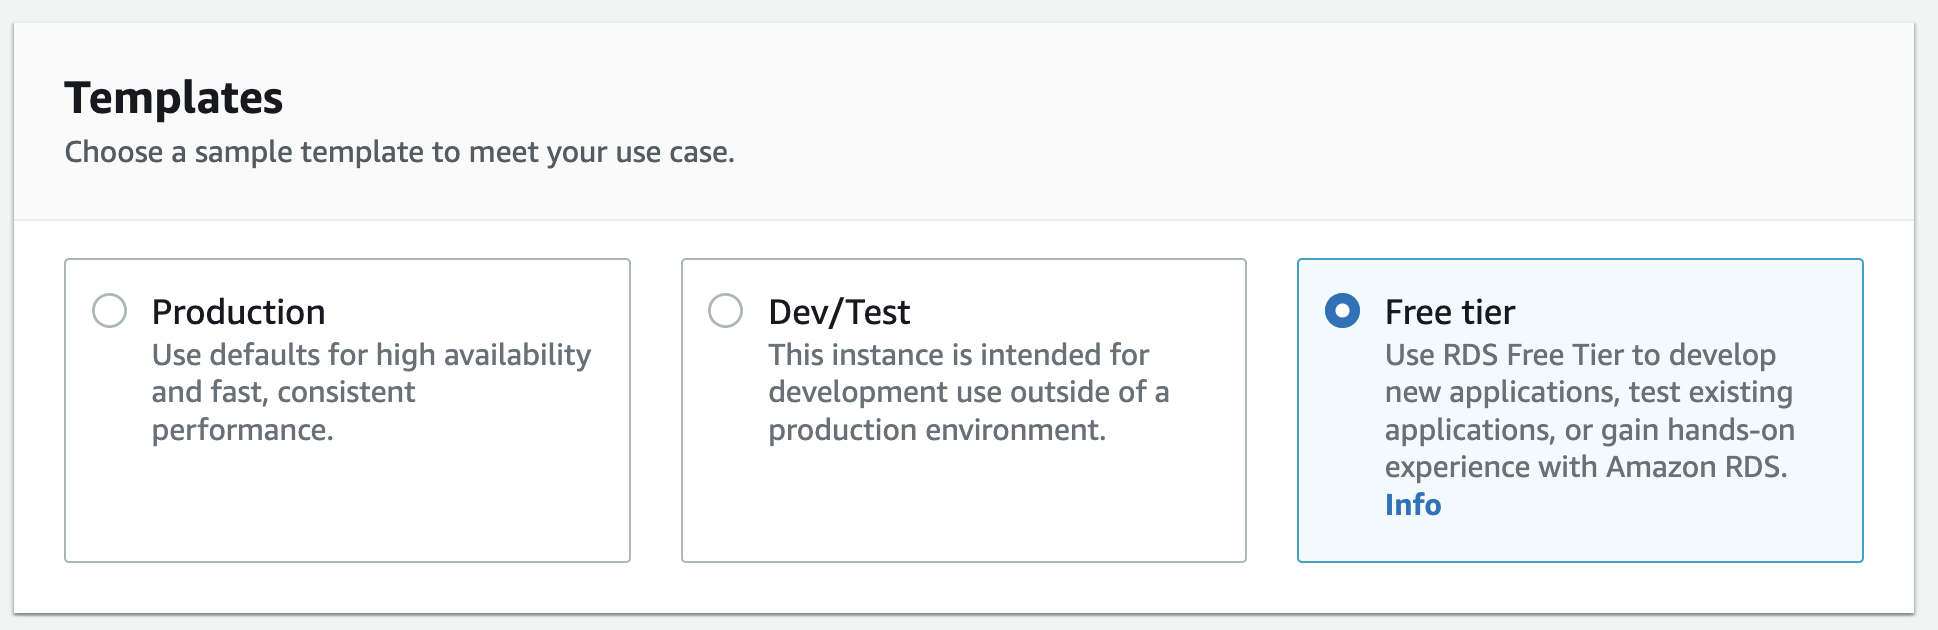
Make sure to specify that you want to use the Free tier!
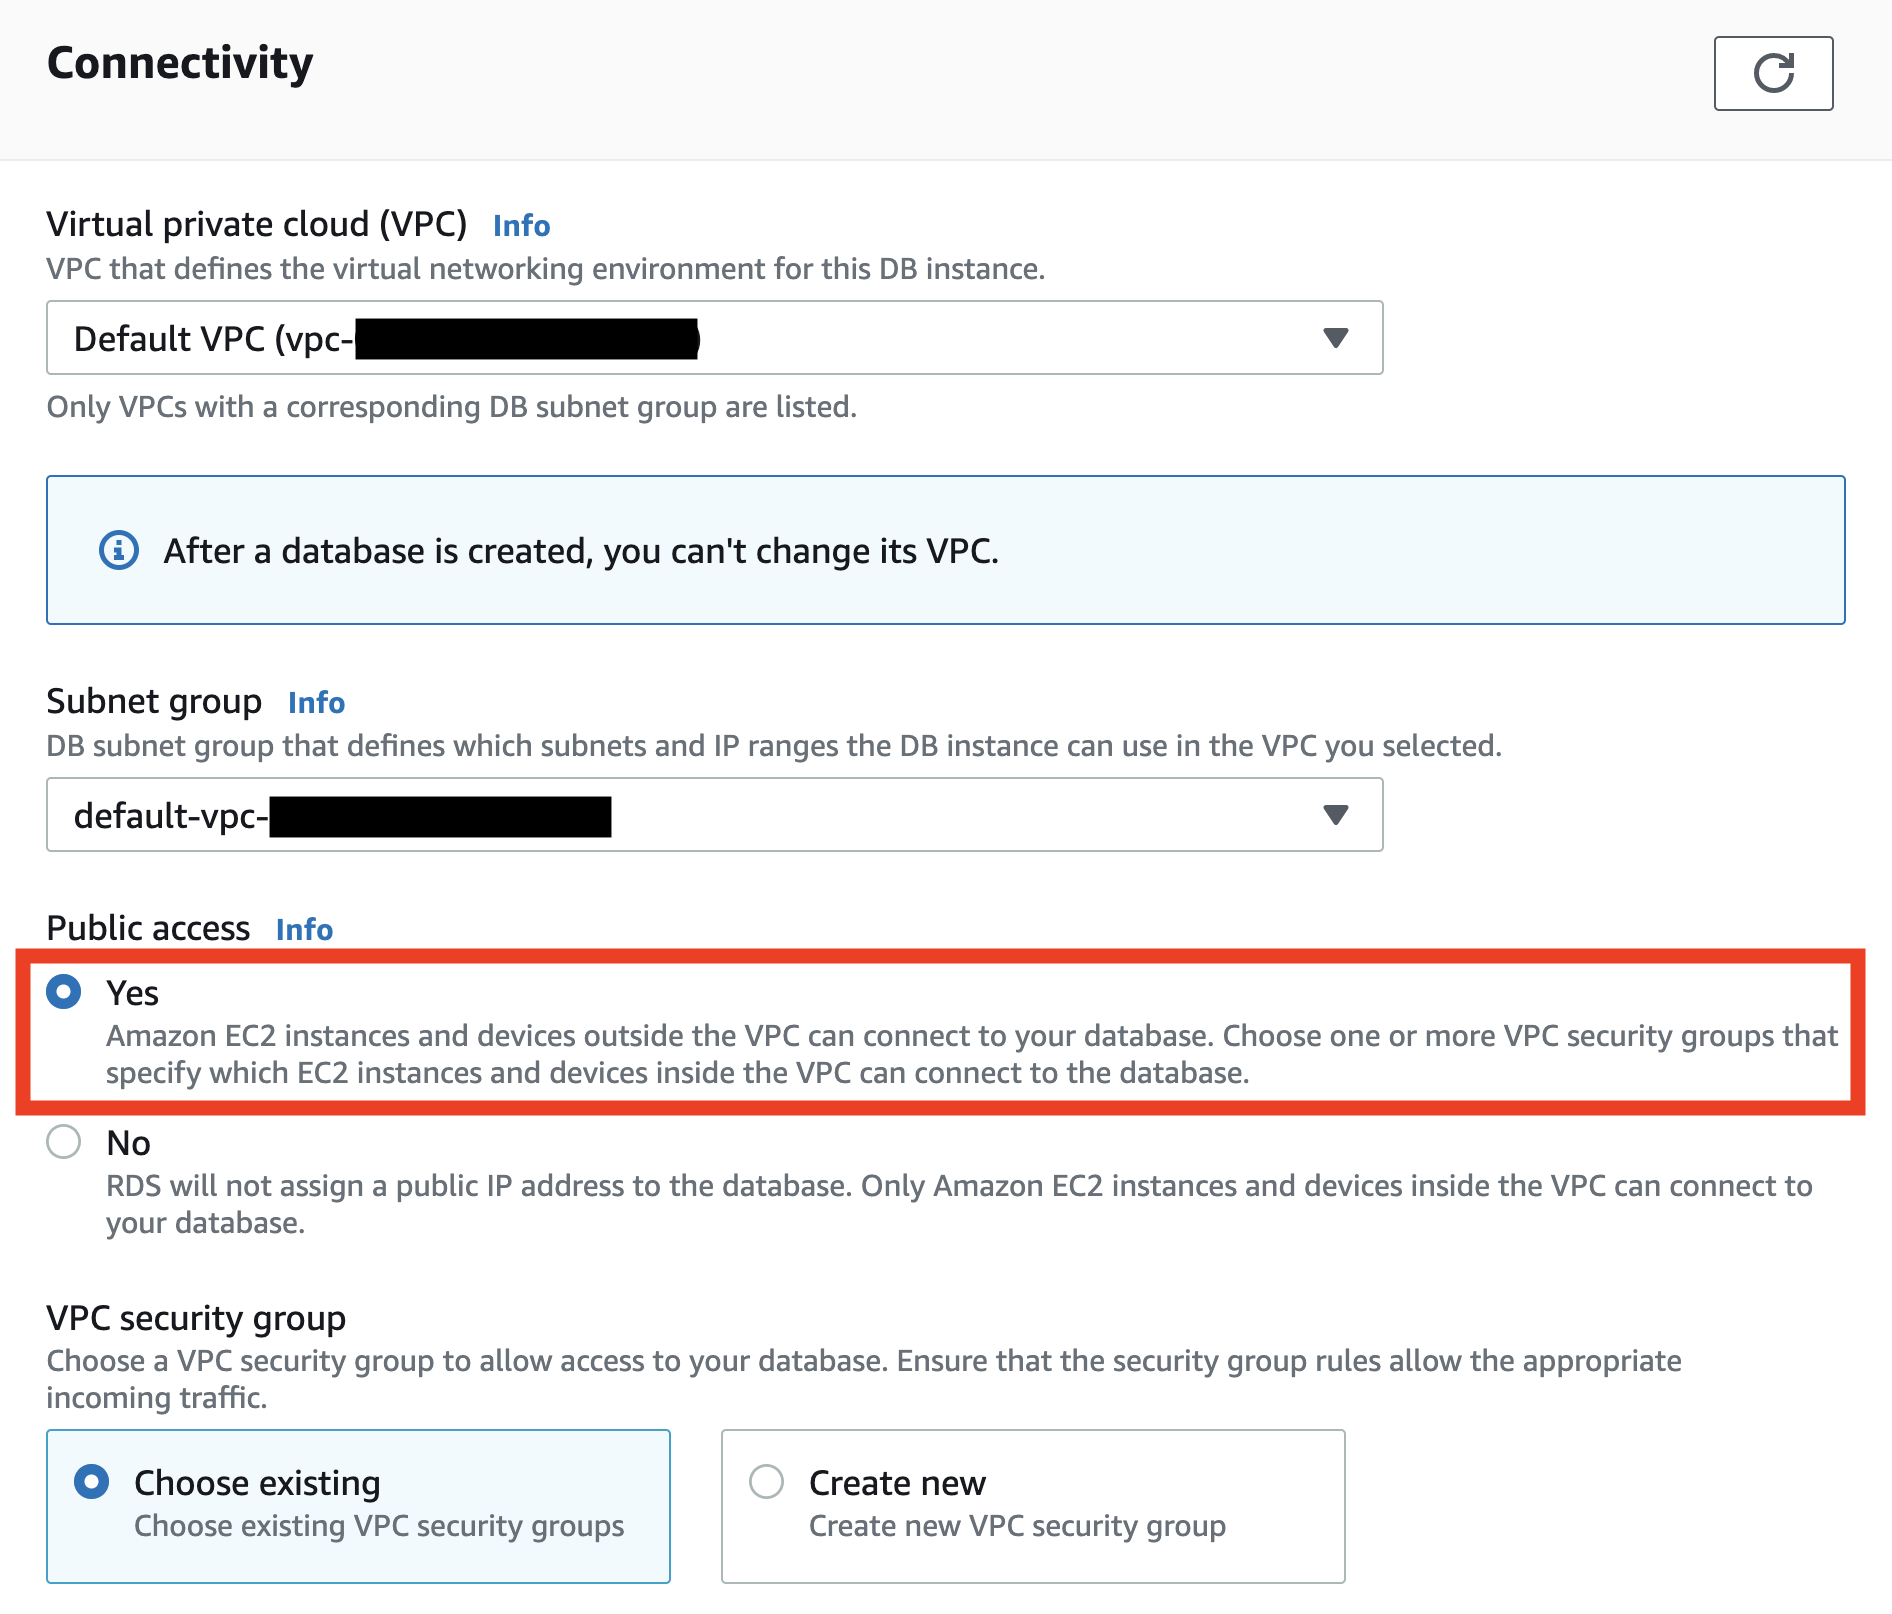
Name your database identifier and set a username – postgres is fine for both – and make sure to write down your password somewhere secure. Disable autoscaling (under “Storage”) and select yes for public access. Our database won’t be truly open to the world, don’t worry – we’ll still require a password to access the database. (For a professional application, though, you’ll want to configure a VPC.)
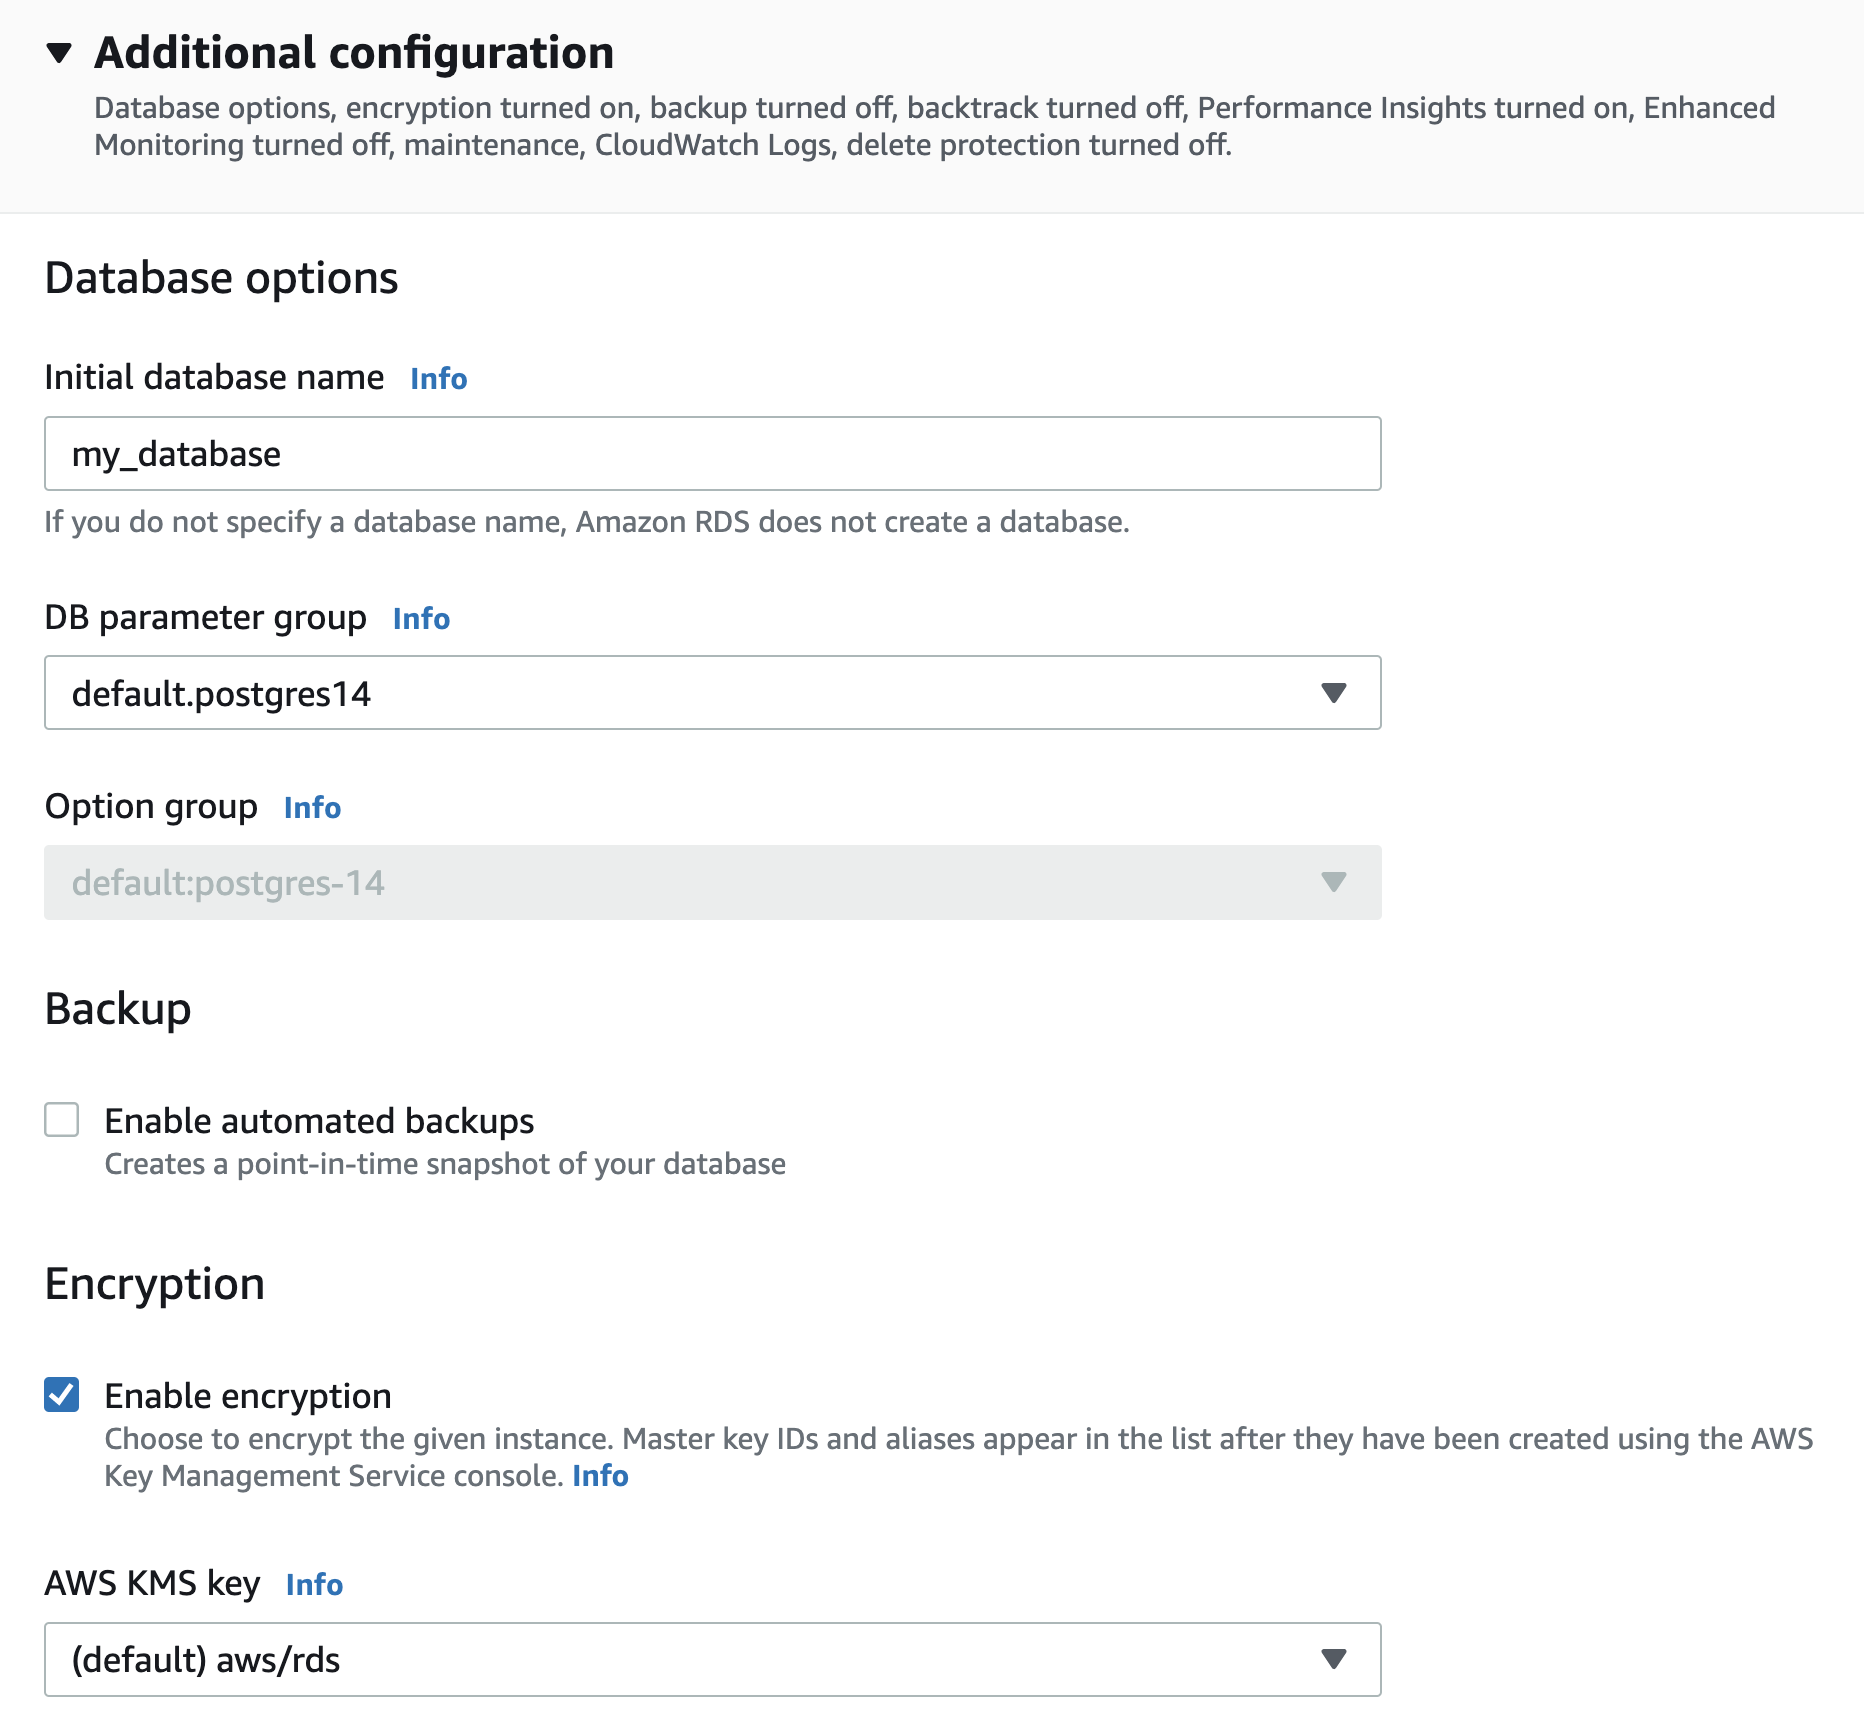
Under “Additional configuration”, name your initial DB my_database, then disable automated backups, performance insights, and minor version upgrades. Everything else in the configuration can stay the same.
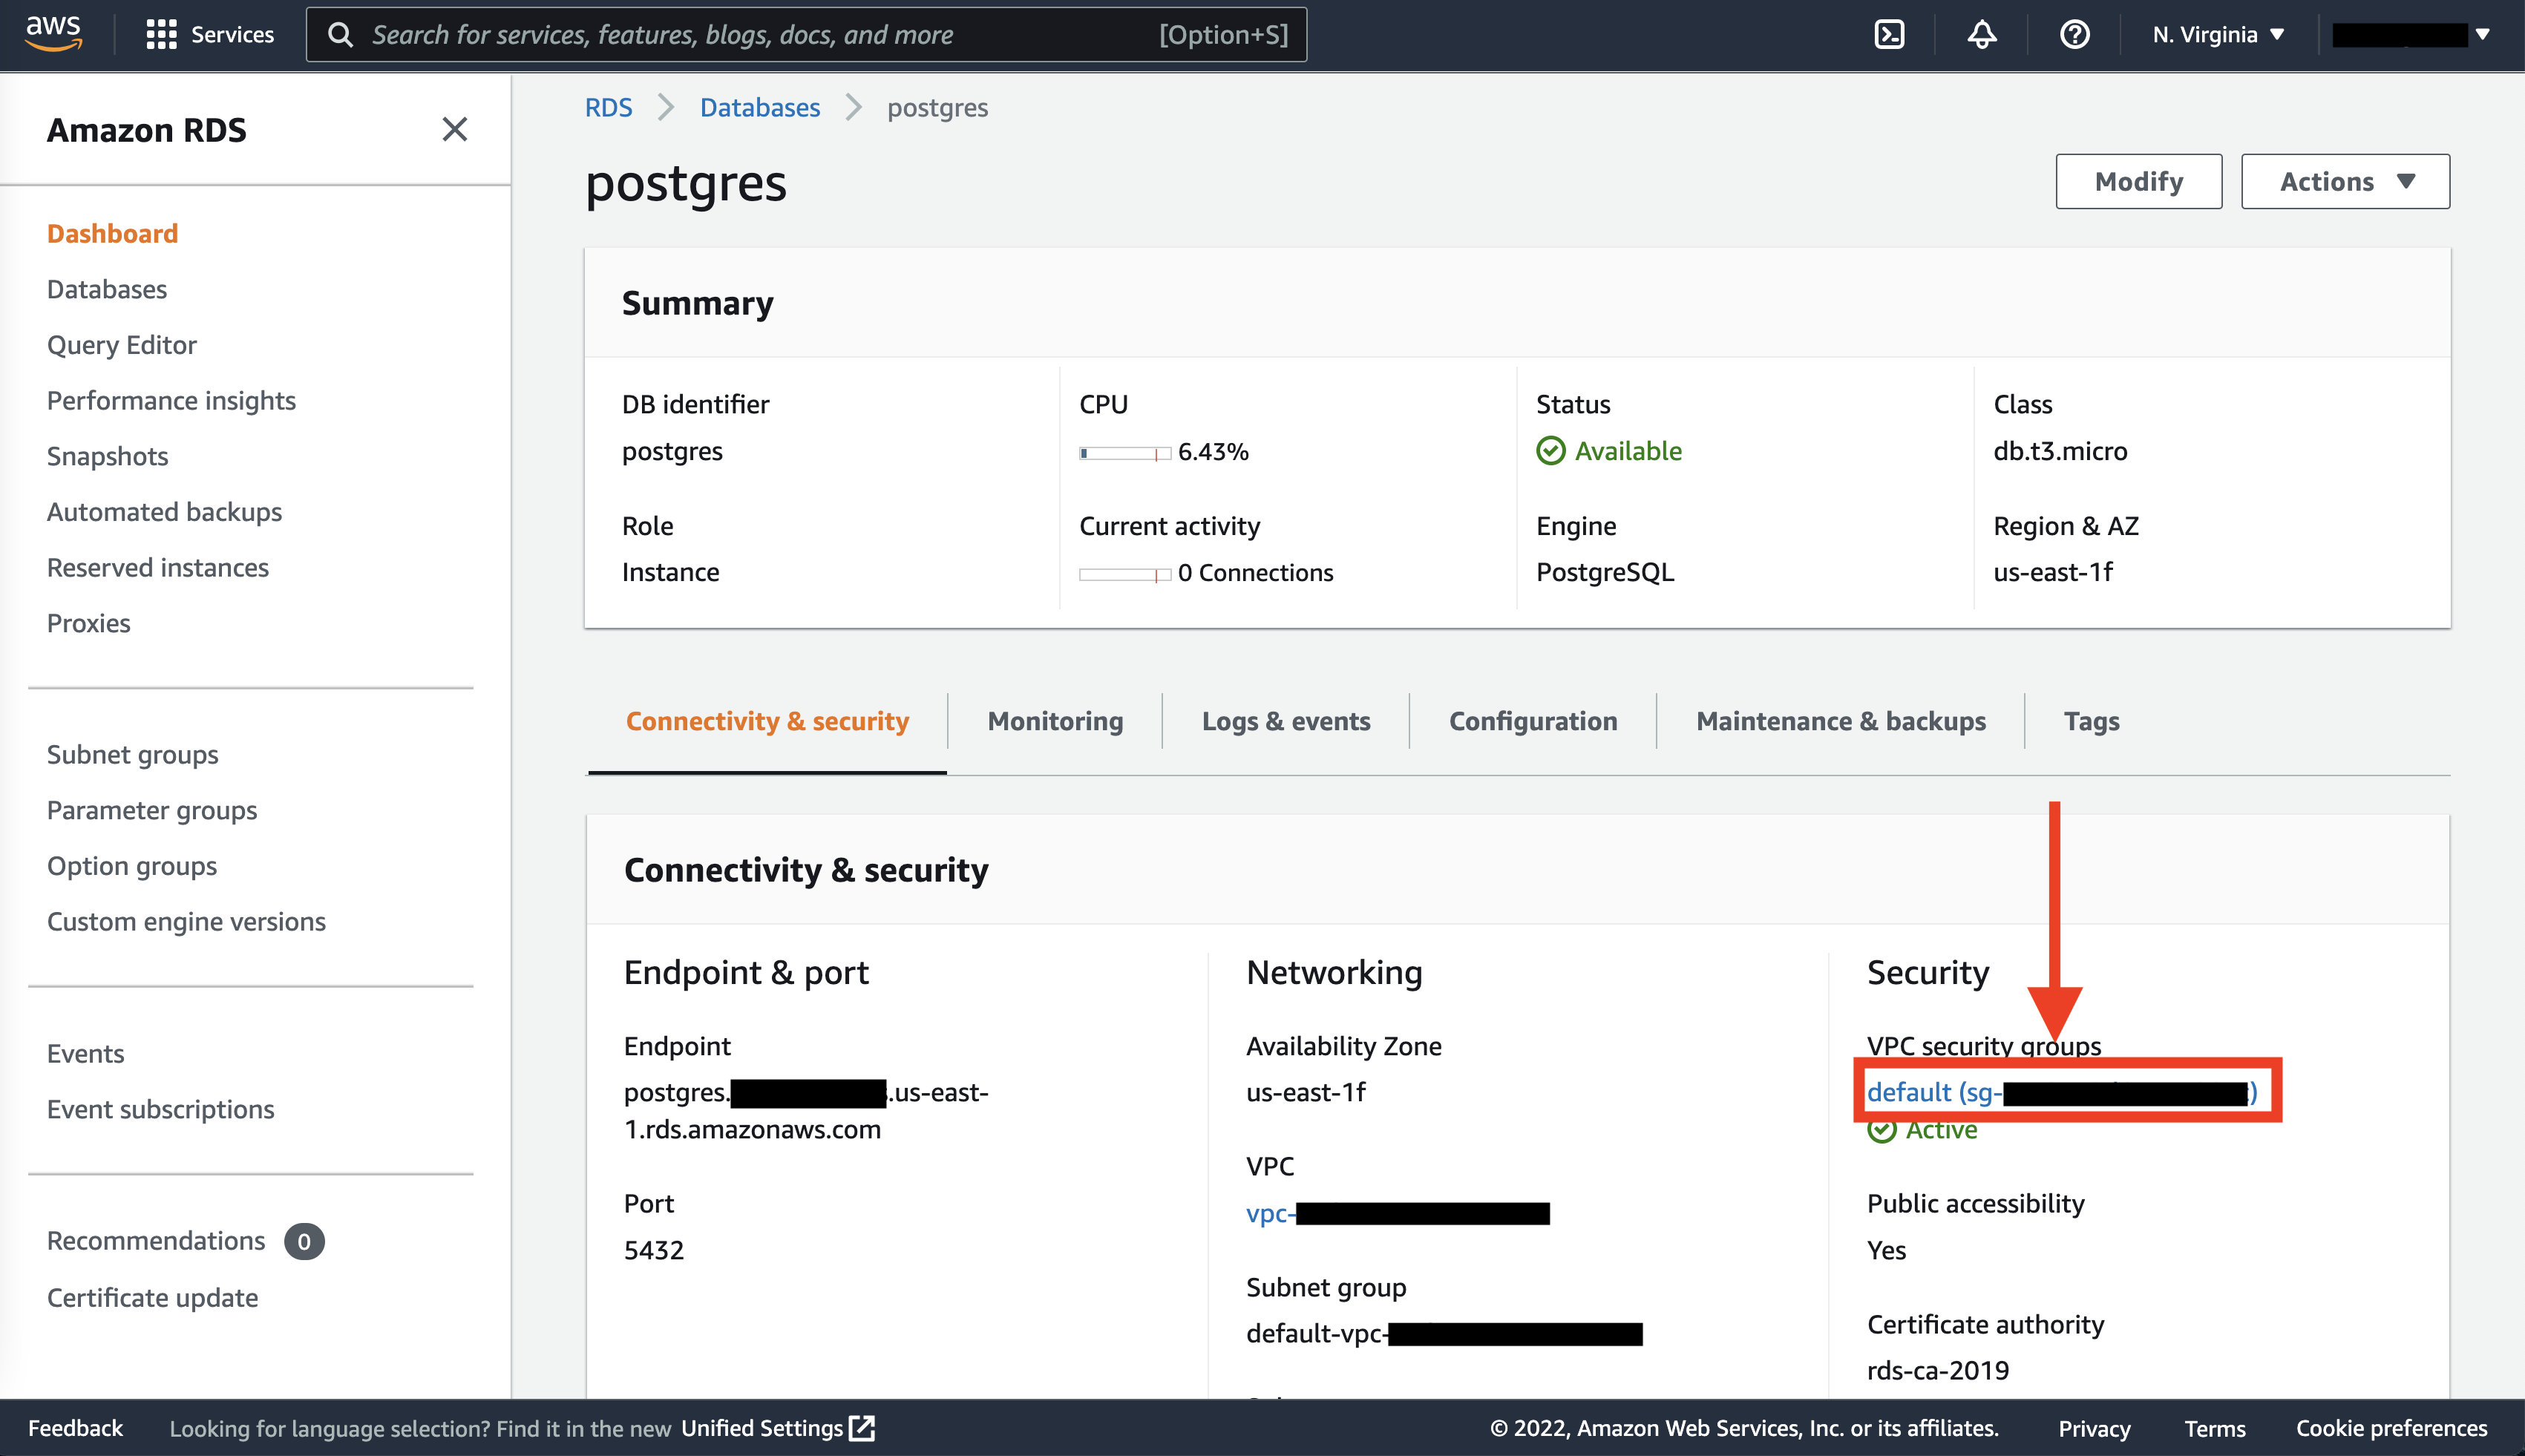
When we hit Create database, we’re taken back to the RDS landing page and see that our database is being created. Once it’s finished, you can click on the instance and be taken to the following page. On this page, click on the VPC security group link under “Security”.
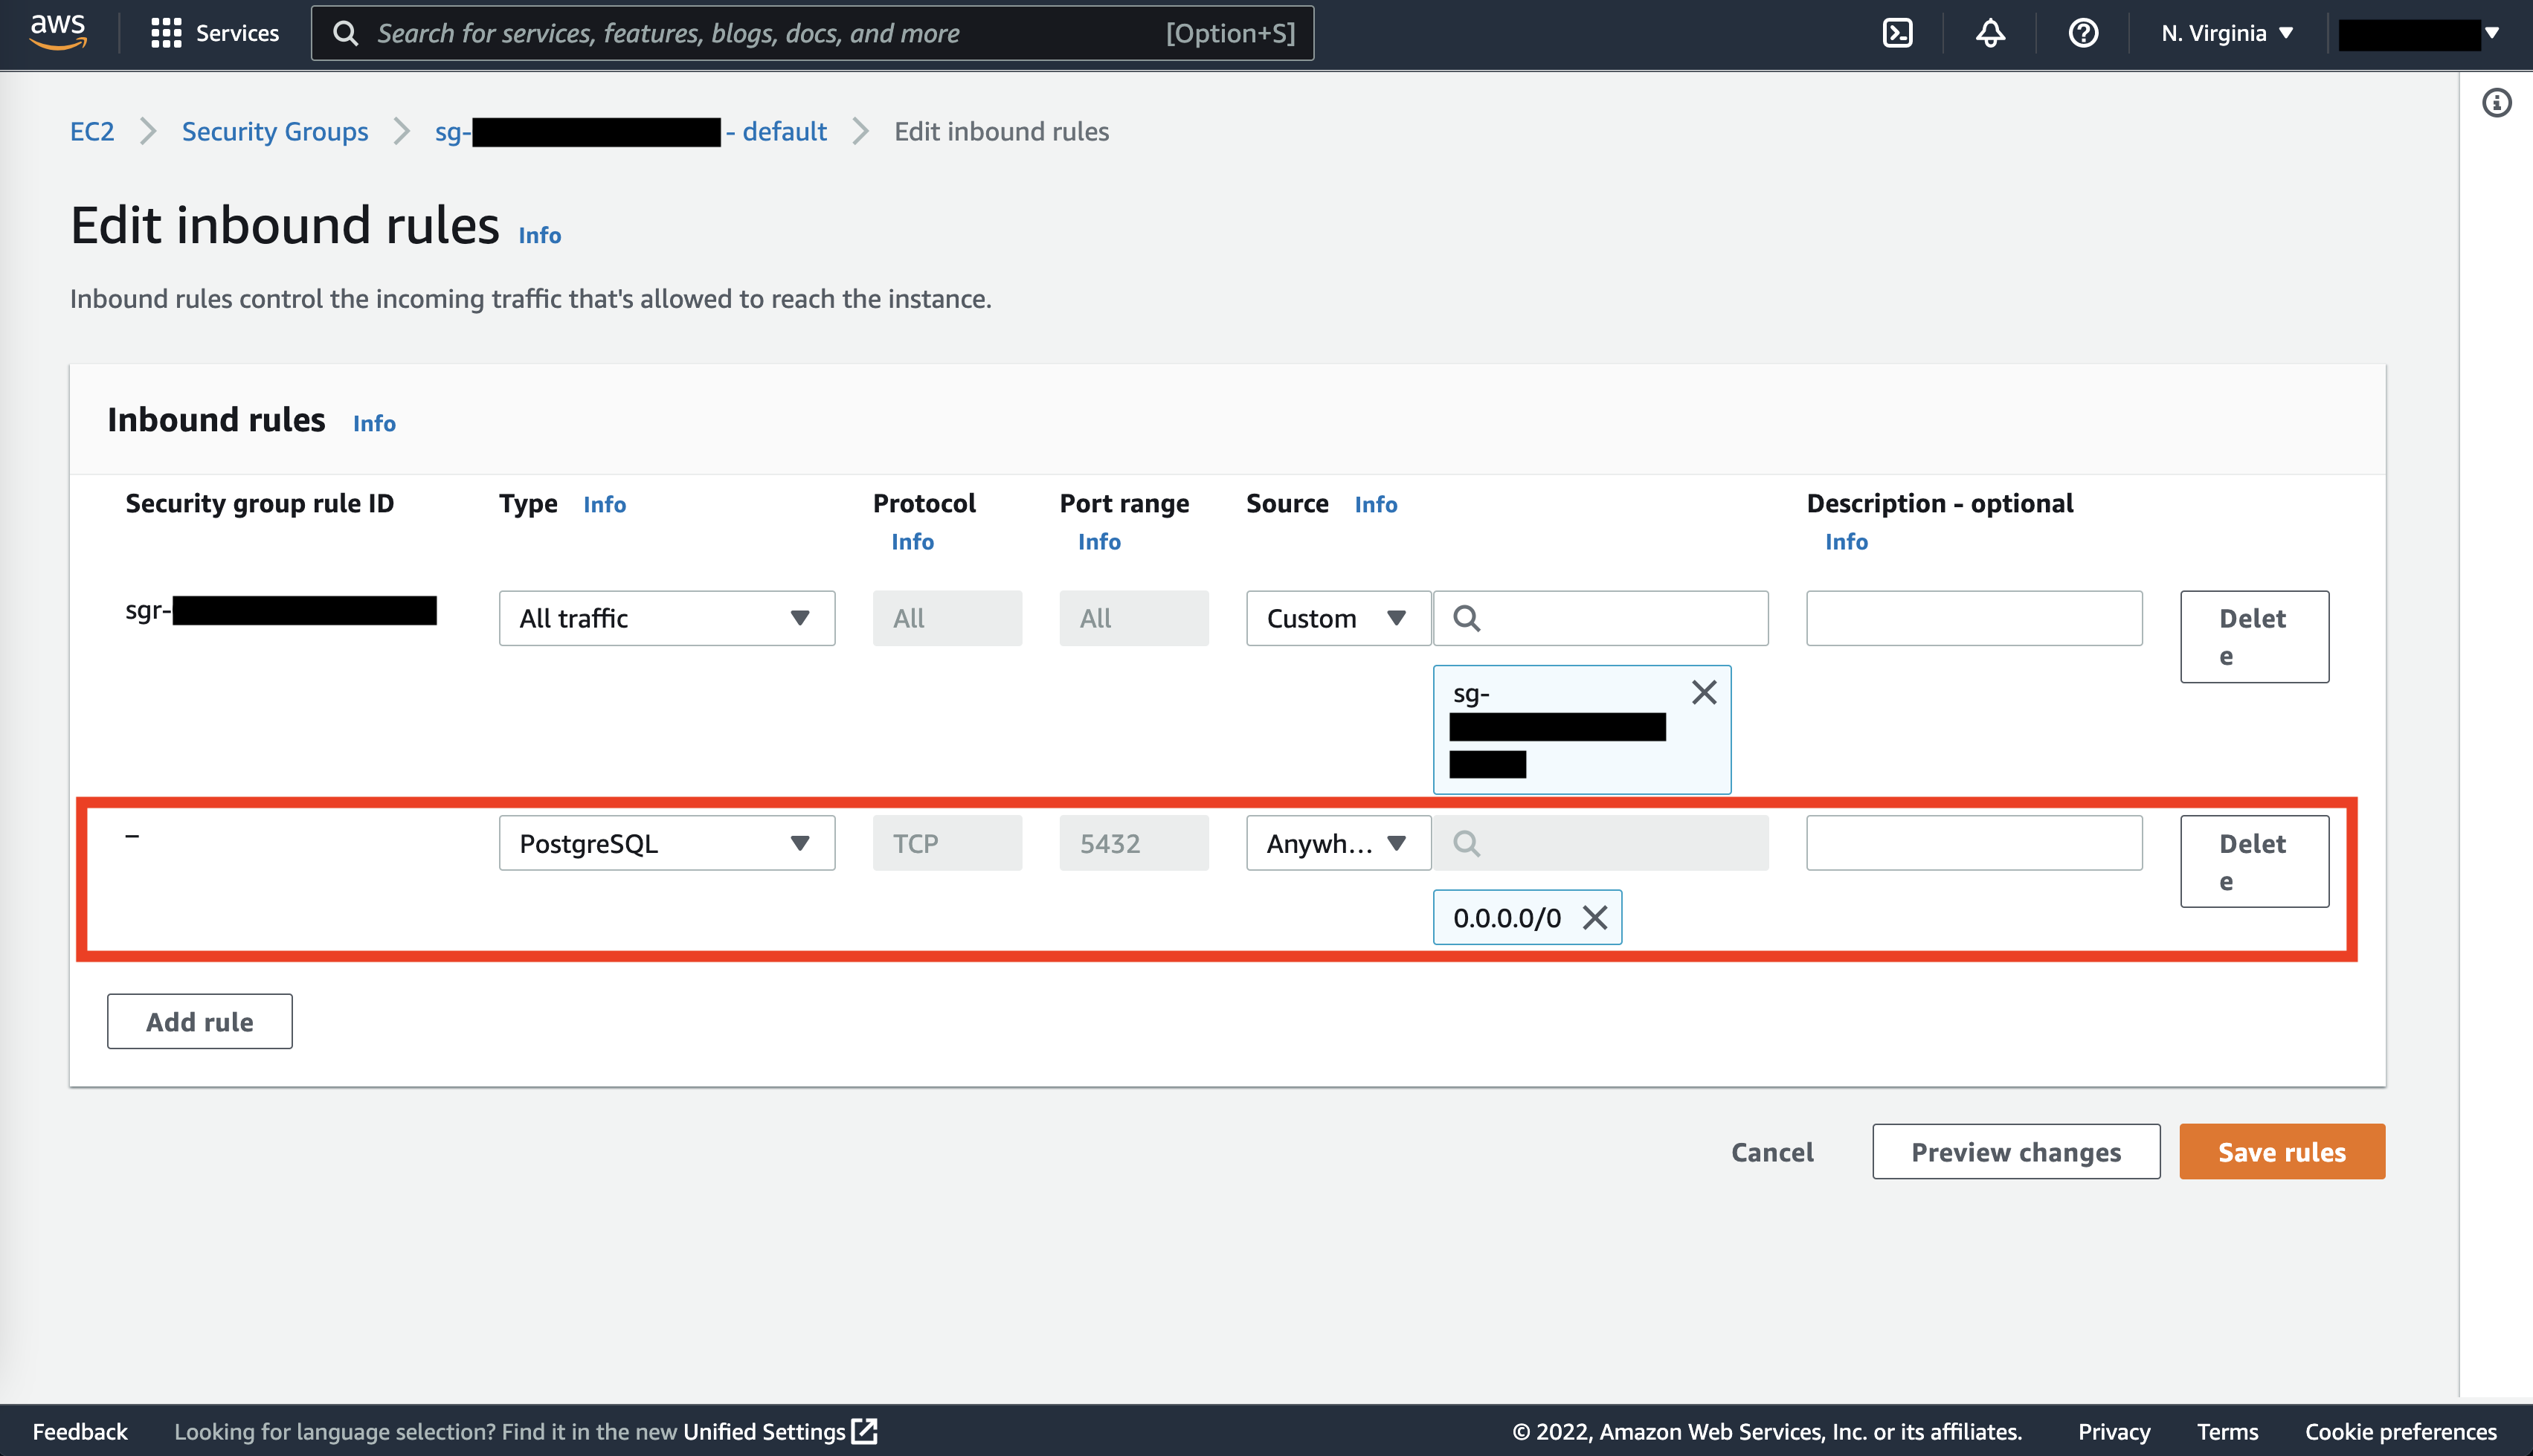
Here, we can scroll down to the Inbound rules tab and click Edit inbound rules, then Add rule. Select “PostgreSQL” for Type and “Anywhere-IPv4” for Source. (Friendly reminder to not do this for a production database!) You can also be more secure by specifying your IP address instead. Once you’re done, click Save rules.
Now do the same for outbound rules: click on the Outbound rules tab, Edit outbound rules, Add rule, “PostgreSQL” for Type and “Anywhere-IPv4” (or your IP address) for Destination, and then Save rules.
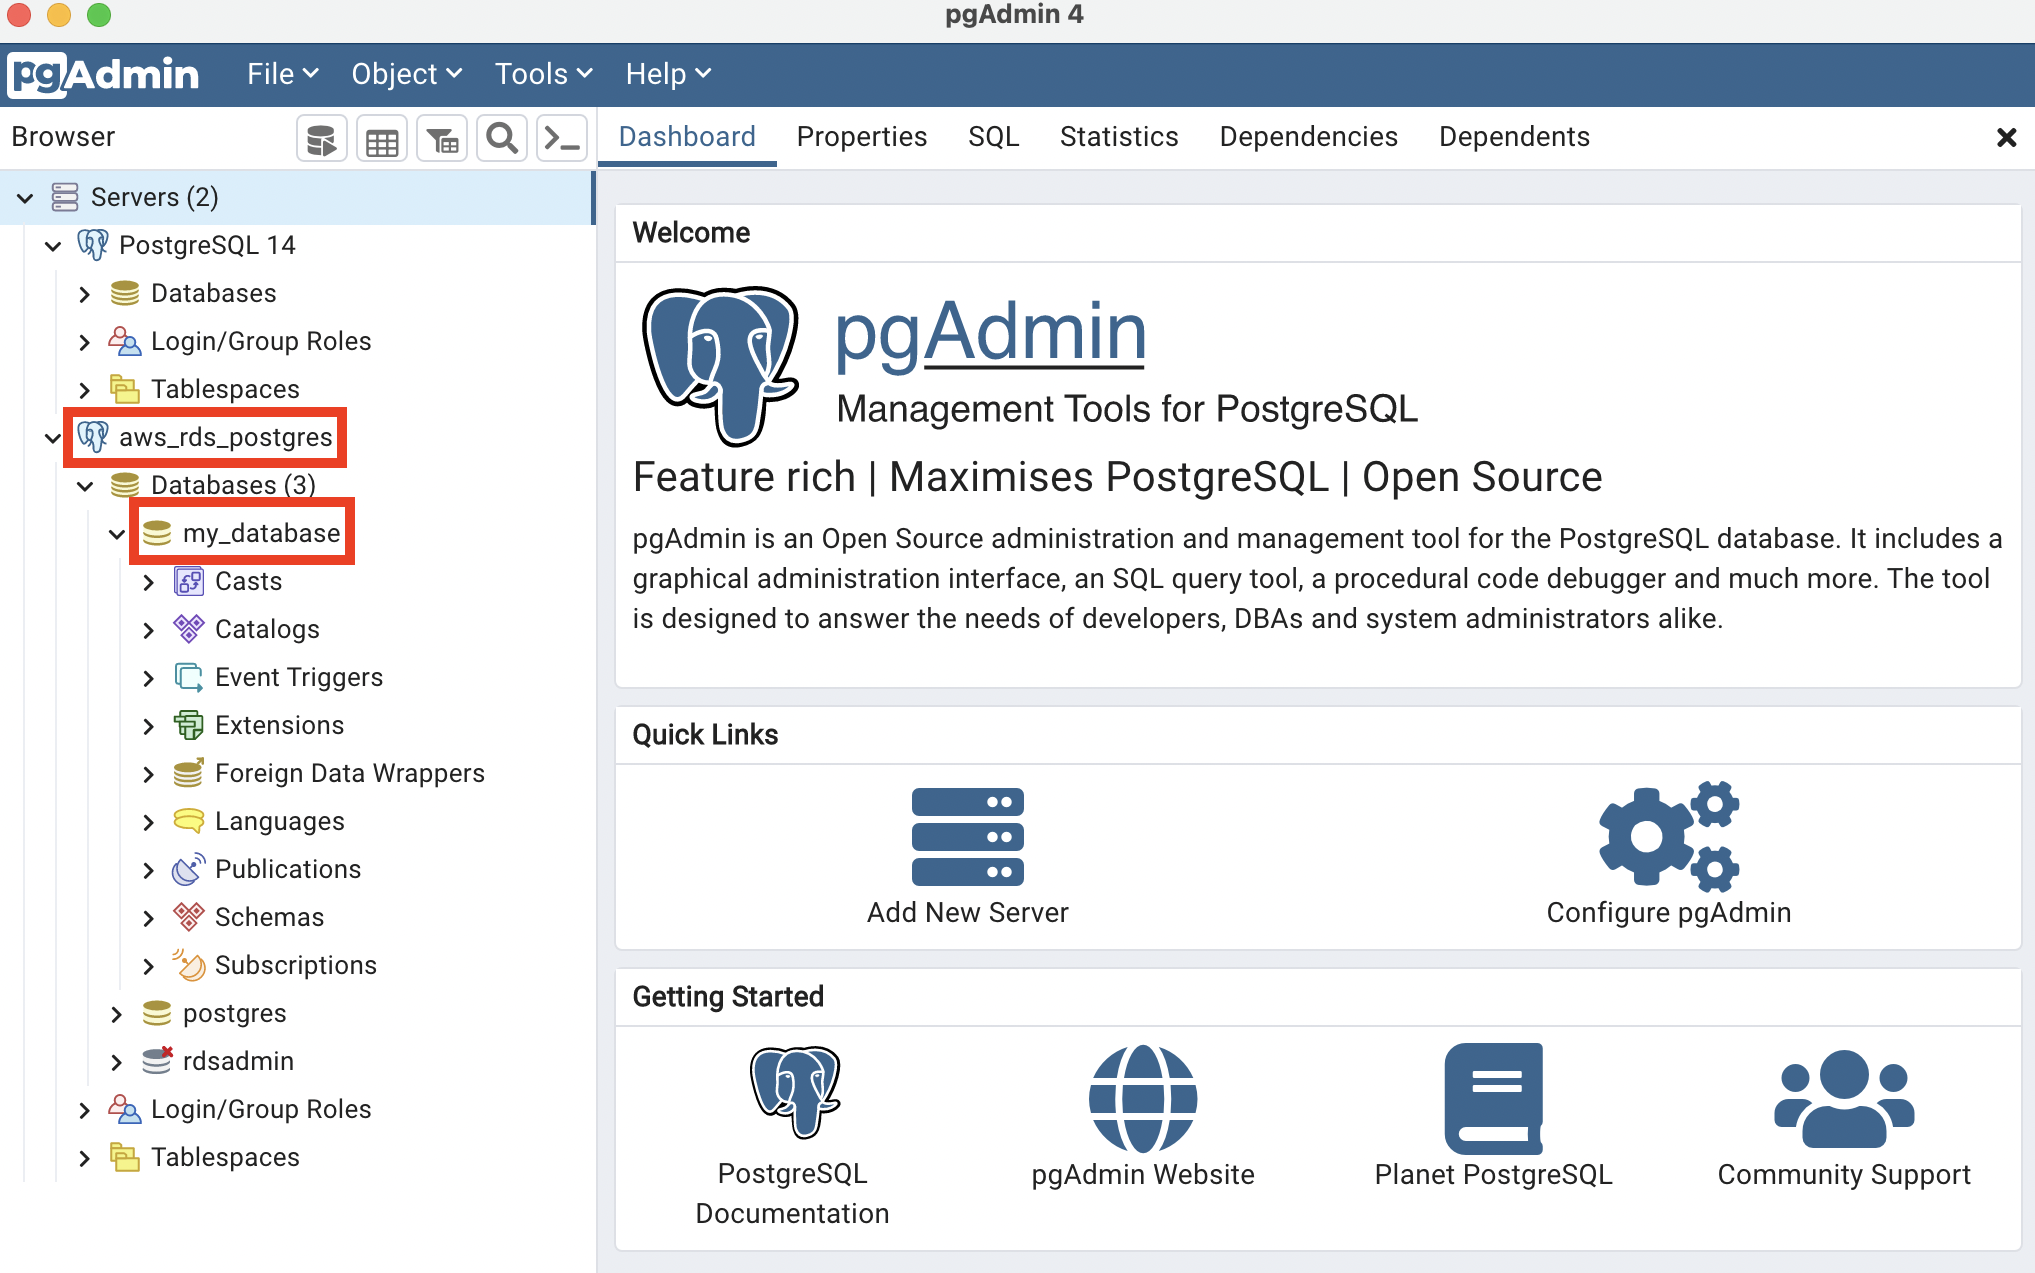
We’ll now access our database from pgAdmin. Under the Connectivity & security tab in AWS RDS, copy the endpoint address. (It’ll look something like postgres.abcdef.us-east-1.rds.amazonaws.com.) Then open pgAdmin, right click on Servers > Register > Server. Name the connection something like aws_rds_postgres and paste the endpoint address in the Hostname/Address field. Fill out your password and click “Save password”.
If all goes well, you should see the aws_rds_postgres server and my_database database.
Right click on my_database, then on Query Tool and type the following:
| SQL |
1
2
3
4
5
6
7
8
9
10
11
CREATE TABLE users (
    id INT PRIMARY KEY GENERATED ALWAYS AS IDENTITY,
    first_name VARCHAR(100),
    last_name VARCHAR(100),
    age INT
);

INSERT INTO users
  (first_name, last_name, age)
VALUES
  ('Matt', 'Sosna', 32);
Since we’re using the Free Tier, we unfortunately can only query our database through pgAdmin, as opposed to the AWS console or boto3. (Though we can make changes to the database itself.) But just to make sure the above operation worked, type the following in pgAdmin to confirm we can query our database.
| SQL |
1
2
3
4
5
6
7
8
9
SELECT
  *
FROM users

/*
 id | first_name | last_name | age |
 -- | ---------- | --------- | --- |
  1 | Matt       | Sosna     |  32 |
*/
DynamoDB
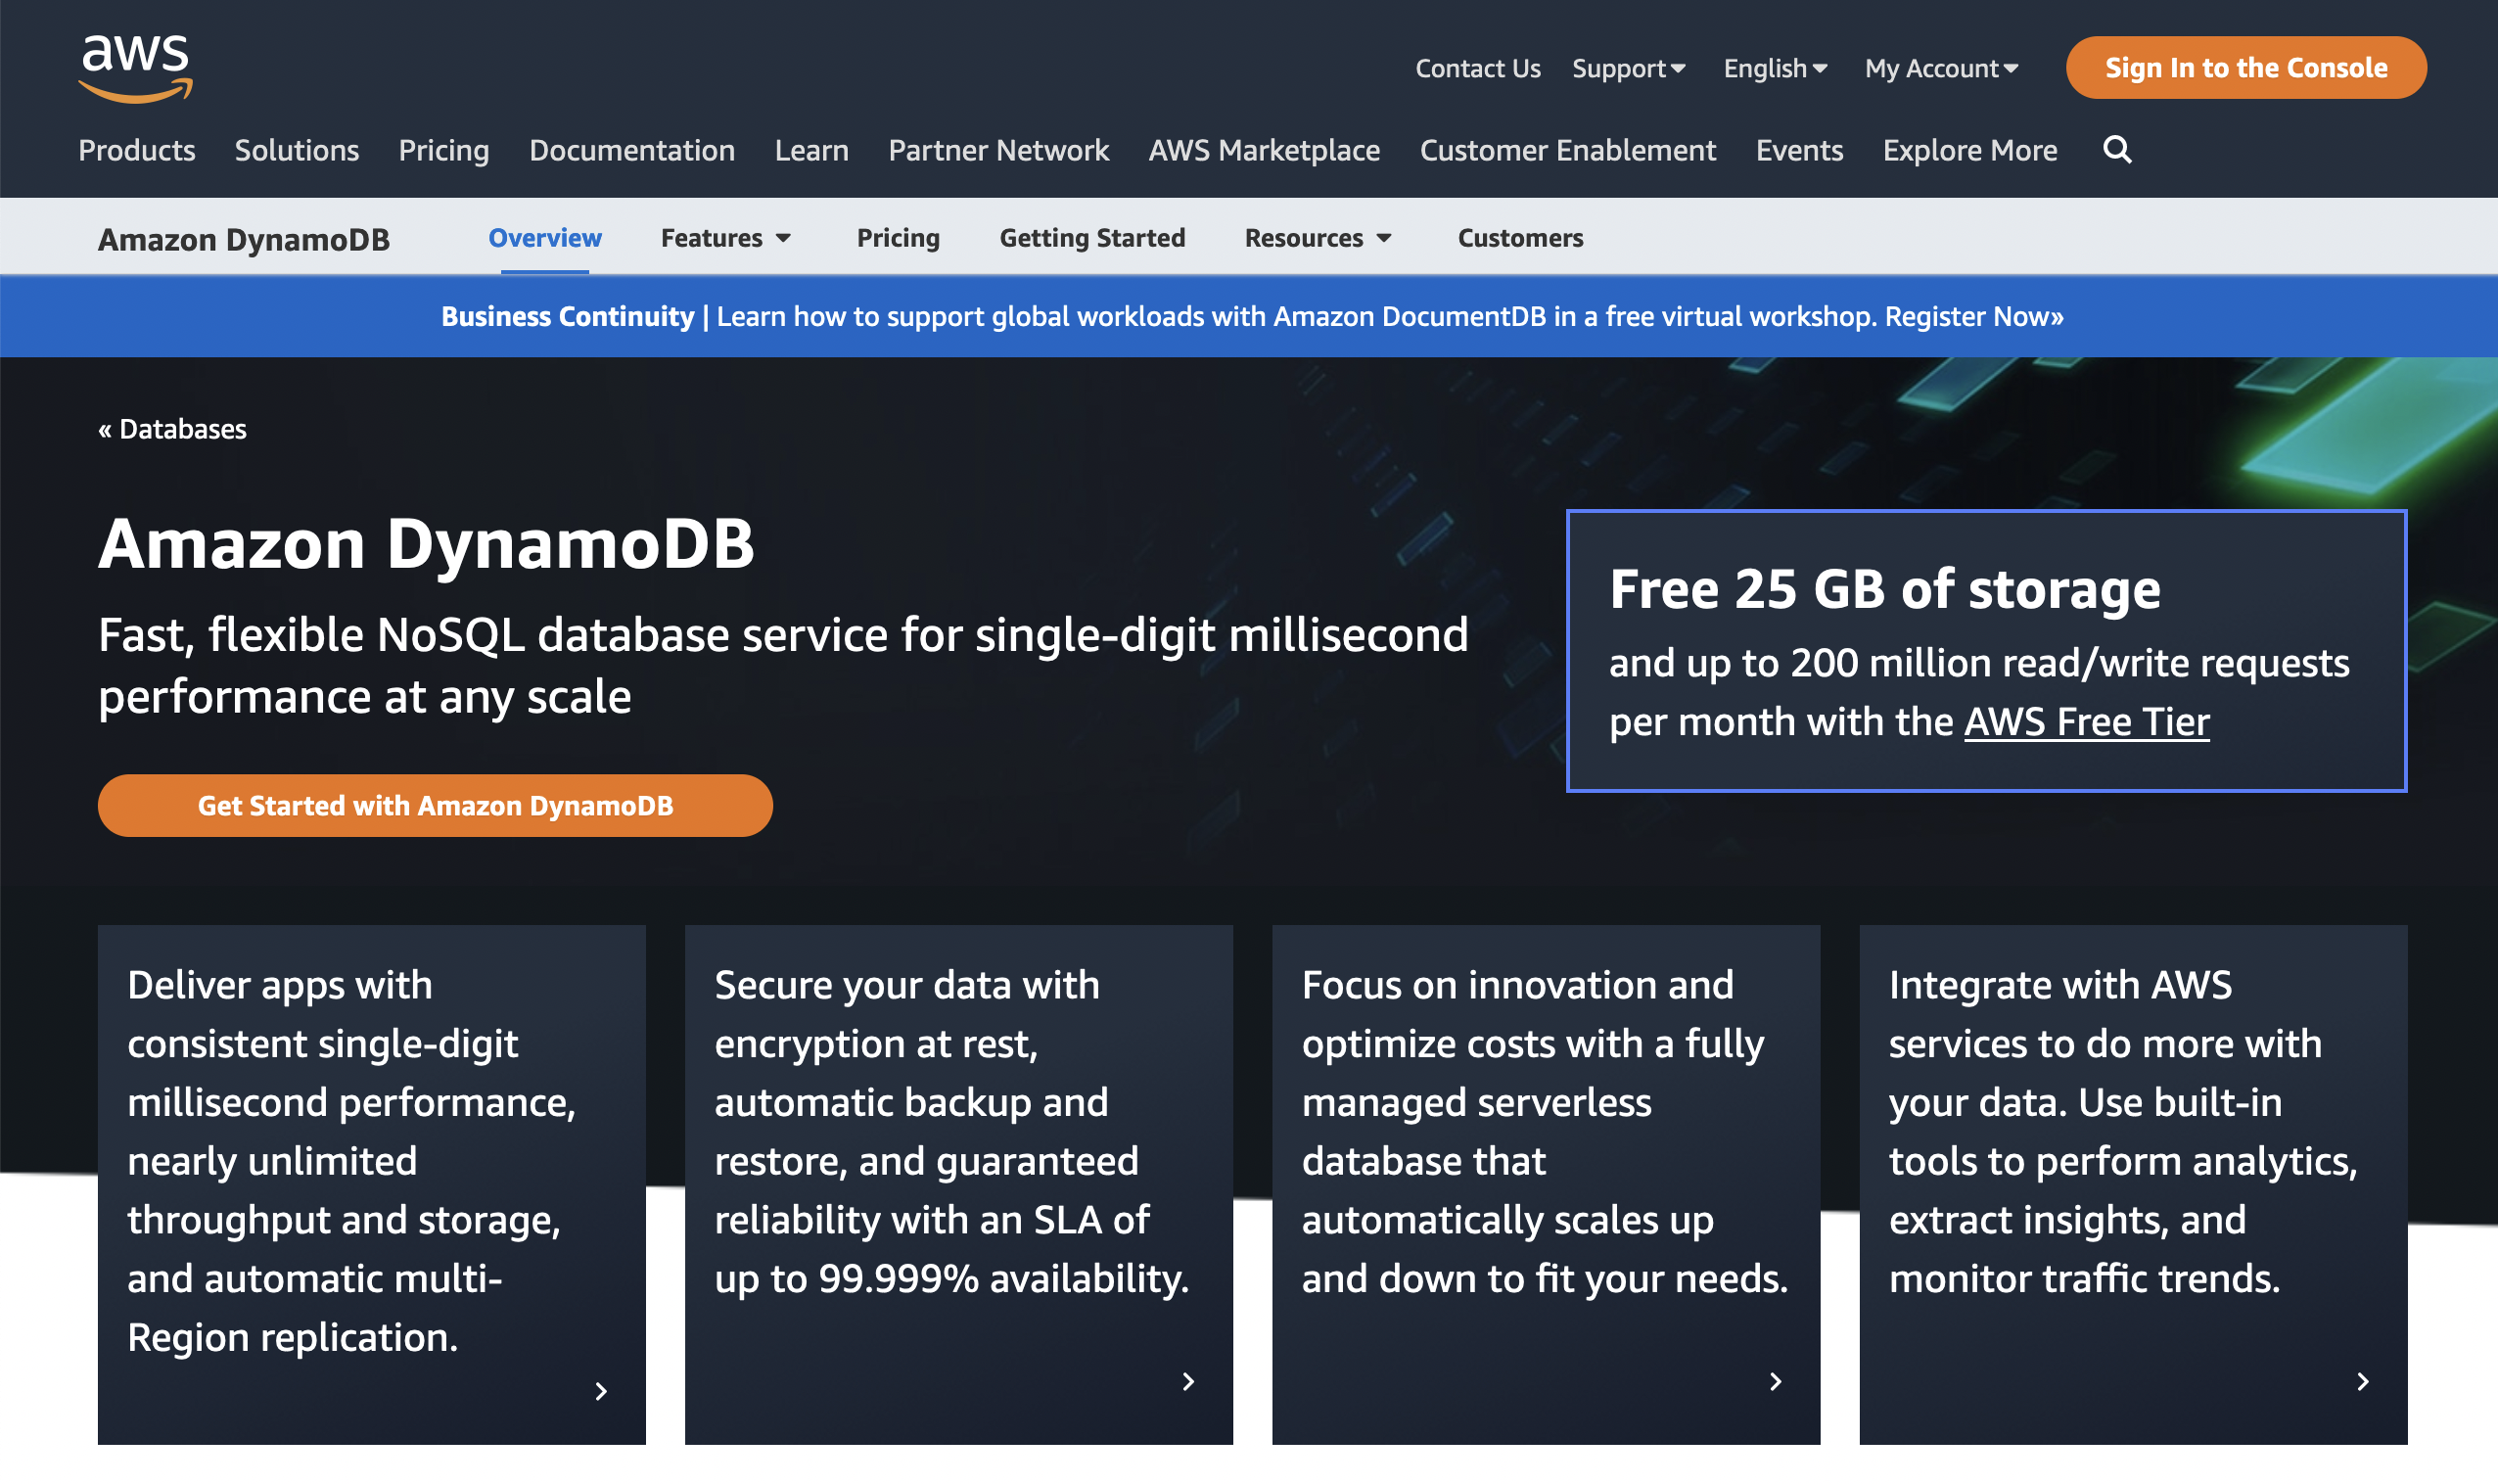
Let’s cover one last database type: non-relational databases. AWS offers DynamoDB for creating and querying NoSQL databases.
Thankfully, DynamoDB is much easier to set up than RDS. We’ll start by navigating to DynamoDB inside the AWS console and clicking the Create table button. Let’s create a table called users with id as a number partition key. Then, click Customize settings.
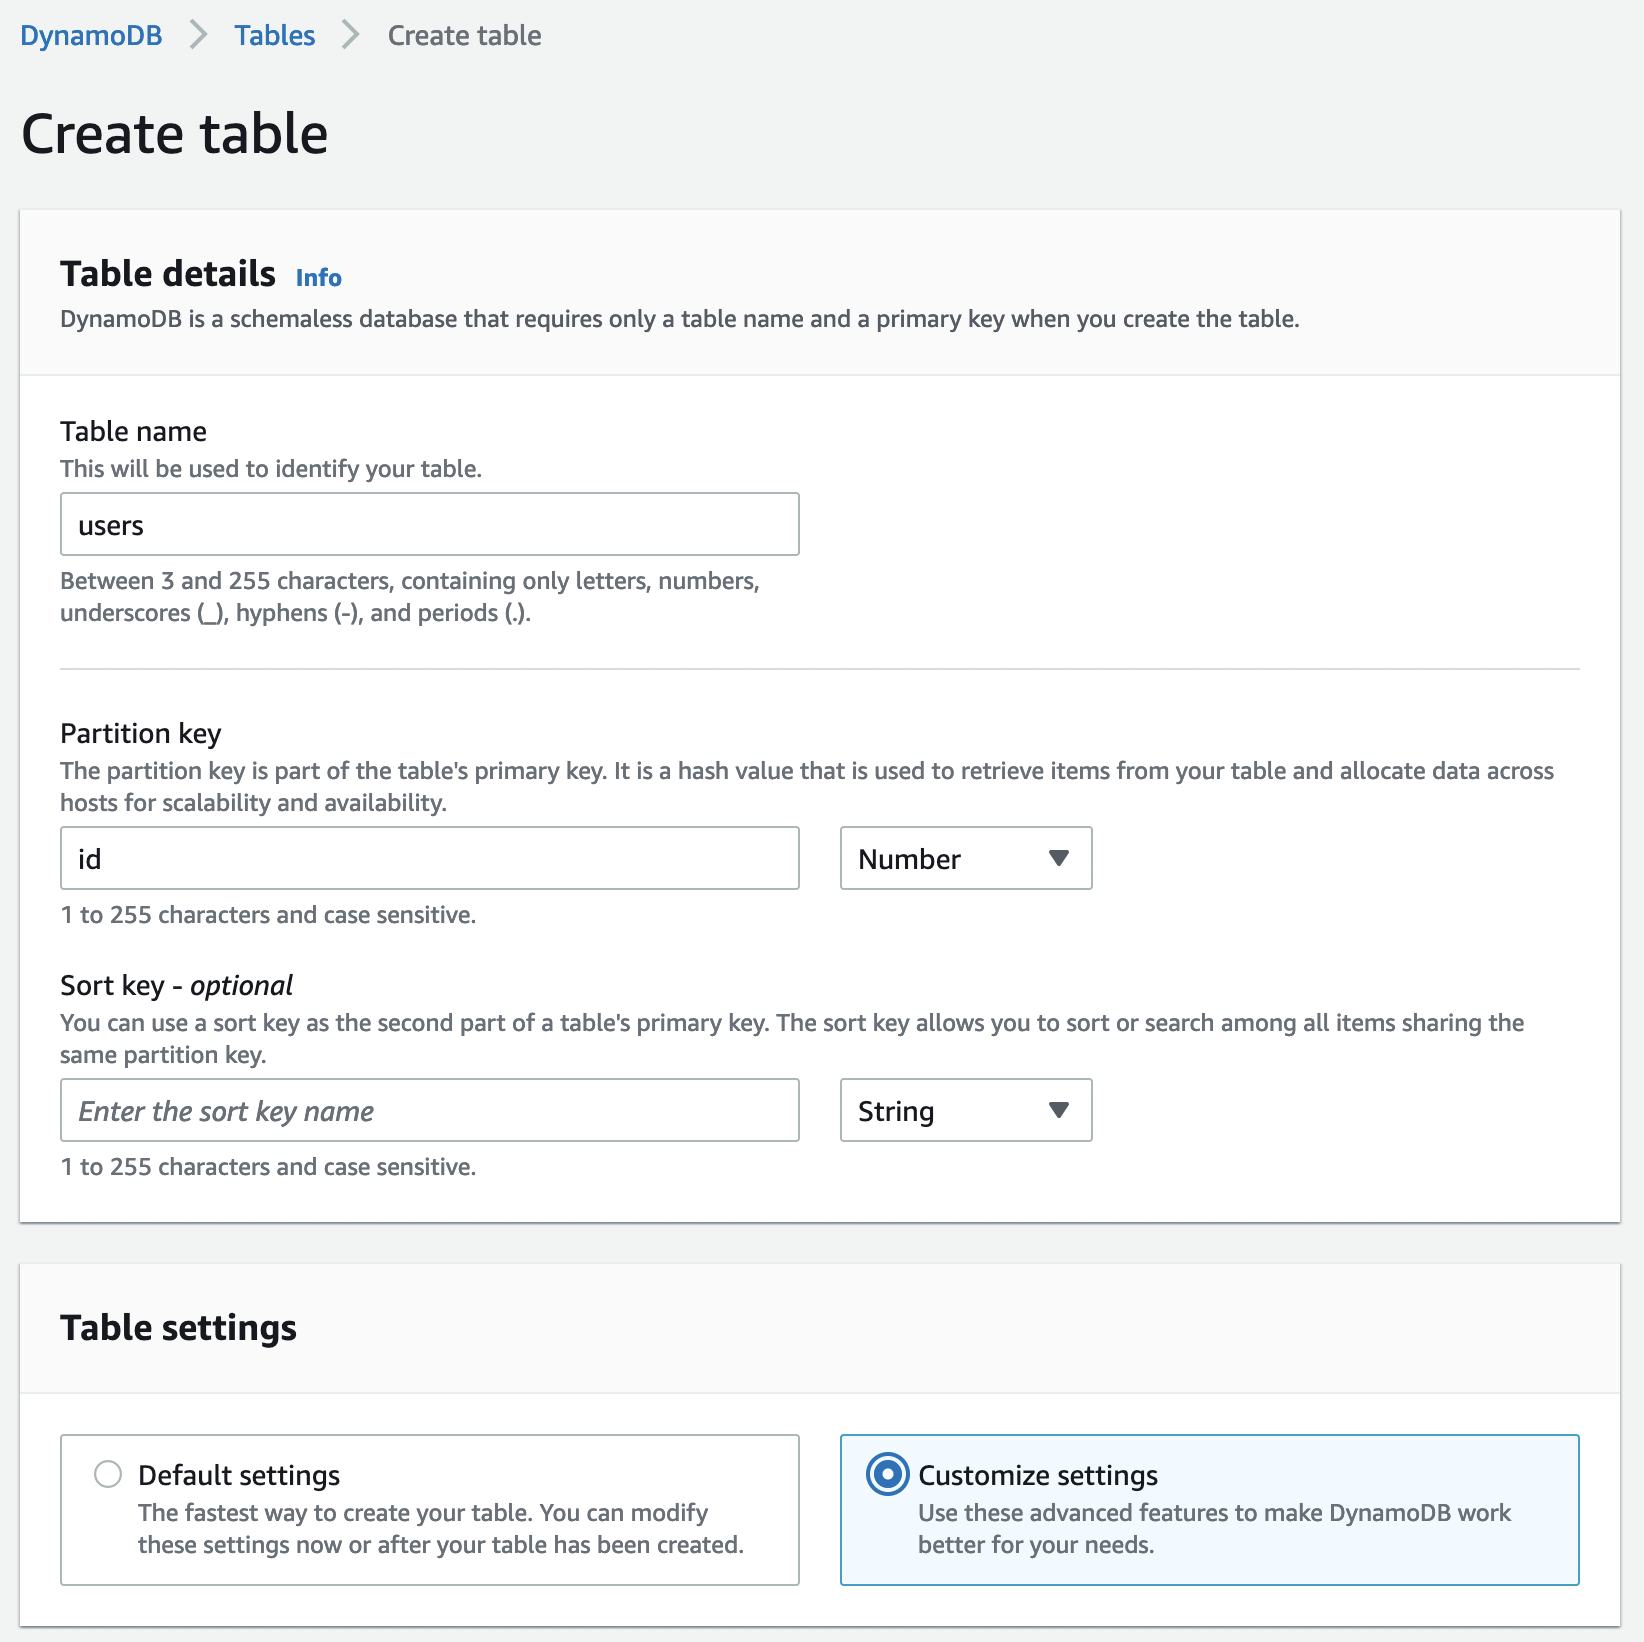
Select DynamoDB Standard as the table class and Provisioned capacity, then turn off auto-scaling for both reads and writes and reduce the number of provisioned capacity units to 1 each.
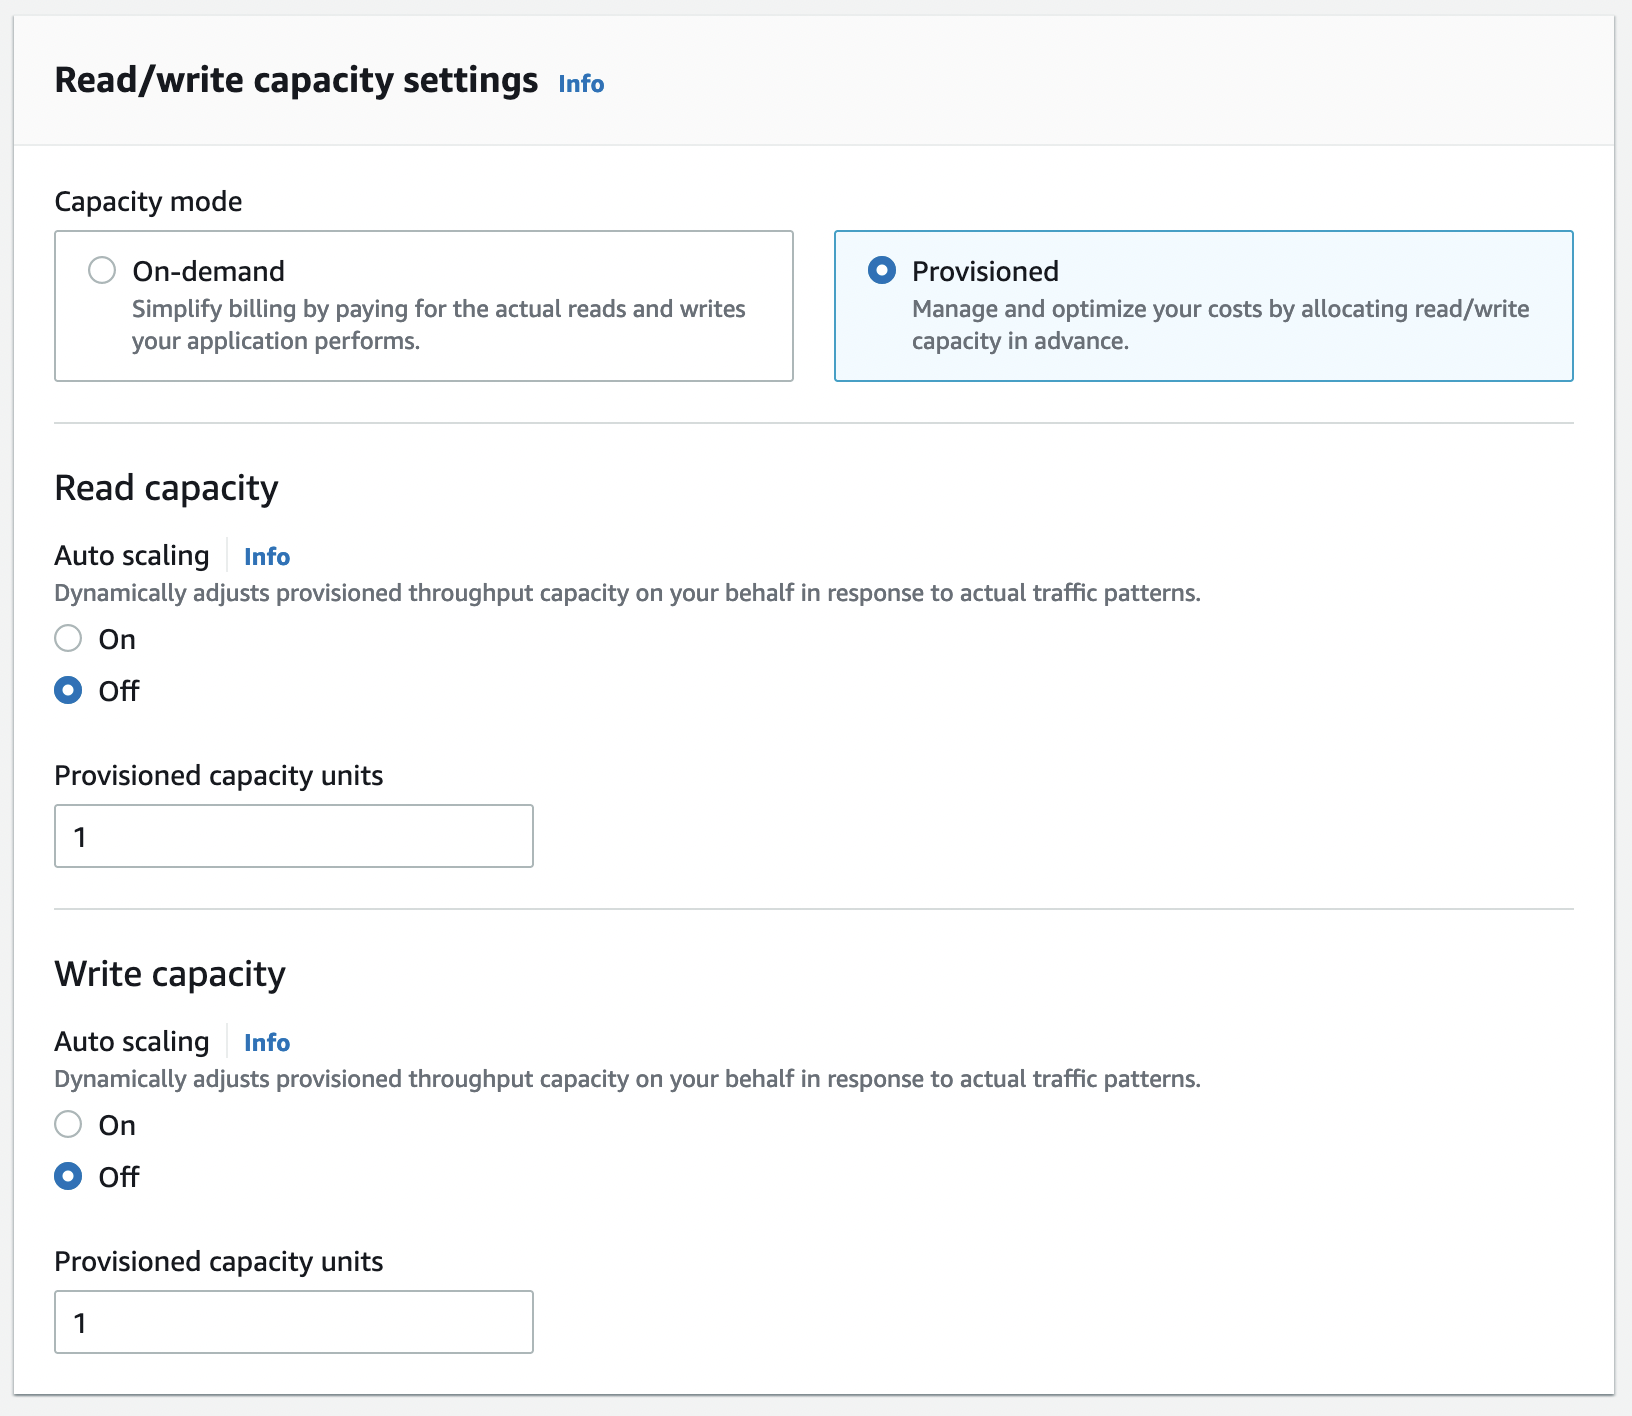
Leave encryption to be owned by Amazon DynamoDB, then click Create table.
And… that’s it! Let’s now navigate to Python to write to our table. In a Jupyter notebook or Python script, run the following:
| Python |
1
2
3
4
5
6
7
8
9
10
11
12
13
14
15
16
17
18
19
20
21
22
23
24
25
26
27
28
29
30
import boto3
import os

# Set up client
client = boto3.client(
    aws_access_key_id=os.environ['AWS_ACCESS_KEY_ID'],
    aws_secret_access_key=os.environ['AWS_SECRET_ACCESS_KEY'],
    region_name='us-east-1',
    service_name='dynamodb'
)

# Add an item to our table
response = client.put_item(
    TableName='users',
    Item = {
     'id': {'N': '123'},
     'first_name': {'S': 'matt'},
     'last_name': {'S': 'sosna'},
     'favorite_movies': {'SS': ['The Matrix', 'Tenet']}
       }
)

response = client.put_item(
    TableName='users',
    Item = {
     'id': {'N': '456'},
     'first_name': {'S': 'fireball'},
     'is_wizard': {'BOOL': True}
       }
)
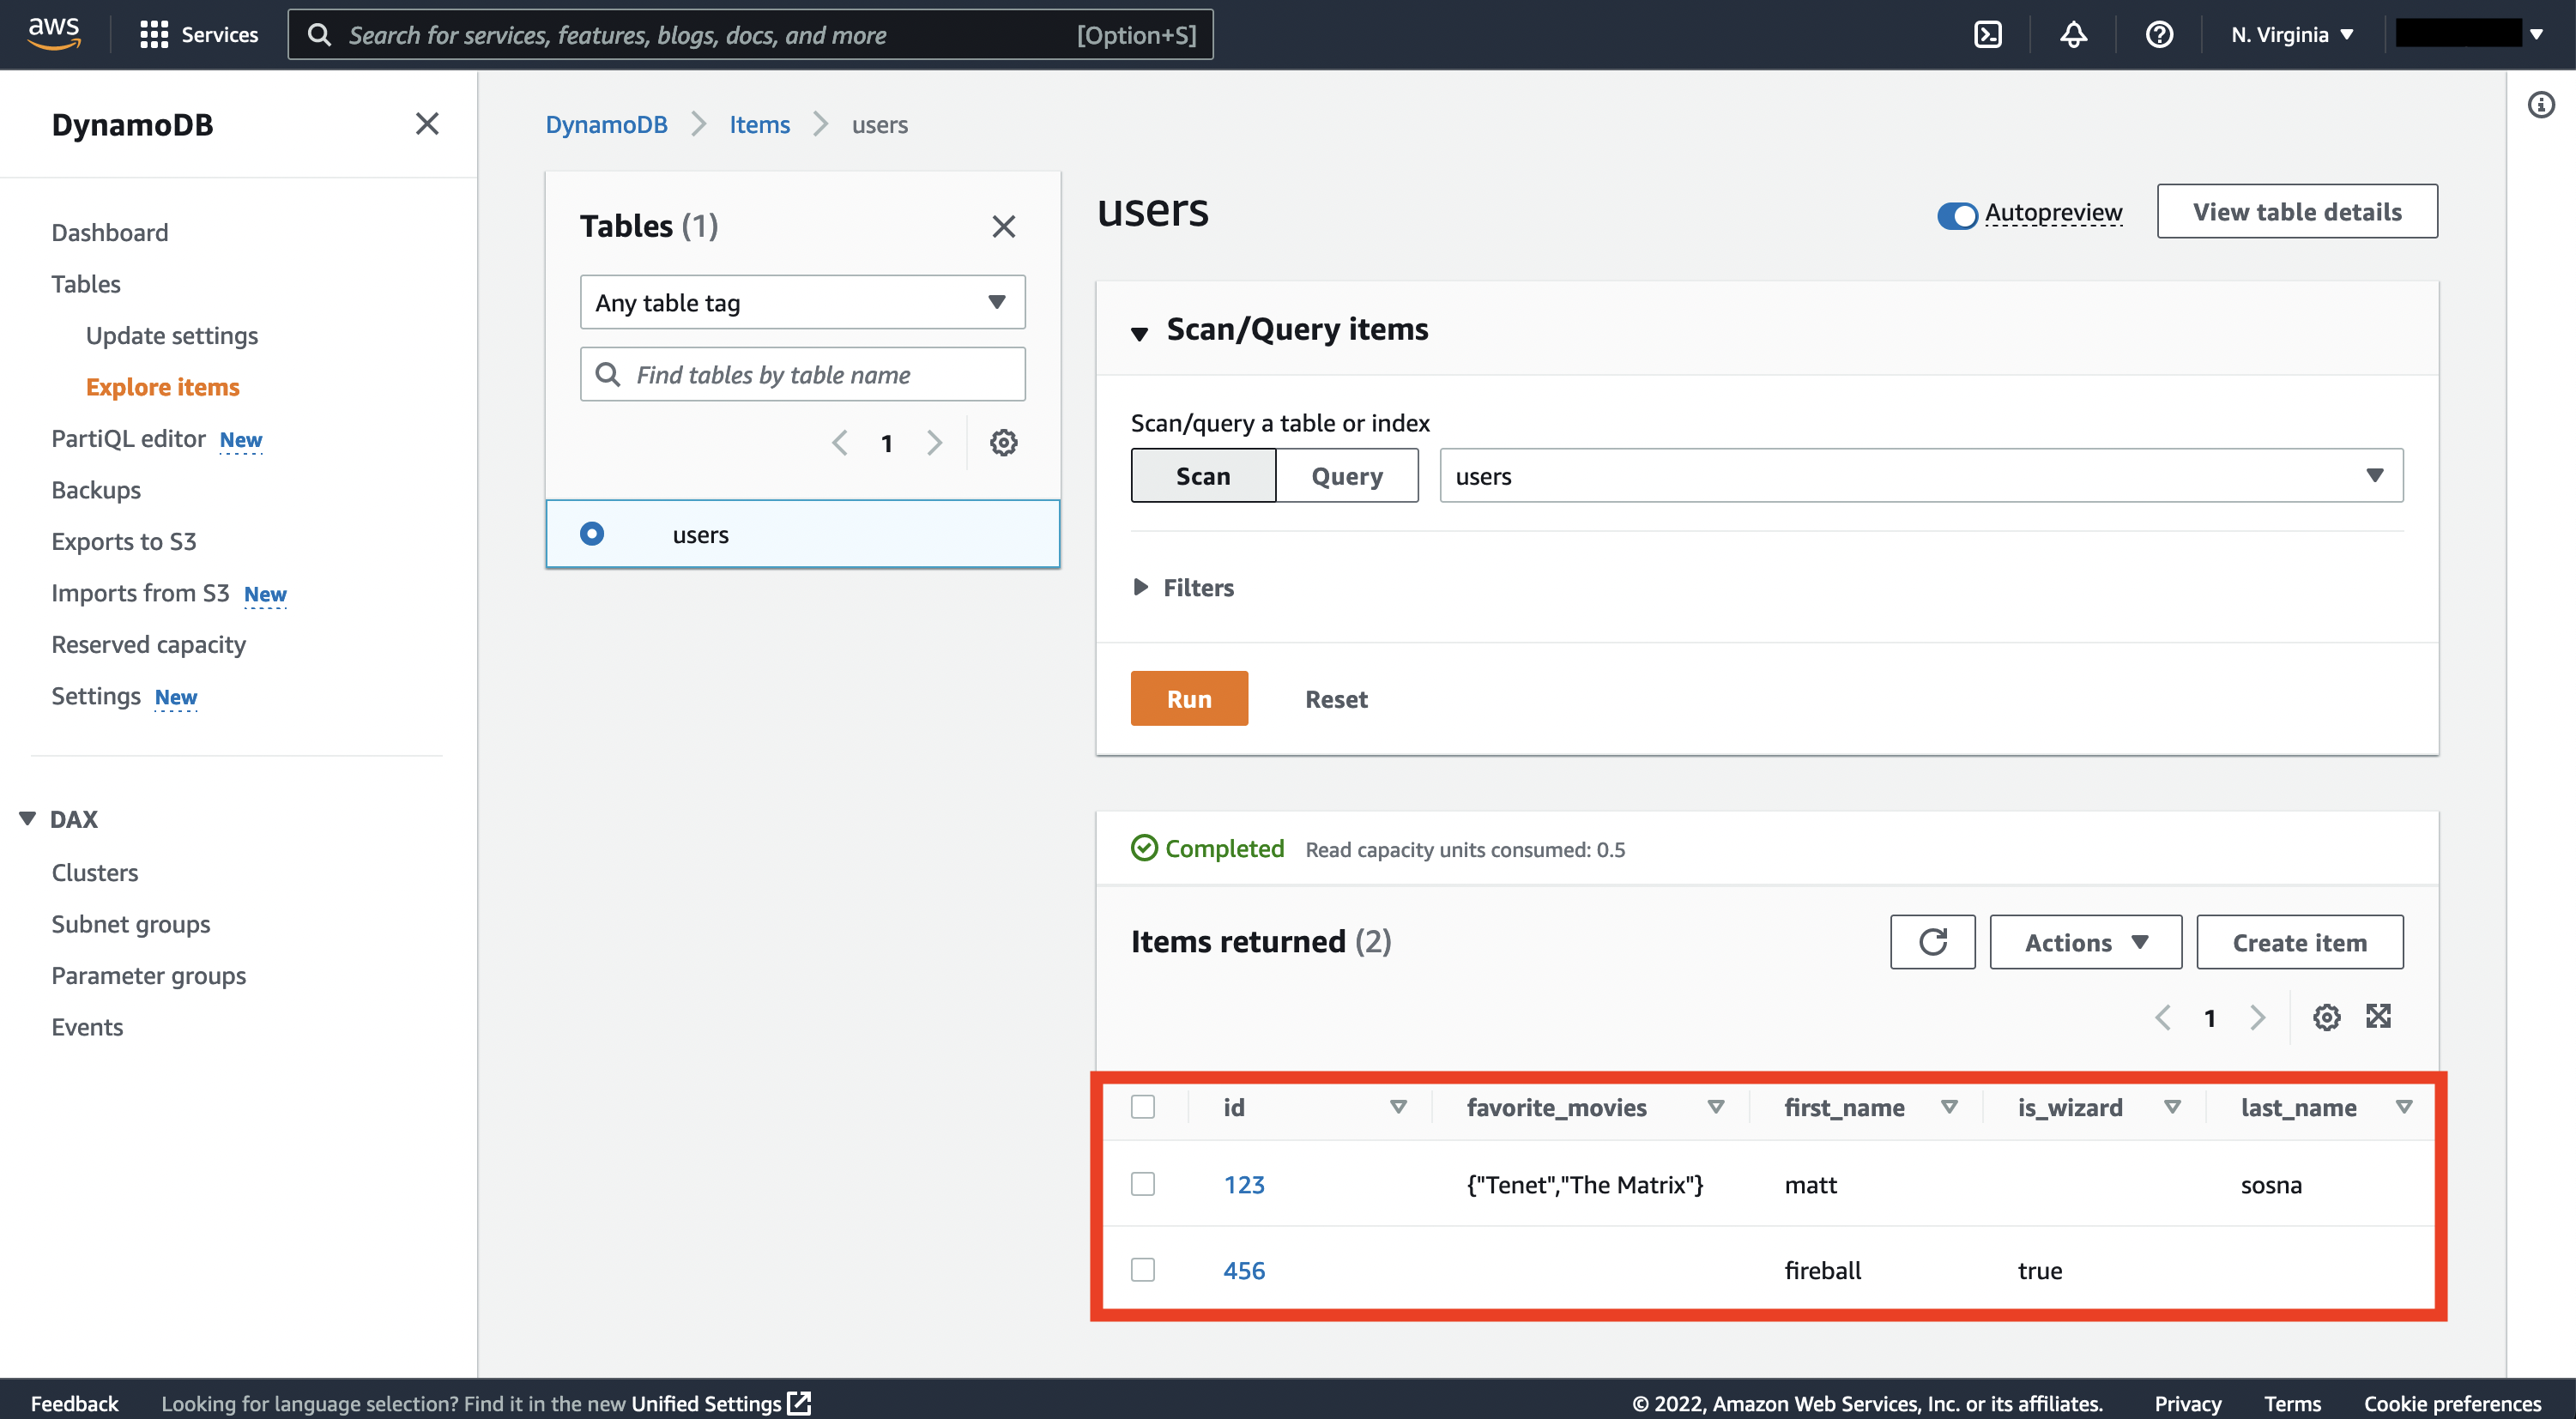
The syntax for writing to DynamoDB is rather explicit – we need to specify the datatype of each element of the dictionary being written. See the boto3 DynamoDB documentation for some examples. But overall, note how we’re able to save a list of movies under favorite_movies and write a different set of fields for user 456. This flexibility is a hallmark of NoSQL databases.
If the above code runs without an error, then we should see these records in the DynamoDB console. Click on our users table, then Explore table items.
Finally, we can also fetch the objects from Python.
| Python |
1
2
3
4
5
6
7
8
9
10
11
12
13
14
15
16
17
18
19
20
21
22
23
24
25
26
27
28
29
30
31
32
33
34
35
36
client.get_item(
    TableName="users",
    Key = {"id": {"N": "123"}}
)
# {'Item': {'favorite_movies': {'SS': ['Tenet', 'The Matrix']},
#  'id': {'N': '123'},
#  'last_name': {'S': 'sosna'},
#  'first_name': {'S': 'matt'}},
# 'ResponseMetadata': {'RequestId': 'K96...',
#  'HTTPStatusCode': 200,
#  'HTTPHeaders': {'server': 'Server',
#   'date': 'Sat, 20 Aug 2022 16:08:19 GMT',
#   'content-type': 'application/x-amz-json-1.0',
#   'content-length': '127',
#   'connection': 'keep-alive',
#   'x-amzn-requestid': 'K96...',
#   'x-amz-crc32': '...'},
#  'RetryAttempts': 0}}

client.get_item(
    TableName="users",
    Key = {"id": {"N": "456"}}
)
# {'Item': {'is_wizard': {'BOOL': True},
#   'id': {'N': '456'},
#   'first_name': {'S': 'fireball'}},
#  'ResponseMetadata': {'RequestId': 'NFS...',
#   'HTTPStatusCode': 200,
#   'HTTPHeaders': {'server': 'Server',
#    'date': 'Sat, 20 Aug 2022 19:38:23 GMT',
#    'content-type': 'application/x-amz-json-1.0',
#    'content-length': '83',
#    'connection': 'keep-alive',
#    'x-amzn-requestid': 'NFS...',
#    'x-amz-crc32': '2747782936'},
#   'RetryAttempts': 0}}
Cleaning up
In this post we’ve set up an S3 bucket, relational database, and NoSQL table. Even though we’re using AWS’s free tier and each data source houses only a tiny handful of data, we’ll still want to tear down each source to avoid eventually being charged.
Deletion, thankfully, is straightforward. In S3, we simply click on our bucket, then the Empty button. Confirm we want everything deleted. Then click on our bucket again and hit the Delete button and confirm we want the bucket gone.
In RDS, we simply click on our database (postgres), then Actions, then Delete. Make sure to avoid taking a final snapshot of the database before deletion.
Finally, for DynamoDB we click on Actions > Delete table, then confirm we don’t want Cloudwatch alarms.
That’s it! Friendly reminder to never do this to your company’s production data. 🤓
Conclusions
This post walked through the benefits of cloud storage and the various data formats we may actually store: structured data for tabular data, semi-structured for data that doesn’t fit nicely into columns and rows, and unstructured for raw and unformatted data.
We then built data sources optimized for each. We created an S3 bucket as a “catch-all” source for logs, CSVs, photos, and anything else we can imagine. We then built an RDS database for neatly structured tabular data. Finally, we used DynamoDB to write Python dictionaries with varying keys and data formats.
There are, of course, plenty of other AWS services for data storage that we didn’t cover here. AWS Glue and Athena let you run SQL queries directly on files in an S3 bucket (with some serious caveats[5]). AWS Redshift is a data warehouse, which lets you combine data from multiple sources (including S3, RDS, and DynamoDB) to make it easier to run analytics. AWS Cloudwatch is a monitoring and alerting service for logs.
With the skills you’ve gained in this post, you should have the building blocks to start building larger and more complex cloud storage applications. In the next post, we’ll finish our AWS series by covering compute, where we’ll use AWS servers to run calculations on data. See you there!
Best,
Matt
Footnotes
1. Why cloud storage?
While we can revoke a user’s access to cloud data, there’s of course always the concern that the user made a local copy. There’s no real good answer to this – we can’t make that downloaded data self-destruct once the person leaves your team. For files from S3, there’s likely little hope, but at least for data from databases, it’s impractical or impossible to download everything. At companies like Meta, data access is carefully monitored, from access to tables with sensitive data to any time data is downloaded.
2. Why cloud storage?
99.999% uptime is a hard number to wrap your head around. Per year, “five 9s” means AWS guarantees it will be unavailable less than 5 minutes and 15 seconds.
3. Avoiding getting hacked when using an SDK
We can use a similar process for data that isn’t as sensitive, such as constants or filepaths.
| Python |
1
2
3
# config.py
SAMPLE_SIZE = 100
EXEMPTED_USER_IDS = [123, 456]
By storing the values in a config file, we can keep our main workflow clean:
| Python |
1
2
3
4
5
6
7
8
# sampler.py
import .config as config

class Sampler:
    def __init__(self):
        self.sample_size = config.SAMPLE_SIZE
        self.exempted_user_ids = config.EXEMPTED_USER_IDS
    ...
If config.py stores data we don’t want others to see, we can add it to our .gitignore file and Git won’t try to version control it. Below, Git won’t track files with .ipynb, .pyc, or config.py in their name.
1
2
3
.ipynb
.pyc
config.py
4. S3: Simple Storage Service
A pedantic note: “folders” in S3 don’t really exist. They’re more like human-friendly ways to organize your data.
5. S3: Simple Storage Service
You can treat an S3 bucket like a database by storing CSVs or JSONs in a standardized format, indexing the bucket with AWS Glue and then querying the indexes with AWS Athena. But there are some serious caveats to this – at a former job, I accidentally uploaded a CSV in the wrong format and made the entire bucket impossible to search. With hundreds of files, I had no idea where the error was. In my opinion, you’re better off using a database with strict write rules that will immediately flag (and block) data in the wrong format.