Building a full-stack spam catching app 3. Frontend & Deployment
#machine-learning
#projects
#python
Written by Matt Sosna on March 21, 2021
Welcome to the final post in our spam catching saga! In the first post, we covered the theory for how to build a model to catch spam. In the last post, we built out the backend for our app by creating the spam classifier and a small Flask app to serve the model. We ended by creating an API and enabling our model to be invoked from Python scripts anywhere on our computer.
In this post, we’ll take it a step further by designing a nice frontend so you can interact with the model outside of Python. We’ll conclude by moving our app off our computer and onto Heroku so others can see what the big deal is.
If you want to skip ahead, you can check out the actual app here and the source code here.
Building a full-stack spam classifier
3. Frontend and Deployment
The frontend
Our app does one thing: classify spam. Most of the code in the last post involved training and storing our TF-IDF vectorizer and random forest model, but all that is abstracted away when we turn on our Flask app. All we’re left with is the /classify endpoint, which lets us send a string to our trained model and get back a probability of spam.
Our frontend, then, will basically just be a webpage with an input field where the user can type out a message to be classified. Hit send, and that message gets sent to our classifier. We can then update our page with the classifier’s response.
We’ll start by writing the page structure with HTML, creating elements for an image, some text, and our input field. We’ll then use JavaScript to dynamically modify text elements with the model’s responses.
HTML
Flask expects HTML files to be in a folder called templates, so let’s start by creating a templates folder at the top level of our project, then adding a file called index.html.
Inside static, let’s also add css, images, and js folders, and add eggs.png to images.
Our directory will now look like this:
1
2
3
4
5
6
7
8
9
10
11
12
13
14
15
spamCatch
|   app.py
|   static/
|      __init__.py
|      css/
|      data/
|         data.csv
|      images/
|         eggs.png
|      js/
|      python/
|         __init__.py
|         spam_catcher.py
|   templates/
|       index.html
The two main sections of an HTML file are the head, or metadata about our page, and the body, or the page’s contents. Let’s start by writing out the following code for our head element.
| HTML |
1
2
3
4
5
6
7
8
9
<!DOCTYPE html>
<html>
<head>
    <meta charset="UTF-8">
    <title>SpamCatch: Let's catch some spam</title>
    <script src="https://d3js.org/d3.v5.min.js"></script>
    <link rel="stylesheet" href="https://maxcdn.bootstrapcdn.com/bootstrap/3.3.7/css/bootstrap.min.css">
    <link rel="stylesheet" href="../static/css/styles.css">
</head>
<!DOCTYPE html> tells browsers (like Chrome or Firefox) that the content they’re about to see is HTML (as opposed to XML, for example). The <html> tag encompasses all the code on our page, and the <head> and </head> tags encompass the head.
<meta charset="UTF-8"> is the character encoding, which tells browsers how to convert typed characters into machine code. The next line is the title of our page, which is displayed in the browser tab, social media links, Google results, etc.
The <script> tag points to a URL for D3.js, the Data-Driven Documents JavaScript library. We’ll later use this library to dynamically modify our HTML in response to users submitting their text to the classifier.
Finally, the <link rel="stylesheet"> lines pull in two CSS files. CSS, or Cascading Style Sheets, are what flavor HTML elements. These files are where you declare what font all paragraphs should have, what color headers should be, how wide to make the margins on images, etc. The first link loads Bootstrap, a popular CSS package, and the other line loads styles.css, which will contain custom classes we’ll write ourselves.
Now let’s actually create the body.
| HTML |
1
2
3
4
5
6
7
8
9
10
11
12
13
14
15
16
17
18
19
20
21
22
23
24
<body style="background-color: black; color: white">
<div class="hero">
</div>
<div class="text-center">
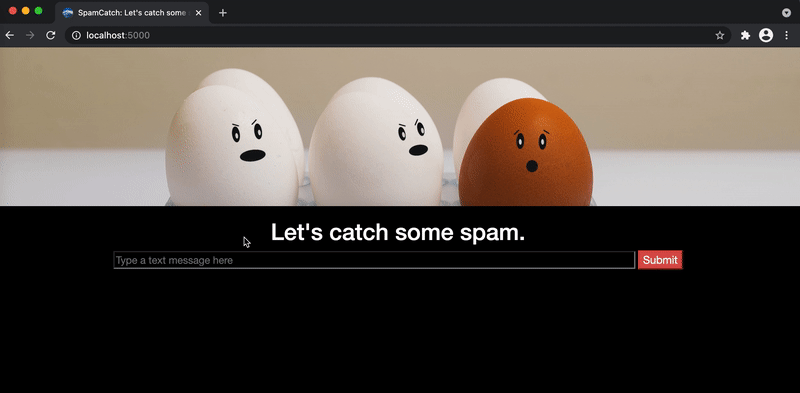
<h1 style="color:white">Let's catch some spam.</h1>
<input id="text" size="100"
placeholder="Type a text message here"
class="black-input">
<button id="button" type="button" class="btn-danger"
style="font-size:17px">Submit</button>
</div>
<h1 id="spamProb" class="text-center spam-prob"></h1>
<div id="decision" class="text-center" style="font-size: 20px"></div>
</body>
<script src="../static/js/script.js"></script>
</html>
Normally, we’d just put <body> to get us started, but here we add inline styling to give us a black background with white text.
Lines 3-4 are our background image. The <div> actually doesn’t contain anything; rather, the logic for inserting an image will be handled by the hero CSS class.[1]
Lines 6-16 are a container where all text will be centered. Line 7 is a header with a welcome message.
Lines 9-11 are this input field we’ve heard so much about. For styling, we reference a CSS class called black-input that we’ll later write.
Hitting enter on our input field (or even just clicking outside the box) will submit any text to our classifier, but on lines 13-14 we add a button that does the same thing in case the user prefers clicking a big red button.
The final lines in the HTML body (18-19) consist of a header and a container with some styling. Like the <div> with the image, there’s nothing in them yet. These elements are empty when the user first visits the page, but we’ll update them when the user submits a message and the model responds with a spam probability.
To close us out, we add a <script> tag on line 23 that loads our JavaScript code.
CSS
We can see what our page looks like so far by opening it with a browser. (Right click on the file > Open With > Chrome.) Our page looks pretty decent with no CSS besides Bootstrap. It’s actually not too different from the screenshot of the final product at the start of this post, beside missing the header image and the input bar being white instead of black.
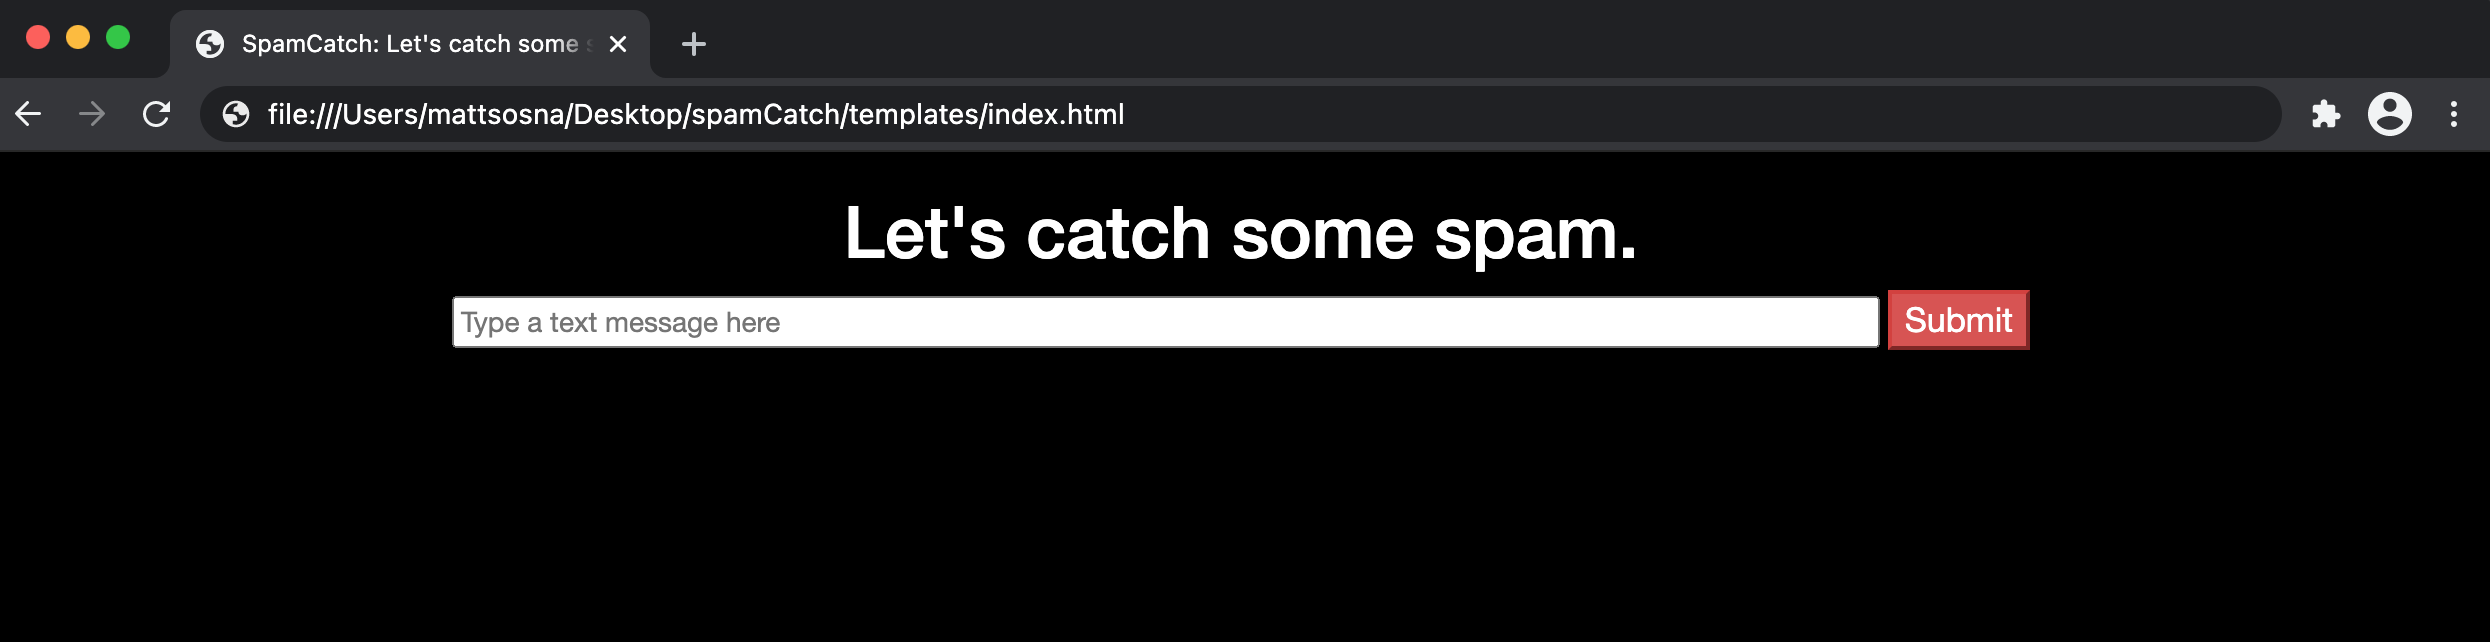
We’re also missing the spam percentage and message at the bottom, but that HTML will be written live by JavaScript. Note that we’re still able to open the page even when our browser fails to load the CSS and JavaScript files that don’t yet exist $-$ that’s an interesting difference from Python.
Let’s now create the CSS classes we referenced in our HTML so far: hero, black-input, spam-prob, and text-center. We create a file called styles.css in the static/css folder and write the following:
| CSS |
1
2
3
4
5
6
7
8
9
10
11
12
13
14
15
16
17
18
19
20
21
22
23
24
25
26
.hero {
    position: relative;
    height: 240px;
    padding: 1px;
    margin-top: -2px;
    margin-left: -10px;
    background: black;
        background-image: url("../images/eggs.png");
        background-size: cover;
}

.black-input {
    background-color: black;
    color: white;
    border-color: gray;
    font-size:16px;
}

.spamProb {
    font-size: 40px;
    padding-top: 50px;
}

.text-center {
    text-align: center;
}
These classes we define are essentially key-value pairs for styling elements, such as text size and padding. Everything not defined is inherited from Bootstrap.
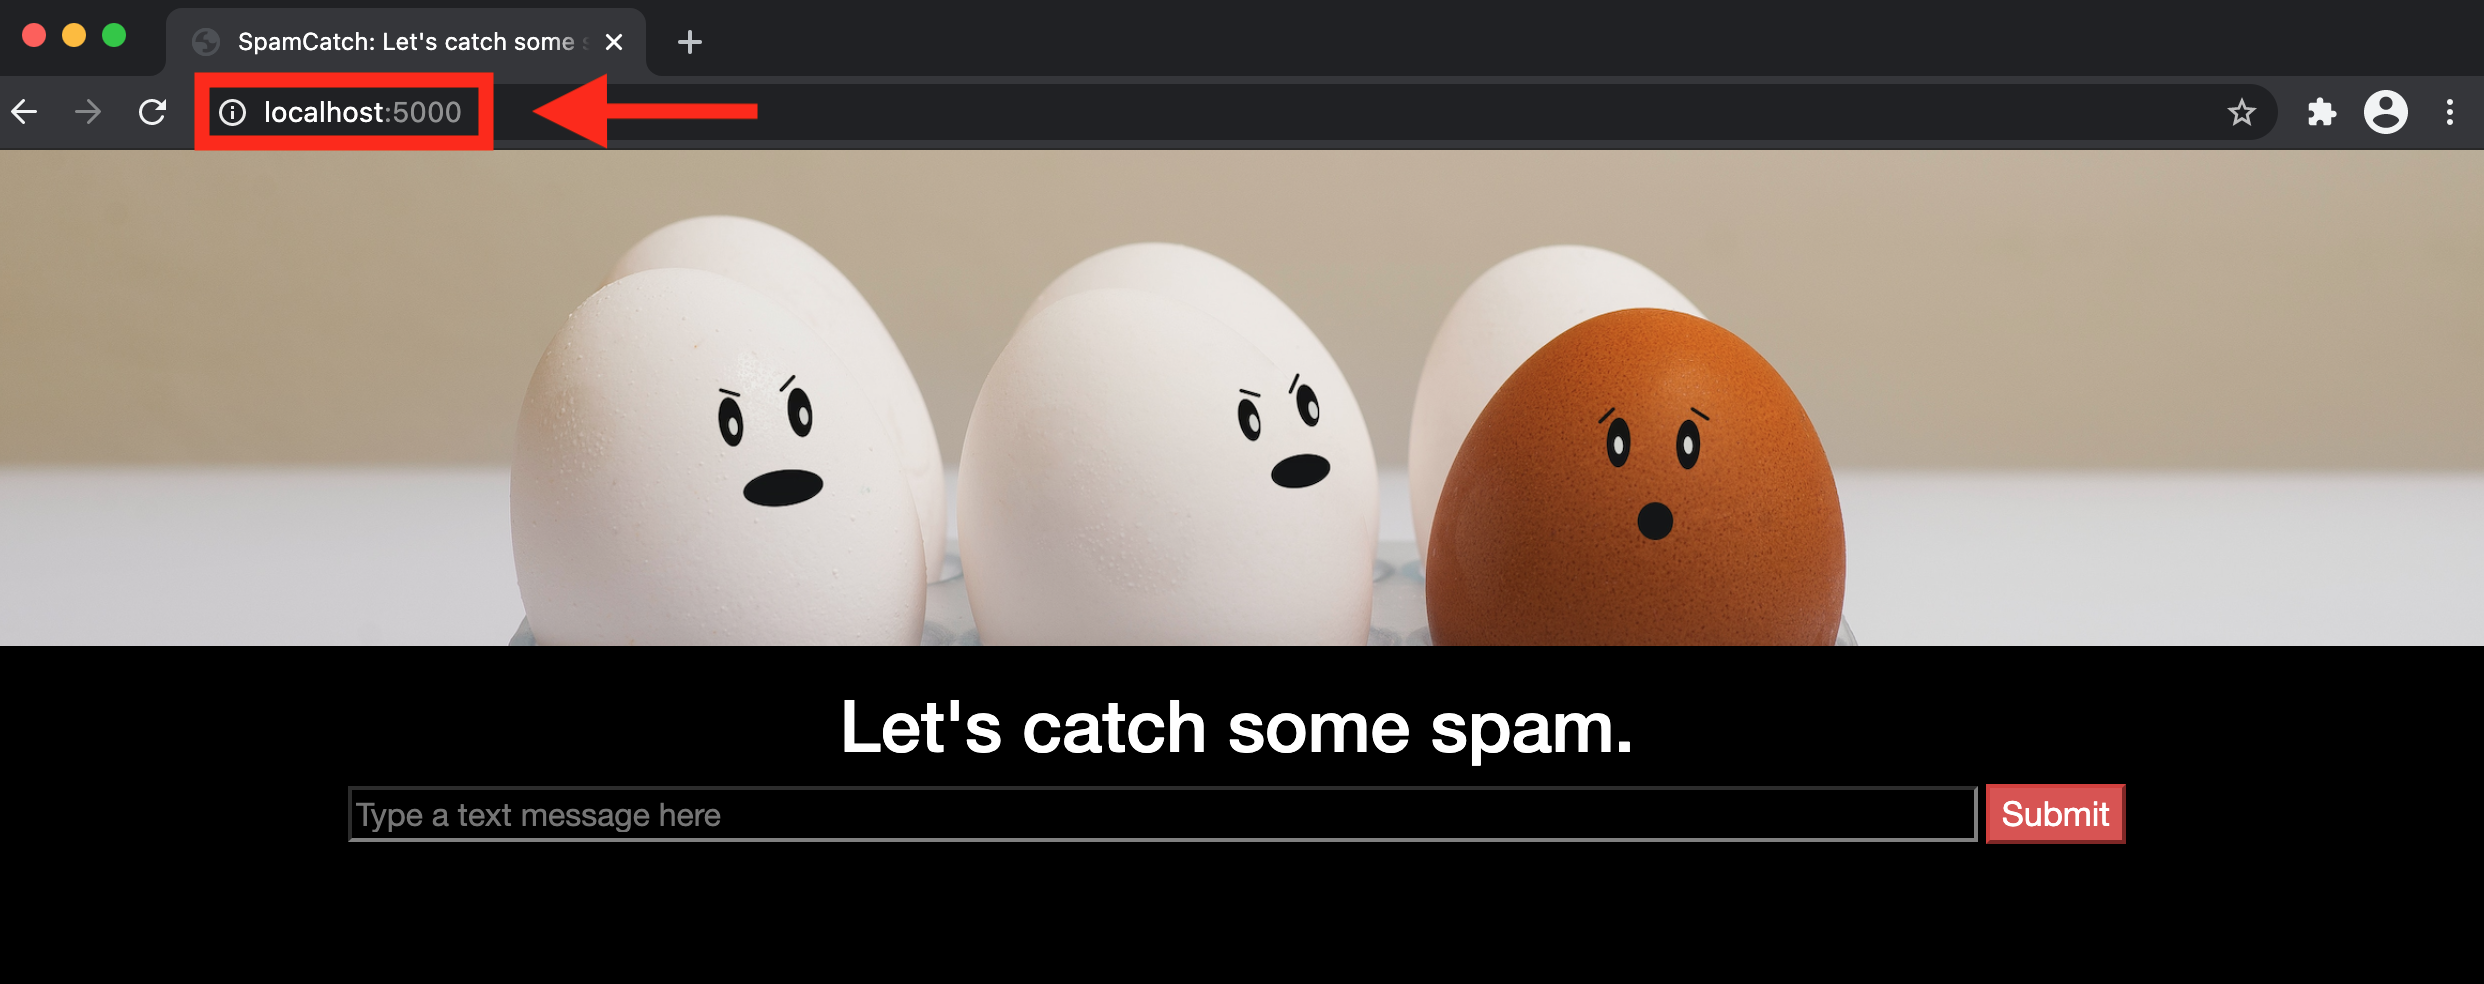
Here’s what our page now looks like. The hero class now adds an image and our input field is larger and black with a gray border.

Connecting to Flask
Adding our page to Flask is incredibly easy. In app.py, add render_template to the imports from flask.
| Python |
1
from flask import Flask, jsonify, render_template
Then add an endpoint for the root, i.e. /. This is the endpoint users will land on when they visit localhost:5000 without an extension (like /classify). (Previously, you’d get an error if you went to this URL in your browser or queried it with requests.get.)
At this endpoint, we simply call render_template on our HTML file. Remember that Flask expects this file to be in the templates directory.
| Python |
1
2
3
@app.route("/")
def index():
    return render_template("index.html")
And that’s it! app.py now looks like this:
| Python |
1
2
3
4
5
6
7
8
9
10
11
12
13
14
15
16
17
18
from flask import Flask, jsonify, render_template
from static import SpamCatcher

sc = SpamCatcher()
sc.load_and_train("data/data.csv")

app = Flask(__name__)

@app.route("/")
def index():
    return render_template("index.html")

@app.route("/classify/<string:text>")
def classify(text):
    return jsonify(sc.classify_string(text))

if __name__ == "__main__":
    app.run(debug=True, port=5000)
Now when you launch your app with python app.py, you can navigate to localhost:5000 in the browser and get to your page.
The exciting thing is that we’re now set up to be able to send a string from the user to our model to classify as spam. We’ll use JavaScript to bridge the user and our model.
JavaScript
We first create a file called script.js inside static/js. In this file, we start by defining strings that we’ll reference or modify later.
| JavaScript |
1
2
3
const SPAM_API = "/classify";
var spamProbTemplate = `Spam probability: <span style="color: {0}">{1}</span><span style="color:white">%</span>`;
var decisionTemplate = `<span style="color: {0}">{1}</span>`;
SPAM_API is our classifier endpoint $-$ we define it as a global variable up top so if we ever change the name of the endpoint, we only need to change the name in this line rather than dig through the script to find every time it’s used. Note that we don’t add localhost:5000 in front of it, just the endpoint.
We also create spamProbTemplate and decisionTemplate variables with placeholder HTML. We’ll update the {0} and {1} slots using a custom String.format function I found on Stack Overflow. It’s apparently taboo to modify built-in classes in JavaScript, but I was craving something analogous to Python’s convenient string templating… don’t tell anyone, alright?
| JavaScript |
1
2
3
4
5
6
7
8
String.format = function() {
    var s = arguments[0];
    for (var i = 0; i < arguments.length - 1; i++) {
        var reg = new RegExp("\\{" + i + "\\}", "gm");
        s = s.replace(reg, arguments[i + 1]);
    }
    return s;
}
We then have our event handler onSubmit. This is a function that actually does something when an event occurs $-$ in our case, the user submitting text in the input field. You’ll notice a sort of “waterfall” effect of functions triggering other functions rather than returning any values, which is characteristic of functional programming.
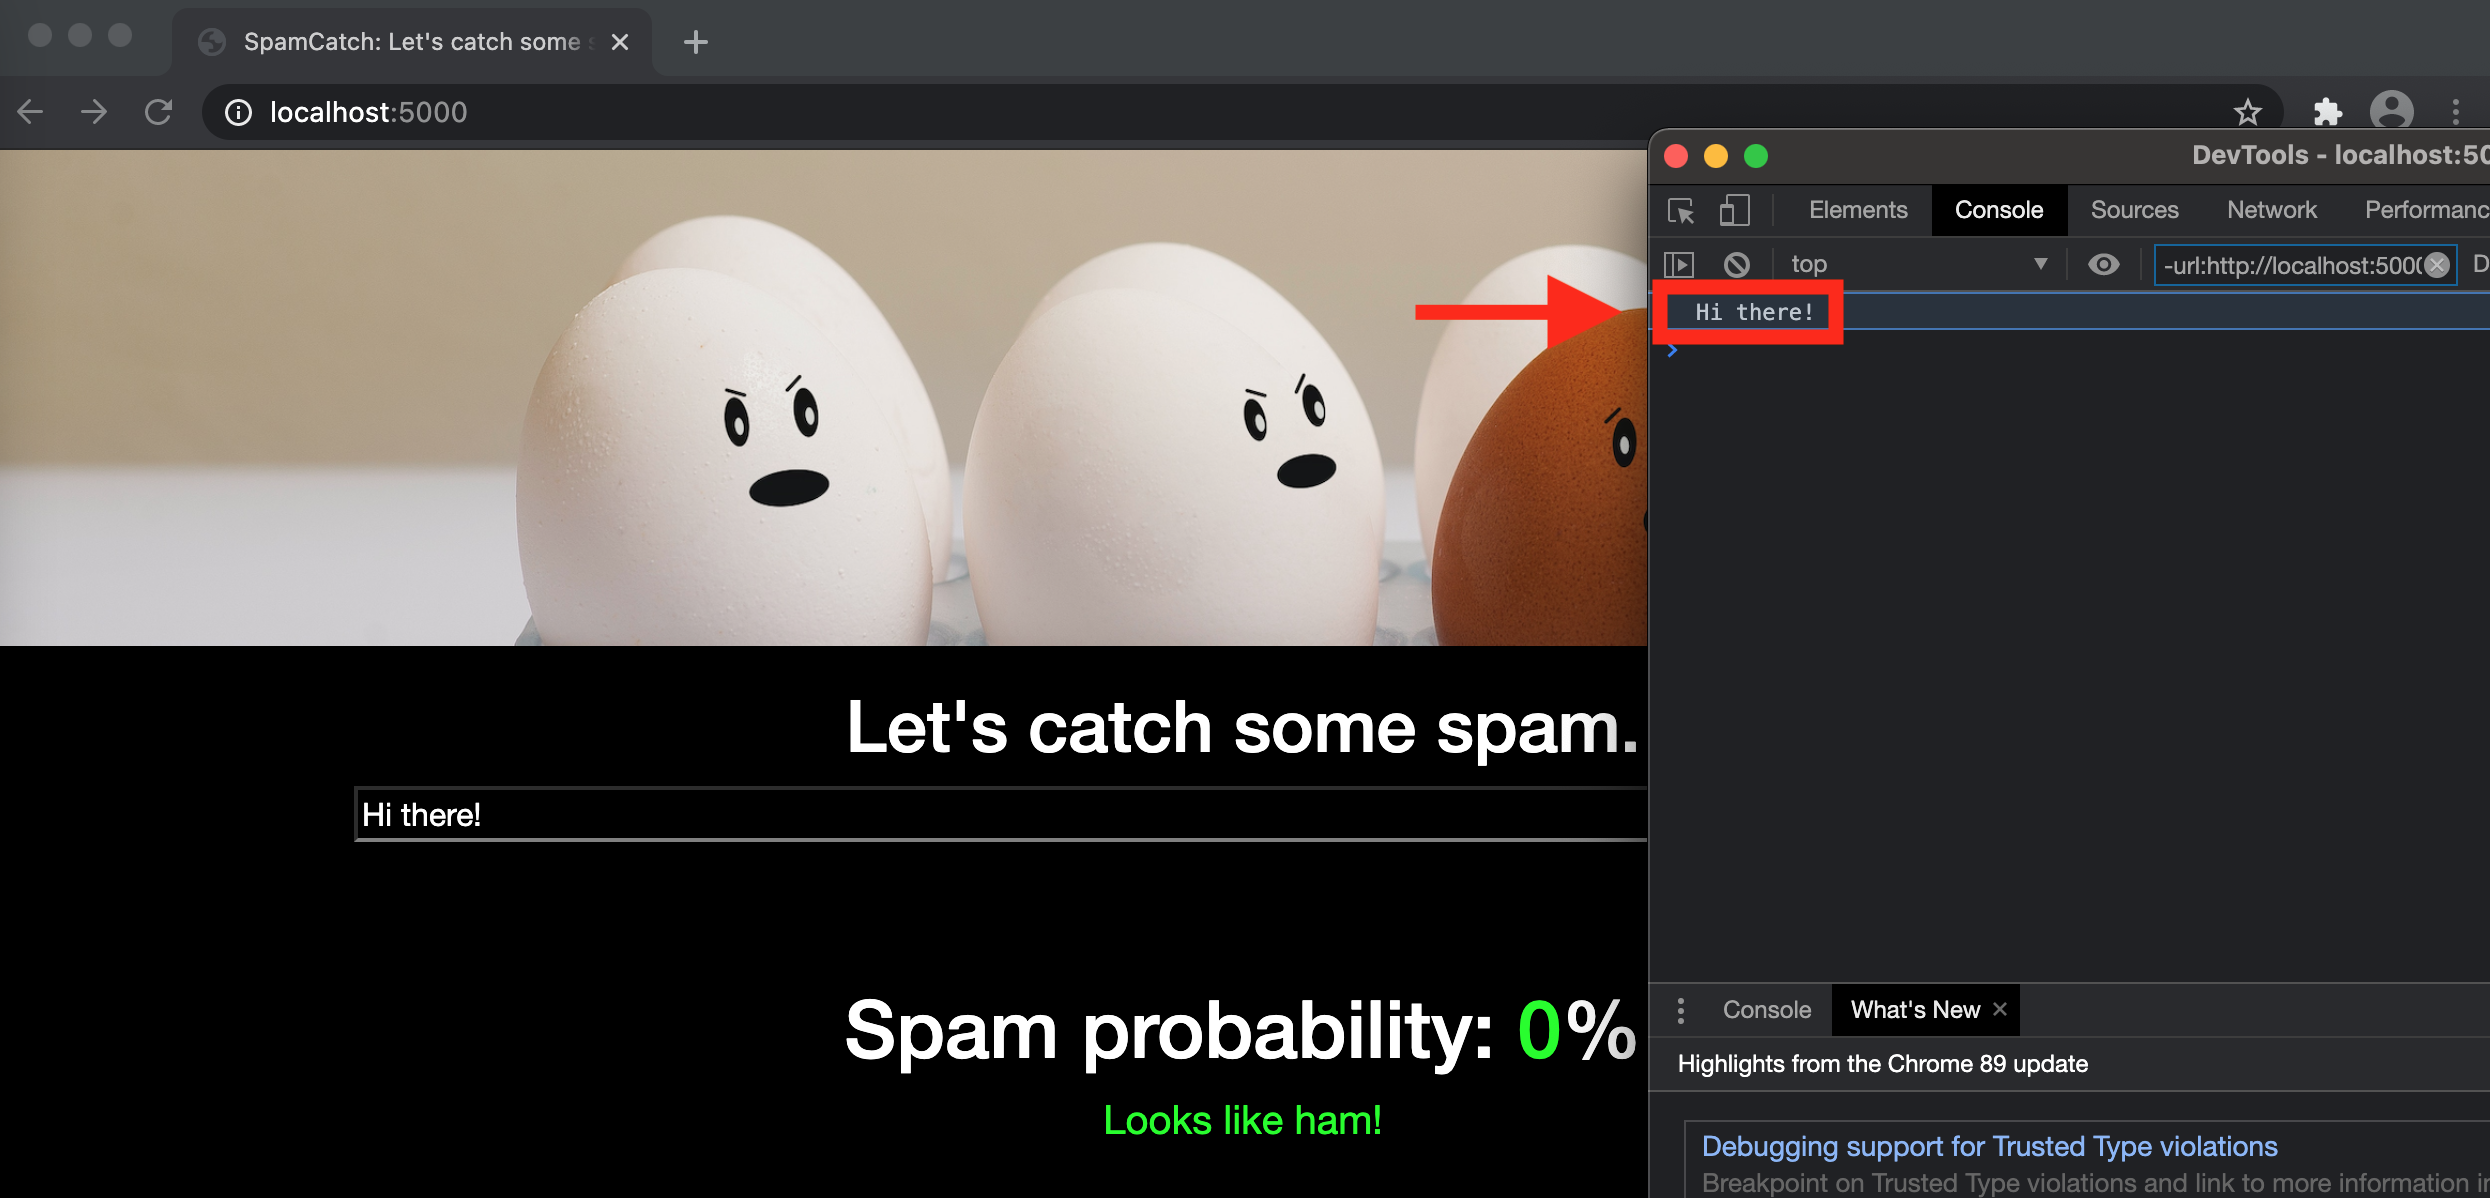
onSubmit gets the value of the input text field (identified with id='text' in the HTML), logs it to the console[2], and passes it to updateSpamProb.
| JavaScript |
1
2
3
4
5
function onSubmit() {
    var text = d3.select("#text").property("value");
    console.log(text);
    updateSpamProb(text);
}
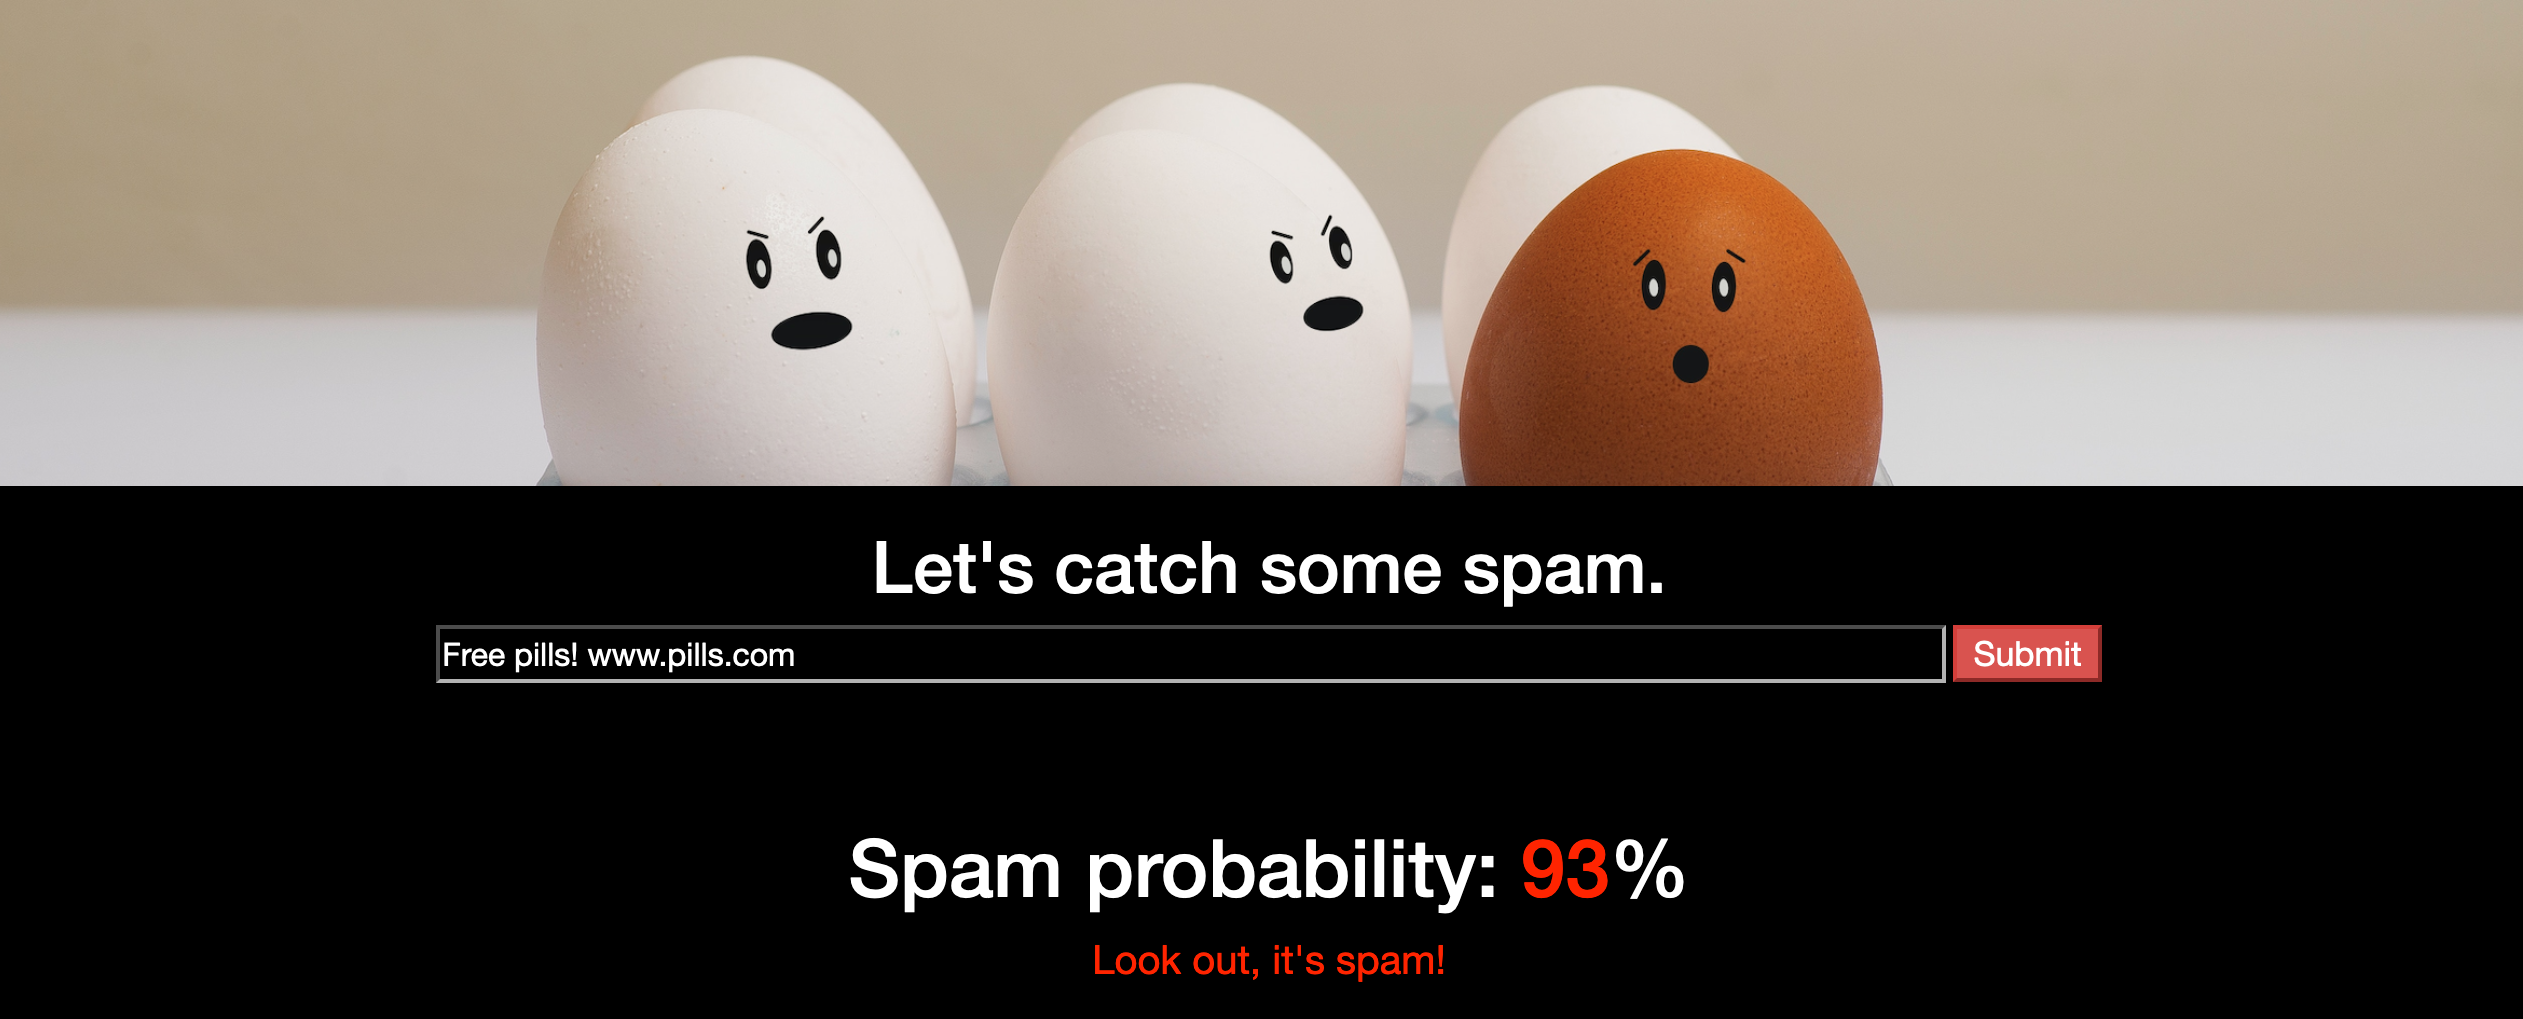
updateSpamProb then does the following:
- Select the (formerly empty) div whose ID is
spamProb(line 2) - Create a URL consisting of our
classifyFlask endpoint and the text from the input field (line 3) - Use D3 to perform a GET request to the endpoint (line 5)
- Take the spam probability returned from the endpoint (
prob) (line 5) - Assign it a color between green and red with
prob2color(line 6) - Update our selected
<div>withspamProbTemplate, where we pass in the color and spam probability as a percent (line 7) - Call
updateDecisionwith the spam probability and associated color (line 8)
| JavaScript |
1
2
3
4
5
6
7
8
9
10
function updateSpamProb(value) {
    var div = d3.select("#spamProb");
    var url = `${SPAM_API}/${value}`;

    d3.json(url).then(prob => {
         var color = prob2color((1-prob));
         div.html(String.format(spamProbTemplate, color, Math.round(100*prob)));
         updateDecision(prob, color);
     });
}
updateDecision modifies the text underneath the spam probability. We first select the <div> by referencing its unique ID (decision), then update its HTML with decisionTemplate formatted with one of three strings depending on the probability of spam.
| JavaScript |
1
2
3
4
5
6
7
8
9
10
11
12
13
function updateDecision(prob, color) {
    var div = d3.select("#decision");

    if (prob < 0.25) {
        div.html(String.format(decisionTemplate, color, "Looks like ham!"));
    }
    else if (prob >= 0.25 && prob < 0.5) {
        div.html(String.format(decisionTemplate, color, "Hm... something's fishy..."));
    }
    else {
        div.html(String.format(decisionTemplate, color, "Look out, it's spam!"));
    }
}
prob2color comes mostly from this GitHub Gist by user mlocati. (Thanks!)
| JavaScript |
1
2
3
4
5
6
7
8
9
10
11
12
13
function prob2color(prob) {
    var r, g, b = 0;
    if(prob < 0.5) {
    	r = 255;
    	g = Math.round(510 * prob);
    }
    else {
    	g = 255;
    	r = Math.round(510 - 510 * prob);
    }
    var h = r * 0x10000 + g * 0x100 + b * 0x1;
    return '#' + ('000000' + h.toString(16)).slice(-6);
}
Finally, we have the event listeners, which are what actually connect these JavaScript functions to our HTML page. When the user changes the text input field or clicks the button (identified by their text and button IDs), we trigger onSubmit, which kicks off the whole process.
| JavaScript |
1
2
d3.select("#text").on("change", onSubmit);
d3.select("#button").on("click", onSubmit);
Summary
That should be it for our full-stack app! Let’s see it in action. In Terminal, navigate to your spamCatch directory, type python app.py, and then open a browser and go to localhost:5000.
Congrats! Play around to see if you can find the patterns that lead to higher probabilities of spam.
Deployment
Serving our app locally is pretty cool, but let’s take it all the way and put it on the web so anyone can interact with it. For this, we turn to Heroku, a Platform as a Service company. Heroku lets you rent server space in the cloud at a public URL. It’s like copying your app onto a computer that anyone can access.
We’ll only use the free tier in our trial, which means the app will be slow if a lot of people are using it at once, and it’ll go to sleep if no one interacts with it for half an hour. But that’s totally fine for us $-$ in a professional setting, meanwhile, companies need to pay to have their services always available and able to handle spikes in demand.
There’s surprisingly not too much to say on how to deploy our app, since we’ve already done all the hard work in building it. I found this StackAbuse article incredibly helpful. Here’s a summary of the steps.
In the root of your folder, (the same level as app.py), create a file called Procfile (no extension) that is just this line:
1
web: gunicorn app:app --preload --workers 1
This file tells Heroku to use gunicorn (a Python HTTP server) to serve our app, which is called app and located inside app.py, and to preload a worker before serving the app. Preloading causes Heroku’s error logs to be much more informative.
Then, also at the same level as app.py, create a requirements.txt file with the necessary packages for your app to run.
1
2
3
4
Flask
pandas
scikit-learn==0.21.3
gunicorn
Our project directory should now look like this:
1
2
3
4
5
6
7
8
9
10
11
12
13
14
15
16
17
18
19
spamCatch
|   app.py
|   Procfile
|   requirements.txt
|   static/
|      __init__.py
|      css/
|         styles.css
|      data/
|         data.csv
|      images/
|         eggs.png
|      js/
|         script.js
|      python/
|         __init__.py
|         spam_catcher.py
|   templates/
|       index.html
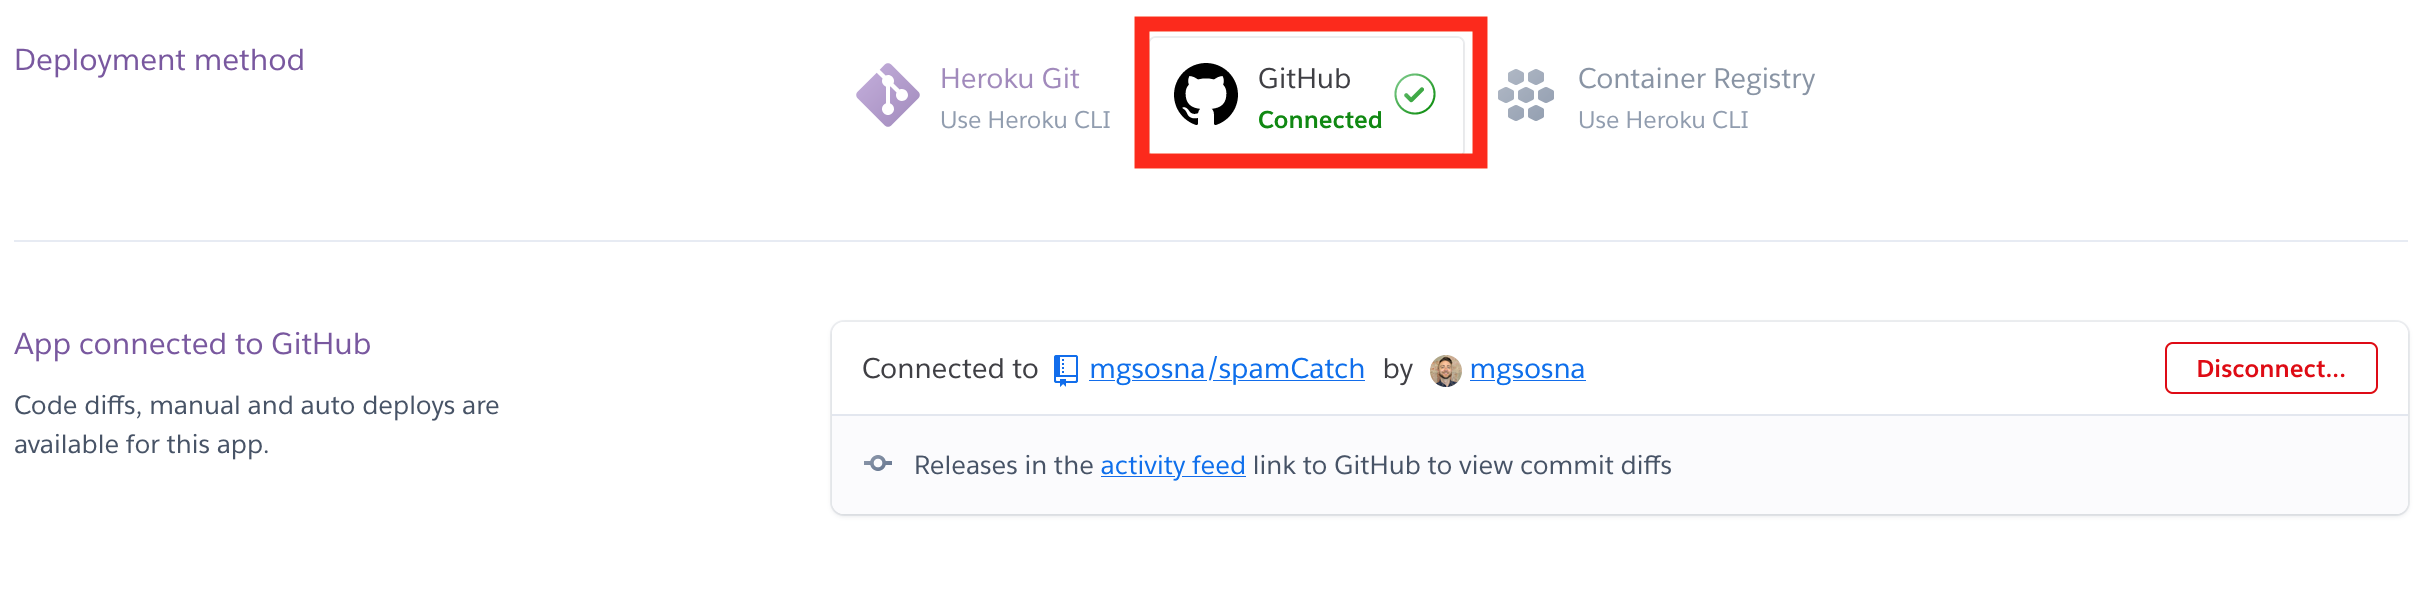
Your code will need to be in GitHub for Heroku to access it. If you haven’t already, create a new repository and push the code in this project to it.
Now, head over to Heroku. Create an account if you don’t have one, and then start a new application. Name it something besides spam-catcher, since that’s already taken by me. ;-)

Under Deployment, link your GitHub repo for the app to your Heroku account.
Now manually deploy your app.

Heroku will spend a minute or two processing your files and setting up the web server. Now repeat the previous steps a dozen times, puzzling over the error logs and making small changes. The final bug for me was needing to have scikit-learn==0.21.3 in my requirements file, not sklearn.
But once you make it through without any errors, celebrate! You’ve deployed a web app! You can see mine here if you’d like. Share yours in the comments!
Conclusions
Congrats on deploying a full-stack data science app! Over the last three posts, we’ve covered the machine learning and NLP theory for how to identify spam, written a classifier and Flask server, and finally created a nice frontend for users to play with. Knowing a little bit of HTML, CSS, and JavaScript goes a long way in giving life to a data science project!
There are of course ways to improve our classifier. The classifier rates the tokens www and com as heavy indicators of spam, but we don’t necessarily want to throw out any YouTube video a friend texts us. It’d be better to create features from patterns in the URLs themselves: www.google.com is fine for example, but u7x0apmw.com isn’t.
Another way to improve our classifier would be to add features like the number of capitalized letters or number of exclamation marks. If you want a really tailored classifier, make your classifier raise an eyebrow any time a text greets you by the wrong name!
The world is your oyster. Looking forward to seeing what you create.
Best,
Matt
Footnotes
1. HTML
A div is a generic HTML container used to organize code on the page. A hero CSS class refers to a large image that can contain text, usually at the top of the webpage.
2. JavaScript
There are two consoles to keep track of when we have a Flask app that’s using JavaScript. The first is the Terminal window where you run python app.py to launch your app $-$ this is where any print statements in the Flask endpoints appear. The second is your browser’s console. This is where any console.log JavaScript statements appear. You can access the console by right clicking anywhere on a webpage in your browser, then selecting “Inspect Element” in Firefox or “Inspect” in Chrome.